
Dreamy Cherry Chocolate Ice Cream Cake Recipe for Sweet Tooths
Summers call for cool, decadent desserts that melt hearts with every creamy chocolate cherry ice cream cake bite.
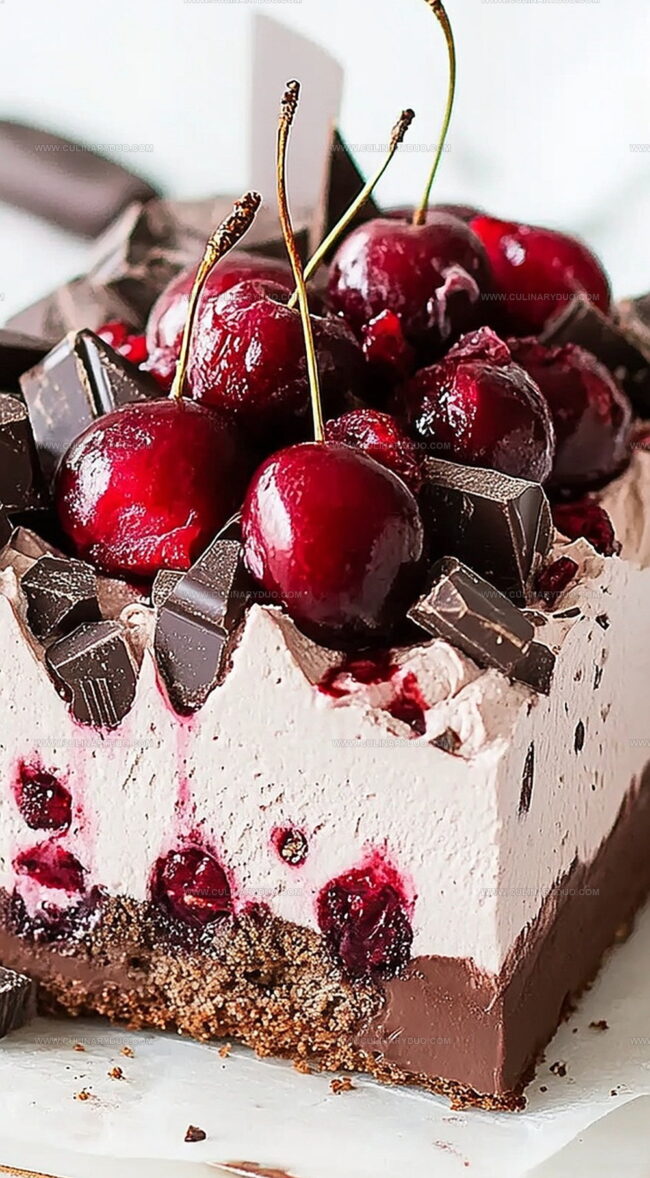
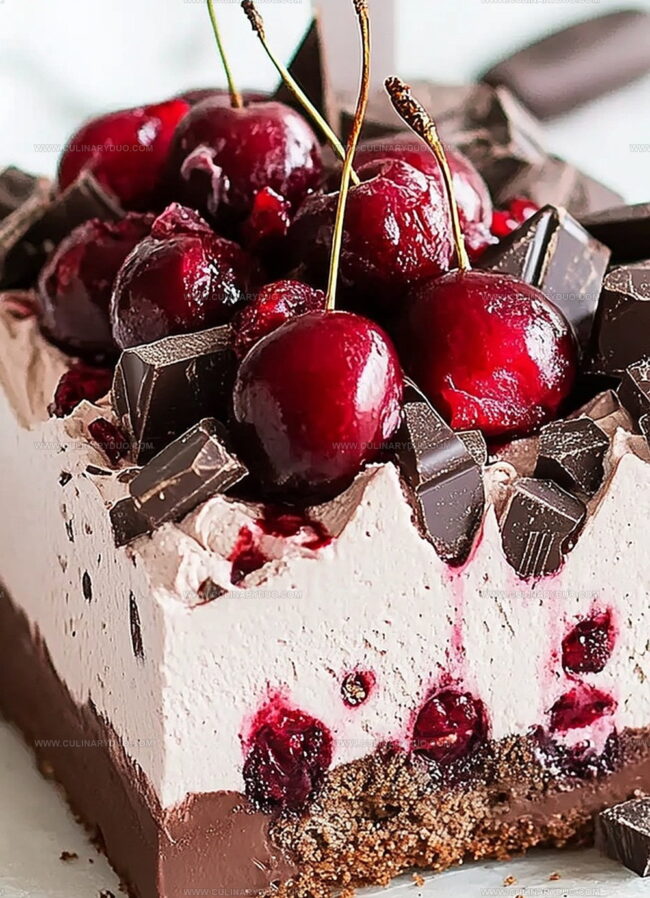
Sweet cherries and rich chocolate create a dreamy combination that dances across taste buds.
Layers of velvety chocolate cake nestled between smooth ice cream promise pure indulgence.
Each slice reveals a stunning pattern of deep burgundy fruit and dark chocolate swirls.
The recipe blends classic flavors with unexpected textures that surprise and delight.
Homemade desserts like this transform ordinary moments into special celebrations.
Cherry Chocolate Ice Cream Cake – Why It’s a Party Hit
Ingredients for a Cherry Chocolate Ice Cream Cake
Base Layer:Ice Cream Layer:Topping and Finishing:Making Ice Cream Cake with Cherry Chocolate Flavors
Step 1: Prepare the Cake Base
Select a perfectly baked chocolate cake and gently place it into a springform pan, ensuring the cake sits evenly across the bottom of the pan.
Step 2: Create the Cherry Ice Cream Layer
Soften the cherry ice cream at room temperature for a few minutes.
Spread the creamy ice cream smoothly and evenly over the chocolate cake base, creating a luscious and thick layer.
Step 3: Add Fresh Cherry Touches
Sprinkle freshly chopped cherries across the ice cream surface, distributing them generously to provide bursts of fruity flavor throughout the cake.
Step 4: First Freezing Session
Transfer the cake to the freezer and allow it to set completely.
Let the cake freeze for 2-3 hours until the ice cream becomes firm and holds its shape perfectly.
Step 5: Pour Decadent Chocolate Ganache
Remove the cake from the freezer and drizzle rich, glossy chocolate ganache over the entire surface.
Use a spatula to spread the ganache evenly, covering every inch of the frozen cake.
Step 6: Add Chocolate Decorative Touches
Generously sprinkle chocolate shavings or decorative chocolate sprinkles across the top, creating a beautiful and tempting finishing touch.
Step 7: Final Freezing and Serving
Return the cake to the freezer for one more hour to allow all layers to set completely.
When ready, remove from the freezer, slice, and serve this delightful dessert.
Pro Tips for the Best Ice Cream Cake Layers
Ice Cream Cake Variations for Chocolate Lovers
Serving Slices of Cherry Chocolate Cake
Ice Cream Cake Storage Tips for Home
FAQs
The ice cream should be spreadable but not completely melted. Let it sit at room temperature for 5-10 minutes until it reaches a soft, creamy consistency that you can easily spread with a spatula.
Both work well. Fresh cherries provide a brighter flavor, while frozen cherries are convenient and can be used directly from the freezer after chopping.
Semi-sweet or dark chocolate creates the best rich flavor for this cake. Choose a high-quality chocolate with at least 50-60% cocoa content for the most intense chocolate taste.
Print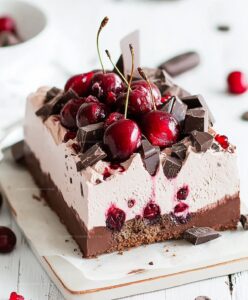
Cherry Chocolate Ice Cream Cake Recipe
- Total Time: 4 hours 15 minutes
- Yield: 8 1x
Description
Indulgent cherry chocolate ice cream cake blends rich chocolate layers with luscious cherry swirls for a delightful summer dessert. Cool creamy textures and sweet-tart flavors promise a refreshing treat you’ll savor with pure delight.
Ingredients
Cake Base:
- 1 chocolate cake layer (store-bought or homemade)
Ice Cream Layer:
- 1 quart (946 milliliters) cherry ice cream, softened
Toppings and Garnish:
- 1/2 cup (120 milliliters) chopped cherries (fresh or maraschino)
- 1 cup (240 milliliters) chocolate ganache (melted chocolate & cream)
Instructions
- Position the chocolate cake base centrally in a springform pan, ensuring an even surface.
- Gently smooth softened cherry ice cream across the cake layer, creating a uniform thickness from edge to edge.
- Delicately scatter fresh chopped cherries over the ice cream surface, distributing them for consistent flavor and texture.
- Transfer the pan to the freezer and allow the dessert to solidify completely for approximately 2-3 hours at 0°F.
- Remove from freezer and carefully drizzle rich chocolate ganache over the frozen cake, tilting the pan to achieve complete coverage.
- Elegantly garnish the surface with delicate chocolate shavings or decorative sprinkles for added visual appeal.
- Return the cake to the freezer for an additional hour to set the ganache and enhance the overall structure.
- Prior to serving, let the cake rest at room temperature for 5-10 minutes to soften slightly and facilitate easier slicing.
Notes
- Softening ice cream at room temperature for 10-15 minutes ensures smooth, even spreading without damaging the cake layer.
- Use fresh, ripe cherries for maximum flavor and natural sweetness in the dessert.
- Line the springform pan with parchment paper for easy removal and clean slicing of the cake.
- Make ganache with high-quality dark chocolate for a rich, glossy finish that complements the cherry ice cream perfectly.
- Prep Time: 15 minutes
- Cook Time: 4 hours
- Category: Desserts
- Method: Freezing
- Cuisine: American
Nutrition
- Serving Size: 8
- Calories: 390 kcal
- Sugar: 34 g
- Sodium: 150 mg
- Fat: 22 g
- Saturated Fat: 14 g
- Unsaturated Fat: 7 g
- Trans Fat: 0.5 g
- Carbohydrates: 45 g
- Fiber: 2 g
- Protein: 4 g
- Cholesterol: 60 mg
Natalie Brooks
Co-Founder & Content Strategist
Expertise
Education
eCornell
Natalie brings the vibrant, plant-powered side to Culinary Duo. After earning her Plant-Based Nutrition Certificate from eCornell, she combined her love for fresh ingredients with a passion for storytelling, aiming to make healthy cooking simple and satisfying.
Her kitchen motto: good food doesn’t need a fancy label, it just needs fresh ideas and a little creativity. Outside of writing and recipe testing, Natalie’s happiest in her garden, exploring farmers’ markets, or mixing global flavors into new kitchen experiments.