The Ultimate Chocolate Peanut Butter Ooey Gooey Cake Recipe
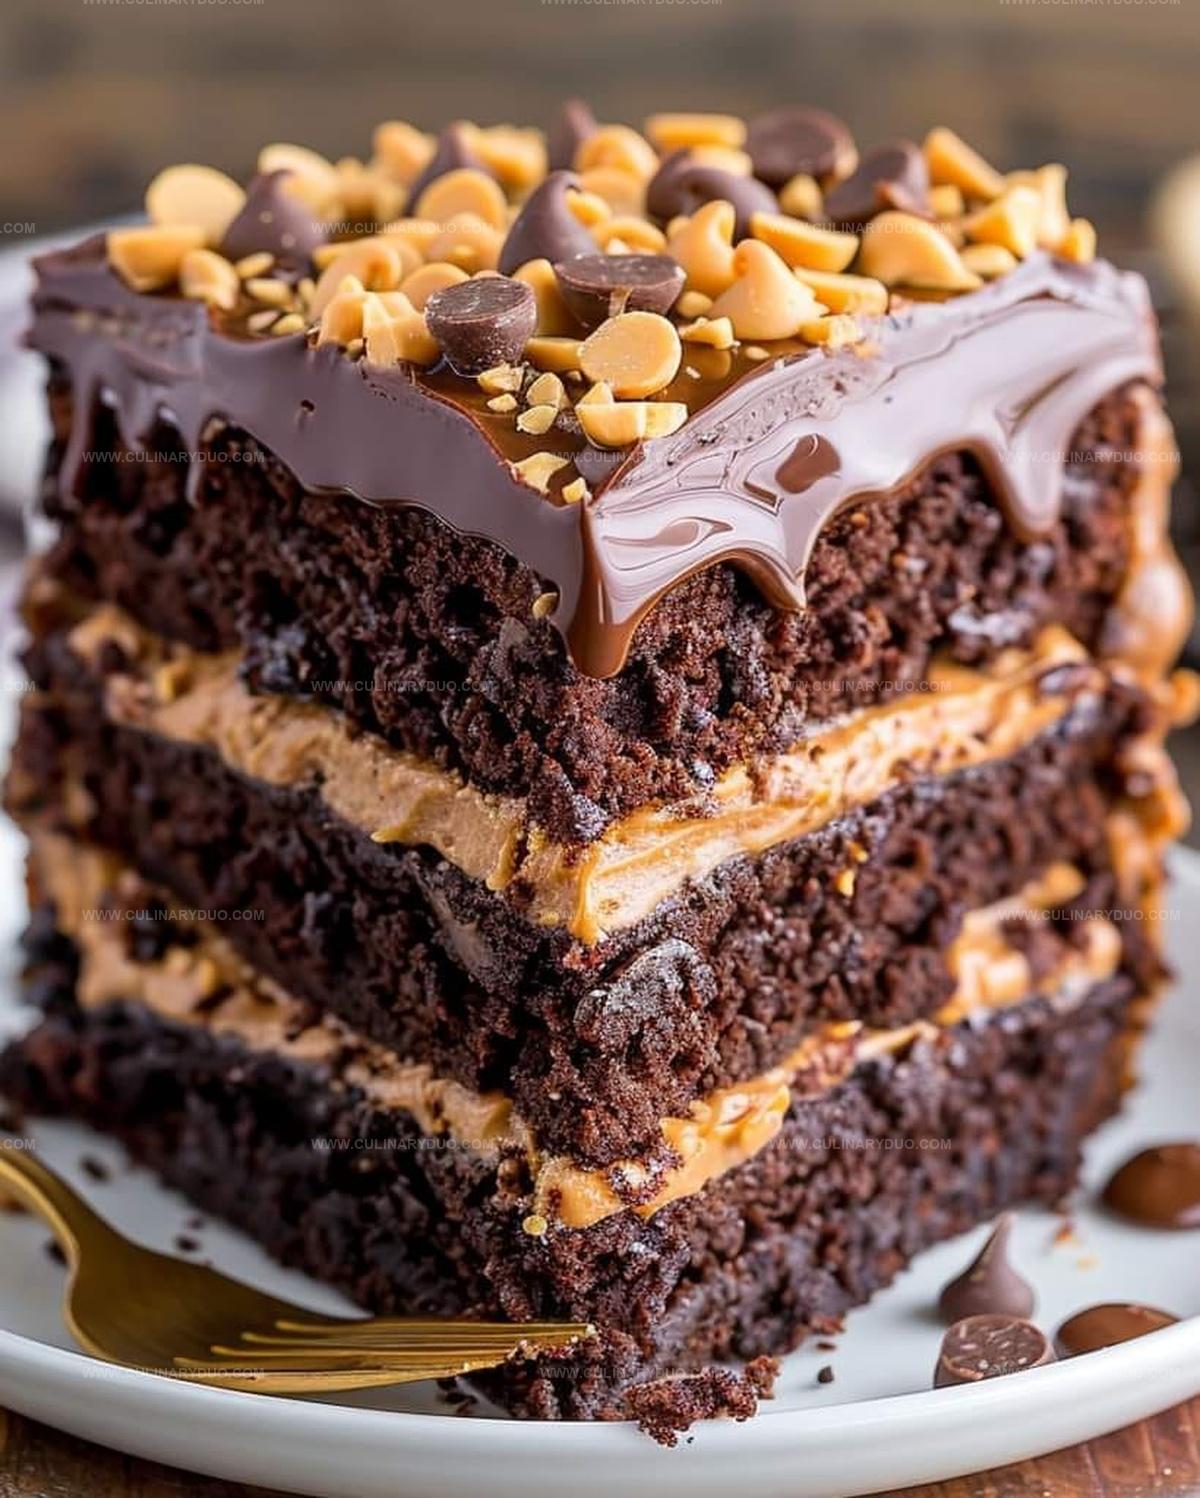
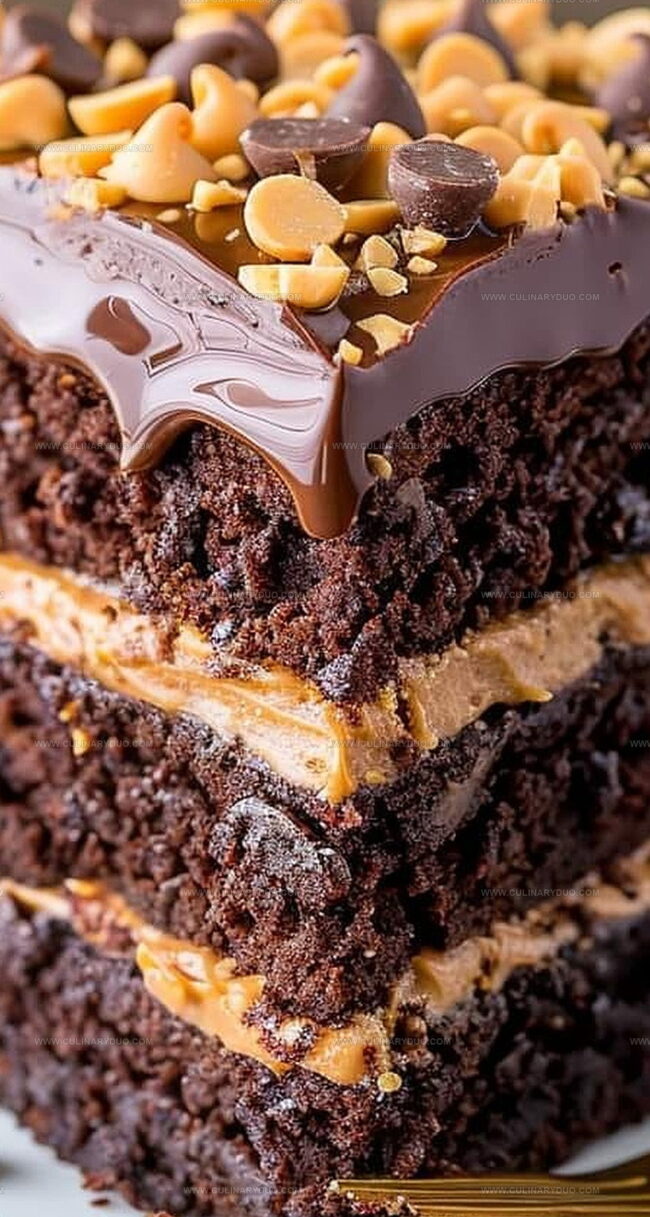
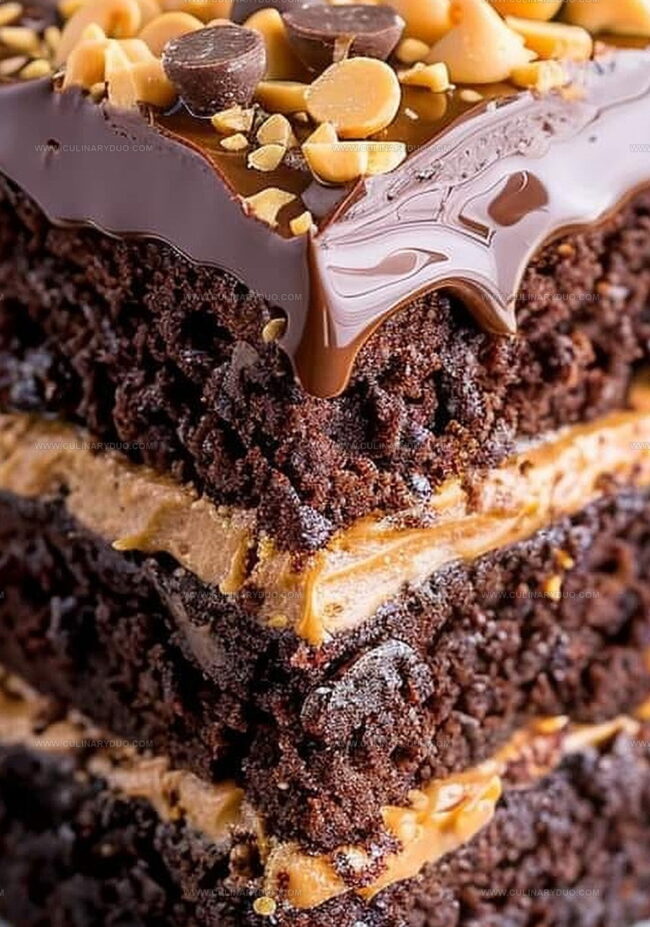
Chocolate and peanut butter create a magical world of heavenly chocolate peanut butter ooey gooey cake that melts hearts instantly.
Sweet dreams come alive with this decadent dessert promising pure indulgence.
Creamy peanut butter swirls dance through rich chocolate layers, creating an irresistible symphony of flavors.
Comfort meets luxury in every single bite of this sinful treat.
Dessert enthusiasts will fall head over heels for this impossibly smooth and gooey masterpiece.
Layers of intense chocolate and smooth peanut butter promise a culinary adventure you cannot resist.
Dive into this recipe and watch pure deliciousness unfold before your eyes.
Heavenly Chocolate Peanut Butter Ooey Gooey Cake Highlights
Ingredients for Chocolate Peanut Butter Ooey Gooey Cake
Cake Base:Wet Ingredients:Filling and Topping:Steps to Make Chocolate Peanut Butter Ooey Gooey Cake
Step 1: Prepare Baking Setup
Heat the oven to 350°F.
Grease three 8-inch round cake pans thoroughly and dust with flour to prevent sticking.
Step 2: Mix Dry Ingredients
Combine flour, cocoa powder, baking soda, and salt in a bowl.
Whisk until perfectly blended with no lumps.
Step 3: Create Butter Base
In a large mixing bowl, cream butter with granulated and brown sugars until light and fluffy.
Add eggs one at a time, mixing completely after each.
Blend in vanilla extract for rich flavor.
Step 4: Develop Cake Batter
Slowly incorporate dry ingredients and buttermilk into butter mixture.
Alternate between flour mix and buttermilk, starting and ending with flour.
Mix gently to maintain batter’s smooth texture.
Step 5: Finalize Batter
Pour hot water into batter, stirring until completely smooth.
Divide batter evenly among prepared cake pans.
Step 6: Bake Cake Layers
Bake for 30-35 minutes.
Check doneness by inserting a toothpick into cake center – it should come out clean.
Allow cakes to cool in pans for 10 minutes, then transfer to wire racks.
Step 7: Create Peanut Butter Filling
Whip together:Beat until mixture becomes smooth and fluffy.
Step 8: Build Cake Layers
Place first cake layer on serving plate.
Spread generous layer of peanut butter filling.
Repeat with remaining layers.
Step 9: Prepare Chocolate Ganache
Melt chocolate chips with heavy cream, stirring until completely smooth and glossy.
Pour ganache over entire cake, allowing it to drip down sides.
Step 10: Decorate and Serve
Sprinkle top with peanut butter chips and chopped peanuts.
Slice and enjoy this decadent chocolate and peanut butter masterpiece.
Pro Tips for Ooey Gooey Chocolate Peanut Butter Cake
Variations for Chocolate Peanut Butter Ooey Gooey Cake
Serving Suggestions for Ooey Gooey Cake
Storage Tips for Chocolate Peanut Butter Cake
FAQs
The recipe requires basic baking skills and standard kitchen equipment. Follow the steps carefully, and you’ll create a delicious dessert even if you’re not an experienced baker.
Yes, but stabilized natural peanut butter works best. Avoid runny or very oily versions that might separate during mixing.
Semi-sweet or dark chocolate chips provide the richest flavor. Avoid milk chocolate, which can be too sweet and make the ganache too thin.
Ensure you don’t overmix the batter and don’t overbake. Use the toothpick test and remove the cakes from the oven as soon as it comes out clean with a few moist crumbs.
Print
Heavenly Chocolate Peanut Butter Ooey Gooey Cake Recipe
- Total Time: 1 hour 5 minutes
- Yield: 12 1x
Description
Chocolate peanut butter ooey gooey cake delivers pure indulgence with layers of rich, creamy goodness. Sweet comfort merges seamlessly, promising blissful moments of decadent pleasure you’ll savor to the last delicious crumb.
Ingredients
Main Ingredients:
- 1 cup all-purpose flour
- 1/2 cup cocoa powder
- 1 cup unsalted butter (softened)
- 1 cup granulated sugar
- 1 cup brown sugar (packed)
- 4 large eggs
- 1 cup peanut butter
- 1 cup chocolate chips
- 1 cup peanut butter chips
Wet Ingredients and Liquids:
- 1 cup buttermilk
- 1 cup hot water
- 1 teaspoon vanilla extract
- 1/2 cup heavy cream
Dry and Additional Ingredients:
- 1 teaspoon baking soda
- 1/2 teaspoon salt
- 2 cups powdered sugar
- 1/2 cup chopped peanuts
Instructions
- Preheat oven to 350°F and prepare three 8-inch round cake pans by greasing and dusting with flour.
- Combine dry ingredients – flour, cocoa powder, baking soda, and salt in a mixing bowl, whisking thoroughly to ensure even distribution.
- In a separate large bowl, cream butter with granulated and brown sugars until light and airy. Incorporate eggs individually, mixing completely after each addition, then blend in vanilla extract.
- Gradually integrate dry ingredient mixture and buttermilk into the butter mixture, alternating and mixing gently to maintain a smooth batter consistency.
- Pour hot water into the batter, stirring until achieving a uniform, silky texture. Distribute batter evenly across prepared cake pans.
- Bake for 30-35 minutes, checking doneness with a toothpick inserted into cake center. Allow cakes to rest in pans for 10 minutes before transferring to cooling racks.
- Prepare peanut butter filling by whipping peanut butter with powdered sugar and heavy cream until achieving a creamy, spreadable consistency.
- Layer cake by placing first cake round on serving plate, spreading generous peanut butter filling between each subsequent layer.
- Create chocolate ganache by melting chocolate chips with heavy cream until achieving a glossy, smooth finish. Drizzle over assembled cake.
- Garnish with scattered peanut butter chips and chopped peanuts for added texture and visual appeal.
Notes
- Ensure buttermilk is at room temperature for smoother cake batter and more even mixing.
- Replace buttermilk with yogurt or sour cream if unavailable, maintaining similar moisture and tang.
- Toast chopped peanuts before garnishing to enhance their nutty flavor and add extra crunch.
- For gluten-free option, substitute all-purpose flour with a certified gluten-free blend and verify cocoa powder is gluten-free.
- Prep Time: 30 minutes
- Cook Time: 35 minutes
- Category: Desserts
- Method: Baking
- Cuisine: American
Nutrition
- Serving Size: 12
- Calories: 519 kcal
- Sugar: 48 g
- Sodium: 230 mg
- Fat: 30 g
- Saturated Fat: 11 g
- Unsaturated Fat: 17 g
- Trans Fat: 0.5 g
- Carbohydrates: 54 g
- Fiber: 4 g
- Protein: 10 g
- Cholesterol: 70 mg
Natalie Brooks
Co-Founder & Content Strategist
Expertise
Education
eCornell
Natalie brings the vibrant, plant-powered side to Culinary Duo. After earning her Plant-Based Nutrition Certificate from eCornell, she combined her love for fresh ingredients with a passion for storytelling, aiming to make healthy cooking simple and satisfying.
Her kitchen motto: good food doesn’t need a fancy label, it just needs fresh ideas and a little creativity. Outside of writing and recipe testing, Natalie’s happiest in her garden, exploring farmers’ markets, or mixing global flavors into new kitchen experiments.