
The Perfect Ice Cream Cake With Cookie Crunch Recipe for Summer
Creamy, decadent desserts always spark joy at gatherings, and this irresistible ice cream cake with cookie crunch delivers pure bliss.
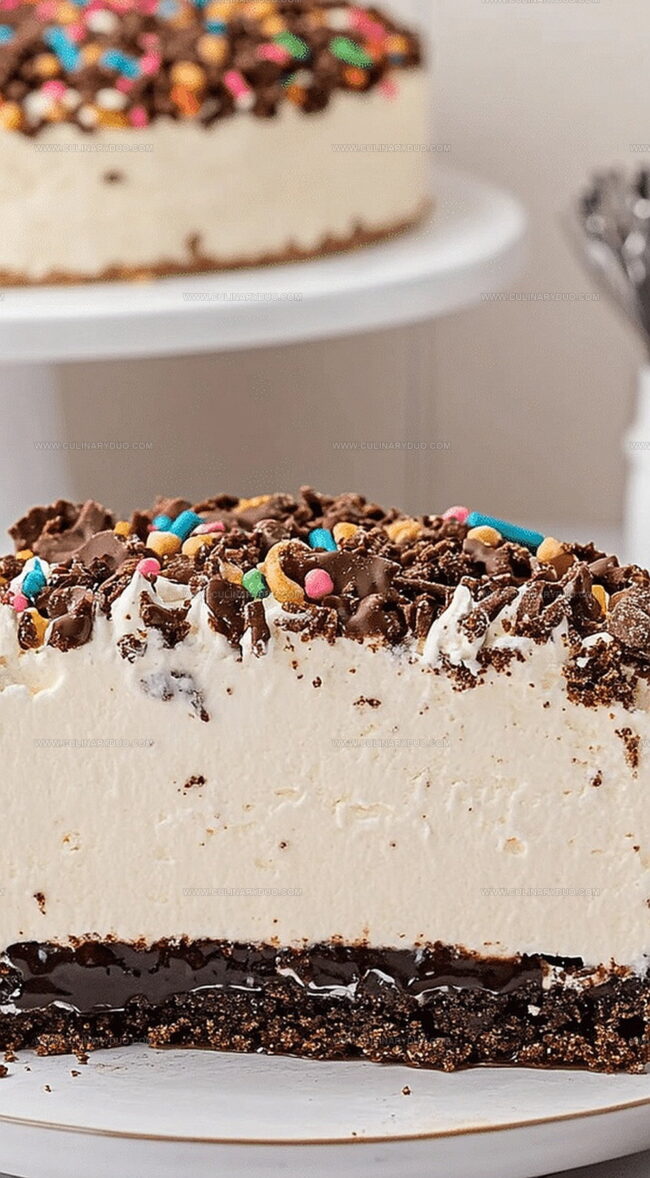
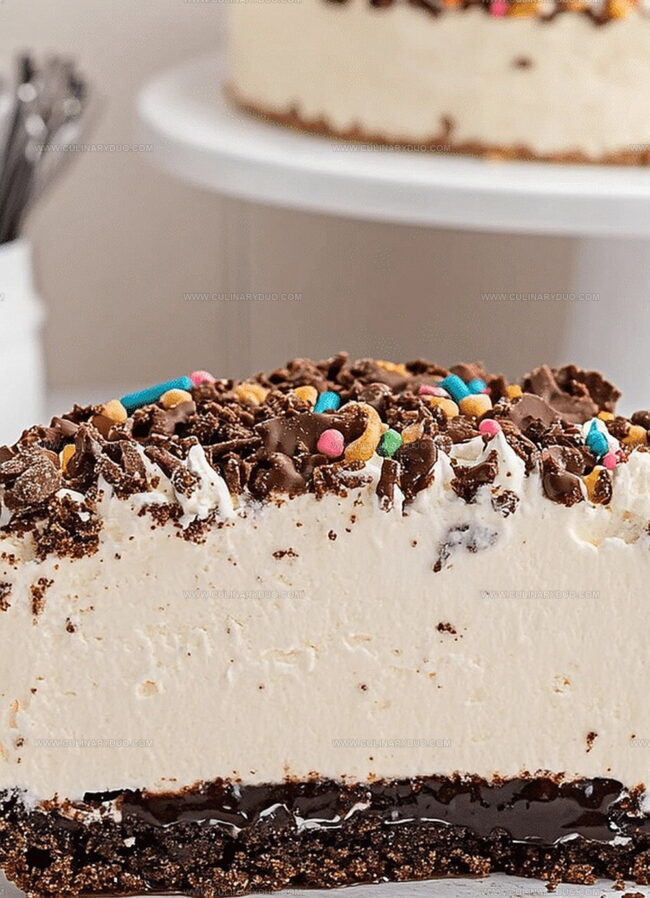
The layers of smooth, velvety ice cream nestled between crunchy cookie bits create a symphony of textures and flavors.
Crisp chocolate cookies provide a delightful contrast to the rich, cold cream, making each bite a delectable experience.
Crafted with simple ingredients and minimal effort, this dessert looks like a professional bakery creation.
The combination of cool, sweet ice cream and crumbly cookie pieces will have everyone asking for seconds.
No special baking skills needed – just a few strategic steps transform ordinary ingredients into an extraordinary treat.
Summer parties or intimate family dinners will never be the same once you serve this showstopping dessert.
Why Ice Cream Cake is a Treat
Ingredients for Cookie Crunch Ice Cream Cake
Cookie Crust:Ice Cream Layers:Topping:Ice Cream Cake with Cookie Crunch, Step-by-Step
Step 1: Prepare Crunchy Cookie Base
Grab your favorite chocolate sandwich cookies and crush them into fine crumbs.
Melt butter until smooth and mix thoroughly with cookie crumbs.
Press this delectable mixture firmly into the bottom of a springform pan, creating an even, compact layer.
Pop the pan into the freezer for a quick 10-minute chill to set the base.
Step 2: Add Creamy Vanilla Layer
Pull out softened vanilla ice cream and spread it generously over the chilled cookie crust.
Use a spatula to create a smooth, even surface.
Return the pan to the freezer and let it set for half an hour, allowing the layer to become firm and stable.
Step 3: Pour Decadent Chocolate Layer
Remove the pan and spread softened chocolate ice cream over the vanilla layer.
Ensure the surface is completely covered and smooth.
Place back in the freezer for another 30 minutes to solidify the chocolate layer completely.
Step 4: Finish With Dreamy Topping
Crown your ice cream cake with fluffy whipped topping, covering the entire surface.
For an extra touch of indulgence, drizzle rich chocolate syrup in elegant swirls across the top.
Serve immediately or keep frozen until ready to enjoy this spectacular dessert.
Tips for the Best Ice Cream Cake
Ice Cream Cake Variations to Explore
Serving Cookie Crunch Ice Cream Cake
Storing Ice Cream Cake for Later
FAQs
Yes, you can use graham crackers, Oreos, or any crunchy cookie that complements the ice cream flavors.
The cake can be stored in the freezer for up to 1 week if tightly wrapped in plastic wrap or placed in an airtight container.
Absolutely! You can prepare the cake a day or two before serving, which makes it perfect for parties and gatherings.
A springform pan is recommended, but you can also use a regular cake pan lined with parchment paper for easy removal.
Print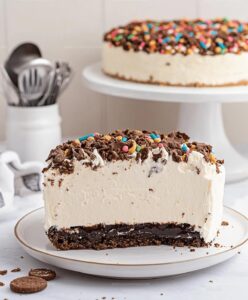
Ice Cream Cake With Cookie Crunch Recipe
- Total Time: 1 hour 30 minutes
- Yield: 8 1x
Description
Creamy chocolate ice cream cake with cookie crunch delights dessert enthusiasts with its irresistible layers of indulgence. Chocolate lovers will savor each rich bite, experiencing a perfect balance of smooth ice cream and crispy cookie textures that promise pure delight.
Ingredients
Main Ingredients:
- 1 quart vanilla ice cream, softened
- 1 quart chocolate ice cream, softened
- 2 cups chocolate sandwich cookies, crushed
Cookie Base:
- 1/4 cup (4 tablespoons) melted butter
Topping:
- 1 cup whipped topping
Instructions
- Pulverize cookies into fine crumbs and blend thoroughly with melted butter until completely combined.
- Transfer the cookie mixture into a springform pan, pressing firmly and evenly across the bottom to create a compact base layer.
- Chill the cookie crust in the freezer for approximately 10 minutes to solidify and set.
- Remove the pan from the freezer and carefully spread softened vanilla ice cream in an even, smooth layer across the chilled crust.
- Return the cake to the freezer for 30 minutes, allowing the vanilla layer to firm up and maintain its structured shape.
- Gently spread softened chocolate ice cream over the vanilla layer, ensuring a consistent thickness and clean edges.
- Freeze the cake for an additional 30 minutes to stabilize the chocolate ice cream layer.
- After freezing, generously cover the top with fluffy whipped topping, creating decorative swirls or peaks.
- Optional: Drizzle rich chocolate syrup in an artistic pattern across the whipped cream surface for enhanced visual appeal and flavor complexity.
- Before serving, allow the cake to rest at room temperature for 5-7 minutes to soften slightly, making slicing easier.
Notes
- Choose room-temperature cookies for easier crushing and better binding when making the crust.
- Ensure butter is completely melted to help cookie crumbs stick together perfectly.
- Use a smooth-bottomed glass to press cookie mixture evenly and firmly into the pan’s base.
- Soften ice cream just until spreadable but not runny to maintain clean, distinct layers.
- Allow each ice cream layer to set completely before adding the next to prevent mixing.
- For a gluten-free version, swap regular cookies with gluten-free graham crackers or almond flour cookies.
- Create flavor variations by using different cookie types like Oreos, chocolate chip, or peanut butter cookies.
- Prepare cake in advance and store in the freezer up to 3 days before serving for stress-free entertaining.
- Prep Time: 15 minutes
- Cook Time: 1 hour 15 minutes
- Category: Desserts
- Method: Freezing
- Cuisine: American
Nutrition
- Serving Size: 8
- Calories: 410 kcal
- Sugar: 34 g
- Sodium: 150 mg
- Fat: 23 g
- Saturated Fat: 14 g
- Unsaturated Fat: 7 g
- Trans Fat: 0.5 g
- Carbohydrates: 48 g
- Fiber: 2 g
- Protein: 5 g
- Cholesterol: 45 mg
Natalie Brooks
Co-Founder & Content Strategist
Expertise
Education
eCornell
Natalie brings the vibrant, plant-powered side to Culinary Duo. After earning her Plant-Based Nutrition Certificate from eCornell, she combined her love for fresh ingredients with a passion for storytelling, aiming to make healthy cooking simple and satisfying.
Her kitchen motto: good food doesn’t need a fancy label, it just needs fresh ideas and a little creativity. Outside of writing and recipe testing, Natalie’s happiest in her garden, exploring farmers’ markets, or mixing global flavors into new kitchen experiments.