
Crispy Golden Lumpia Recipe: A Filipino Delight Worth Sharing
Crispy, golden, and bursting with flavor, this authentic lumpia recipe brings the vibrant street food of the Philippines straight to your kitchen.
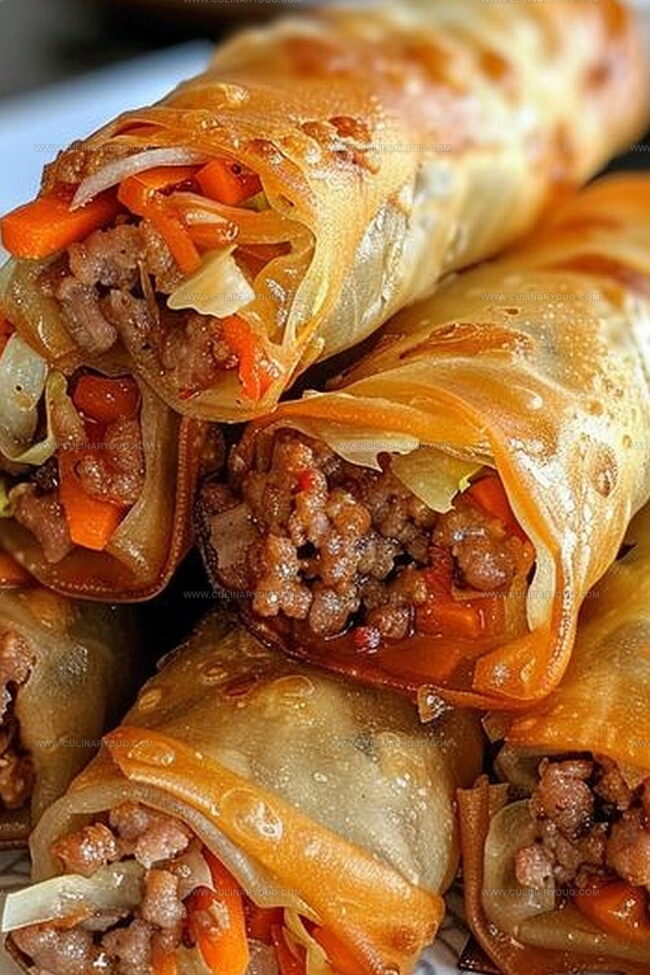
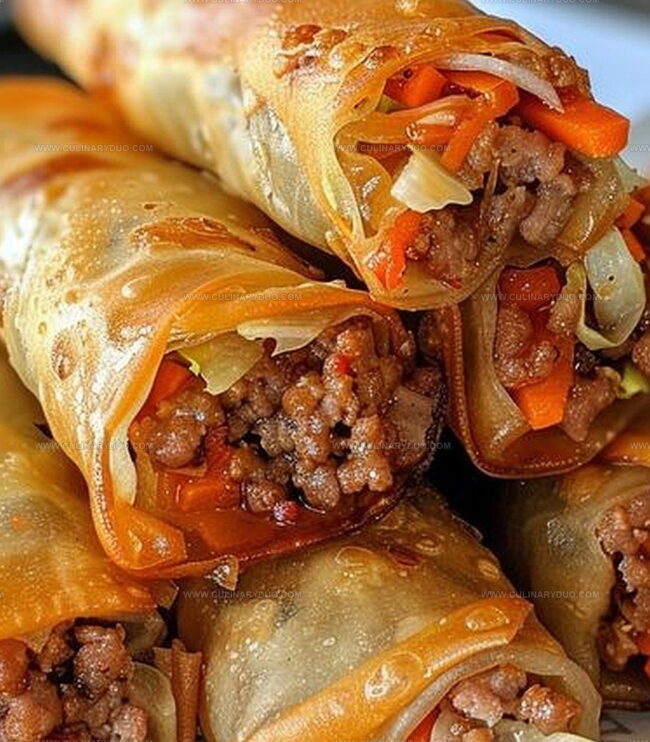
Filipino spring rolls dance with a delightful blend of savory meat and fresh vegetables wrapped in delicate, thin wrappers.
Each bite delivers a satisfying crunch that tells a story of culinary tradition and passion.
The filling comes together quickly, promising a delectable appetizer or snack that will impress everyone at the table.
Carefully crafted techniques ensure your lumpia turn out perfectly crisp and irresistible every single time.
Generations of home cooks have perfected this recipe, and now you can create a dish that connects you to the heart of Filipino cuisine.
Serve these delicious rolls hot and watch as they disappear in moments, leaving everyone asking for more.
Lumpia Top Reasons To Make This Recipe
Must-Have Ingredients For Tasty Lumpia Rolls
Meat Base:Vegetable Mixture:Seasoning and Flavoring:Wrapper and Cooking:Lumpia Recipe Step-By-Step Cooking Guide
Step 1: Mix Savory Filling
Combine ground meat, grated carrots, chopped water chestnuts, sliced green onions, minced garlic, and soy sauce in a mixing bowl.
Blend ingredients thoroughly, ensuring even distribution of flavors.
Season with salt and pepper to enhance the taste profile.
Step 2: Wrap Delicious Parcels
Take a lumpia wrapper and place a spoonful of the prepared filling near one edge.
Carefully fold the wrapper, tucking in the sides and rolling tightly.
Use a small amount of water to seal the final edge, creating a secure, compact roll.
Step 3: Crisp Golden Frying
Heat cooking oil in a deep skillet or wok over medium-high temperature.
Gently place lumpia rolls into the hot oil, turning occasionally to ensure even browning.
Fry until the exterior becomes a beautiful golden-brown color and crispy texture.
Step 4: Drain and Rest
Remove fried lumpia from the oil using a slotted spoon or tongs.
Place on a layer of paper towels to absorb excess oil and allow the rolls to cool slightly.
This step helps maintain the crispy exterior.
Step 5: Vegetarian Adaptation
For a plant-based version, replace ground meat with:Step 6: Freezing for Later
To preserve lumpia for future enjoyment, arrange uncooked rolls on a baking sheet.
Freeze individually, then transfer to a sealed container or freezer bag.
They can be directly fried from frozen, extending meal preparation convenience.
Pro Tips For Perfect Homemade Lumpia Rolls
Flavor Variations For Authentic Lumpia Recipe
How To Serve Lumpia As Appetizer
Lumpia Storage For Fresh And Crispy Rolls
FAQs
Ground meat (usually pork), carrots, water chestnuts, green onions, soy sauce, and garlic are the core ingredients that create the classic Lumpia filling.
Lumpia originates from Indonesian and Filipino cuisine, commonly served as a popular appetizer or snack in Southeast Asian cooking.
Yes, you can prepare Lumpia in advance and freeze them uncooked, which allows for convenient meal preparation and quick cooking later.
Ensure the oil is at the right temperature (medium-high heat) and drain the fried Lumpia on paper towels to remove excess oil and maintain a crispy texture.
Print
Lumpia Recipe
- Total Time: 35 minutes
- Yield: 6 1x
Description
Filipino Lumpia rolls create a crispy, flavor-packed journey through traditional street food magic. Delicate wrappers embrace savory ground pork, vegetables, and aromatic spices, delivering a perfect handheld snack you’ll crave again and again.
Ingredients
Protein:
- 1 pound (454 grams) ground pork or ground beef
Vegetables:
- 2 cups shredded carrots
- 1 cup chopped water chestnuts
- 1/2 cup chopped green onions
- 1 tablespoon minced garlic
Seasonings and Cooking Ingredients:
- 2 tablespoons soy sauce
- Salt to taste
- Pepper to taste
- Lumpia wrappers
- Vegetable oil for frying
Instructions
- Mix ground meat with finely chopped carrots, diced water chestnuts, minced green onions, crushed garlic, and soy sauce, creating a harmonious filling with balanced seasoning.
- Lay out lumpia wrapper, positioning filling diagonally across the wrapper’s center, ensuring an even distribution.
- Fold bottom corner over filling, tightly compress sides inward, then roll upward, creating a compact cylindrical shape.
- Seal the wrapper’s edge using a small amount of water, pressing gently to secure the closure and prevent unraveling during cooking.
- Prepare a deep skillet with oil heated to 350°F, ensuring consistent temperature for even browning.
- Carefully lower lumpia into hot oil, frying until exterior turns golden and crispy, approximately 3-4 minutes per batch.
- Remove lumpia using tongs, allowing excess oil to drain on absorbent paper towels, which helps maintain crispness.
- For vegetarian variation, replace ground meat with crumbled tofu or additional mixed vegetables, maintaining similar texture and flavor profile.
- To preserve for future use, arrange uncooked lumpia on a lined baking sheet, freeze individually, then transfer to freezer-safe container for storage up to one month.
Notes
- Use cold ingredients for better wrapper adhesion and prevent tearing during rolling.
- Work on a clean, flat surface to ensure tight, uniform Lumpia rolls that won’t unravel while frying.
- Pat ground meat and vegetables dry to reduce excess moisture and achieve crispier texture when frying.
- Try dipping sauces like sweet chili or vinegar-based condiments to enhance flavor complexity.
- Prep Time: 20 minutes
- Cook Time: 15 minutes
- Category: Appetizer, Snacks
- Method: Frying
- Cuisine: Filipino
Nutrition
- Serving Size: 6
- Calories: 305 kcal
- Sugar: 3 g
- Sodium: 450 mg
- Fat: 18 g
- Saturated Fat: 6 g
- Unsaturated Fat: 10 g
- Trans Fat: 0.2 g
- Carbohydrates: 15 g
- Fiber: 3 g
- Protein: 17 g
- Cholesterol: 55 mg
Natalie Brooks
Co-Founder & Content Strategist
Expertise
Education
eCornell
Natalie brings the vibrant, plant-powered side to Culinary Duo. After earning her Plant-Based Nutrition Certificate from eCornell, she combined her love for fresh ingredients with a passion for storytelling, aiming to make healthy cooking simple and satisfying.
Her kitchen motto: good food doesn’t need a fancy label, it just needs fresh ideas and a little creativity. Outside of writing and recipe testing, Natalie’s happiest in her garden, exploring farmers’ markets, or mixing global flavors into new kitchen experiments.