
Nostalgic Lunchroom Ladies Brownies: A Timeless 50-Year-Old Recipe
Chocolate has a magical way of bringing people together, especially when it comes to these beloved lunchroom ladies brownies from a cherished 50-year-old recipe.
Generations have savored this classic dessert that whispers nostalgia with every delectable bite.
School cafeterias across America perfected this sweet treat, turning simple ingredients into a memorable indulgence.
The recipe carries memories of childhood lunches and shared moments of joy.
Soft, rich, and wonderfully chocolatey, these brownies capture the essence of comfort food.
Bakers of all skill levels can recreate this timeless dessert that has delighted taste buds for decades.
Lunchroom Ladies Brownies, the Nostalgia
Brownies Ingredient Essentials
Main Ingredients:Flavor Enhancers:Frosting Ingredients:Steps for Classic Lunchroom Brownies
Step 1: Warm Up the Cooking Space
Crank your oven to a toasty 350°F.
Grab your 9×13-inch baking pan and give it a generous butter massage to prevent sticking.
Step 2: Create Chocolate Base
In a spacious mixing bowl, melt butter and whisk in cocoa powder until the mixture looks silky and rich.
Make sure no lumps remain for a smooth texture.
Step 3: Blend Sweet Elements
Pour in sugar, crack in eggs, and add a splash of vanilla.
Stir everything together until the mixture transforms into a glossy, beautiful blend.
Step 4: Incorporate Dry Ingredients
Gently fold in flour and salt.
If you love a nutty crunch, sprinkle in chopped pecans or walnuts.
Mix just until ingredients are combined – don’t overmix.
Step 5: Bake to Perfection
Spread the batter evenly across the prepared pan.
Slide into the preheated oven and bake for 25-30 minutes.
The brownies are done when a toothpick comes out with a few moist crumbs.
Step 6: Whip Up Decadent Frosting
While brownies cool slightly, craft the frosting by blending:Gradually add powdered sugar, beating until the frosting becomes smooth and glossy.
Step 7: Finish with Frosting Flourish
Spread the luscious frosting over warm brownies.
Allow the frosting to set before slicing into delectable squares.
Tips for Fudgy Lunchroom Brownies

Ways to Switch Up Classic Brownies

How to Serve Lunchroom Brownies
Storing Old-Fashioned Brownies for Days
FAQs
These brownies are a nostalgic 50-year-old school lunchroom recipe with a classic, rich chocolate flavor and homemade frosting that sets them apart from typical boxed mix brownies.
Absolutely! The nuts are optional, so you can easily skip them if you prefer or have nut allergies without affecting the overall recipe’s texture or taste.
Look for slightly set edges and a soft center. When a toothpick inserted near the center comes out with a few moist crumbs, they’re done – this prevents overbaking and keeps them fudgy.
Print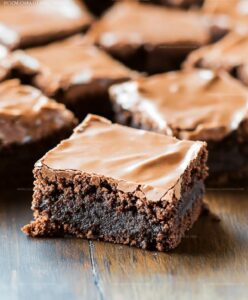
Lunchroom Ladies Brownies-50 Year Old Recipe
- Total Time: 45 minutes
- Yield: 16 1x
Description
Lunchroom Ladies Brownies resurrect nostalgic chocolate memories from school cafeterias across America. Comfort baking meets classic dessert perfection with this simple, rich recipe that promises pure chocolatey bliss you’ll savor with each delightful bite.
Ingredients
Main Ingredients:
- 4 large eggs
- 2 cups all-purpose flour
- 2 cups granulated sugar
- 1 cup butter, melted
- 1/2 cup unsweetened cocoa powder
Flavoring Ingredients:
- 4 teaspoons vanilla extract
Seasoning and Optional Ingredients:
- 1/2 teaspoon salt
- 1 cup chopped nuts (optional)
Instructions
- Warm the oven to 350°F and coat a 9×13-inch pan with cooking spray or butter to prevent sticking.
- Combine melted butter with cocoa powder in a spacious mixing bowl, whisking until the mixture achieves a silky, uniform consistency.
- Incorporate sugar, eggs, and vanilla extract into the chocolate base, stirring vigorously to create a rich, glossy batter.
- Gently fold flour and salt into the wet ingredients, mixing until just incorporated. Optional: Fold in chopped nuts for added texture and crunch.
- Transfer the batter into the prepared pan, using a spatula to distribute evenly and create a smooth surface.
- Slide the pan into the preheated oven and bake for 25-30 minutes, or until a toothpick inserted near the center comes out with a few moist crumbs.
- While brownies are baking, craft the frosting by blending softened butter, cocoa powder, and milk in a separate bowl.
- Gradually sift powdered sugar into the chocolate mixture, beating continuously until the frosting becomes creamy and spreadable.
- Remove brownies from the oven and let cool for 5-10 minutes, then generously spread the warm frosting across the surface.
- Allow brownies to cool completely, enabling the frosting to set before slicing into delectable squares.
Notes
- Opt for unsalted butter to control the salt content and ensure consistent flavor in these nostalgic brownies.
- Toast nuts before adding to enhance their nutty flavor and provide a delightful crunch to the brownie texture.
- Check brownies at 25 minutes to prevent overbaking, ensuring a fudgy and moist center that melts in your mouth.
- For a gluten-free version, substitute all-purpose flour with almond or gluten-free flour blend, maintaining the classic rich chocolate taste.
- Prep Time: 15 minutes
- Cook Time: 30 minutes
- Category: Desserts, Snacks
- Method: Baking
- Cuisine: American
Nutrition
- Serving Size: 16
- Calories: 225 kcal
- Sugar: 22 g
- Sodium: 54 mg
- Fat: 12 g
- Saturated Fat: 7 g
- Unsaturated Fat: 5 g
- Trans Fat: 0.3 g
- Carbohydrates: 28 g
- Fiber: 2 g
- Protein: 3 g
- Cholesterol: 50 mg
Natalie Brooks
Co-Founder & Content Strategist
Expertise
Education
eCornell
Natalie brings the vibrant, plant-powered side to Culinary Duo. After earning her Plant-Based Nutrition Certificate from eCornell, she combined her love for fresh ingredients with a passion for storytelling, aiming to make healthy cooking simple and satisfying.
Her kitchen motto: good food doesn’t need a fancy label, it just needs fresh ideas and a little creativity. Outside of writing and recipe testing, Natalie’s happiest in her garden, exploring farmers’ markets, or mixing global flavors into new kitchen experiments.