
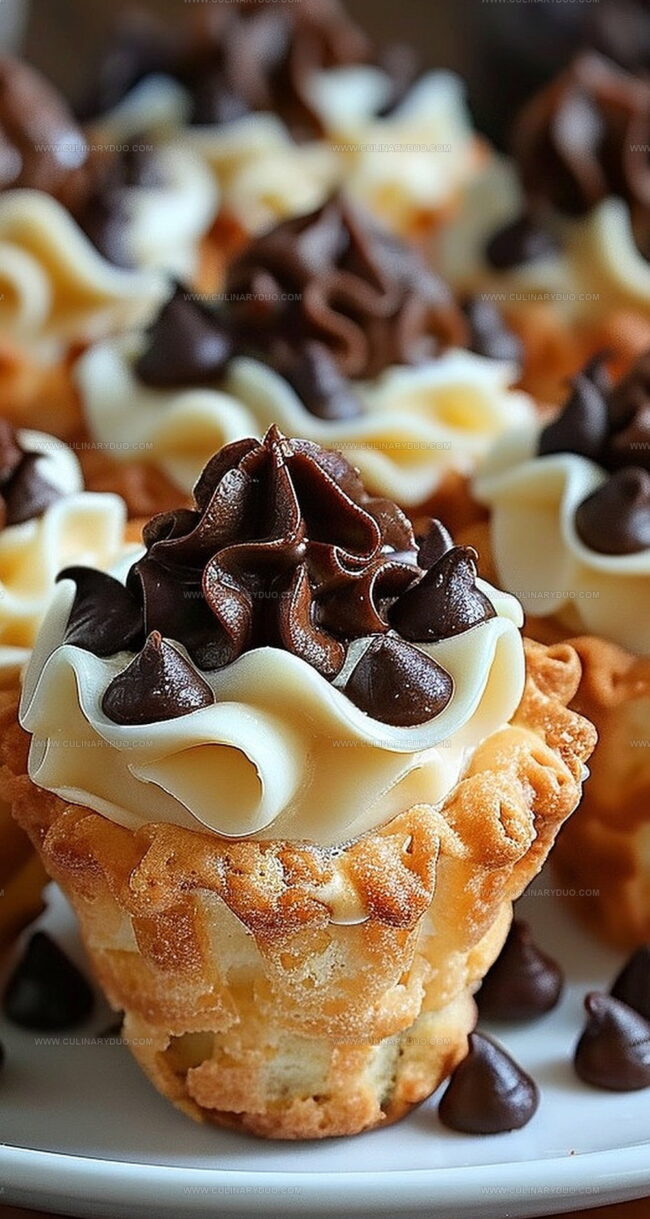
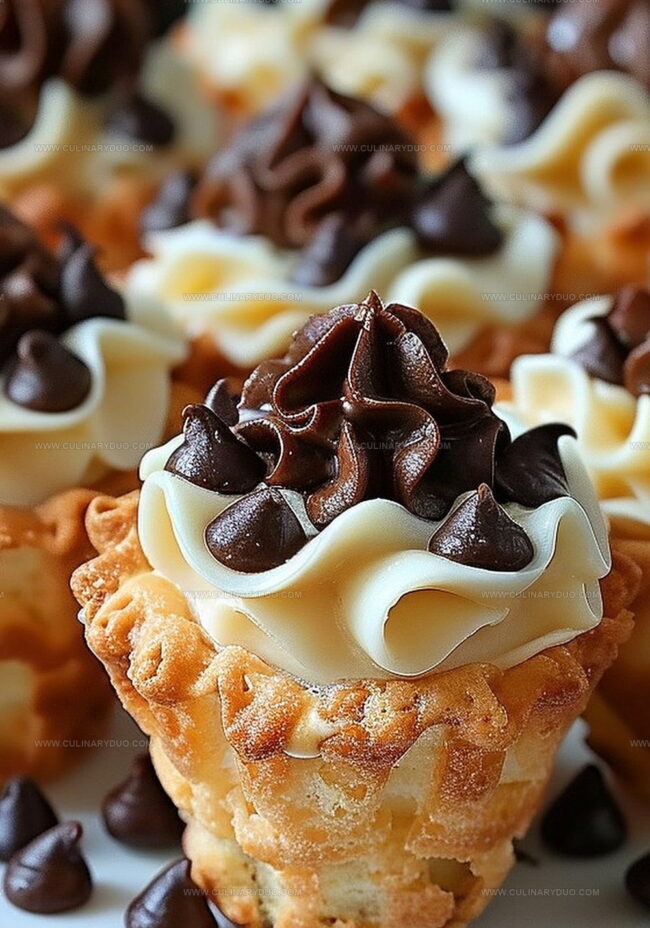
Heavenly Mini Cannoli Cups Recipe: Easy Bite-Sized Joy
Sweet pastry lovers rejoice as this mini cannoli cups recipe delivers pure Italian dessert magic straight to your plate.
Delicate shells cradle a rich, creamy filling that captures the essence of traditional cannoli.
These bite-sized treats blend crisp texture with smooth ricotta in a way that delights every palate.
You’ll fall in love with the delicate crunch and velvety center of each miniature cup.
The recipe combines simple ingredients to create an elegant dessert that looks professionally crafted.
Powdered sugar adds a perfect finishing touch to these irresistible little delicacies.
Mini Cannoli Cups: Why Everyone Smiles
Whip Up Crowd-Pleasing Bites: These mini cannoli cups deliver big flavor in tiny, irresistible packages perfect for any gathering.
Simplify Dessert Prep: No complicated rolling or traditional cannoli shaping required – just cut, press, and fill mini pastry shells with creamy ricotta mixture for stress-free entertaining.
Quick Party Showstopper: Impressive dessert that looks elegant but comes together surprisingly fast, making it ideal for last-minute celebrations or unexpected guests.
Customize with Ease: Swap toppings like chocolate chips and pistachios to match personal preferences or seasonal themes, letting your creativity shine through delicious tiny treats.
Gather Ingredients For Easy Mini Cannoli Cups
Base Pastry:Filling Ingredients:Garnish Ingredients:Fill & Assemble Your Mini Cannoli Cups
Step 1: Prepare Pastry Rounds
Dust your work surface with flour and unroll the pie crusts.
Sprinkle turbinado sugar and cinnamon generously over the crusts.
Gently press the sugar mixture into the dough using a rolling pin.
Use a 2½-inch round cookie cutter to create pastry circles.
Press each round carefully into ungreased mini muffin cups.
Continue cutting and reshaping scraps until you have 48 pastry rounds.
Step 2: Bake Crispy Shells
Place the muffin tin in a preheated oven at 425°F.
Bake the pastry shells for 10 minutes until they turn a beautiful golden brown.
Allow the shells to cool completely in the pan for about 15 minutes, then transfer to a wire rack for additional cooling.
Step 3: Create Creamy Filling
In a large mixing bowl, combine:Beat the mixture with an electric mixer on medium speed until smooth and creamy.
Transfer the filling to a 1-gallon zip-top bag and refrigerate until serving time.
Step 4: Fill and Garnish
Remove the filling from the refrigerator.
Snip a corner off the zip-top bag and pipe about 1 tablespoon of filling into each cooled pastry shell.
Sprinkle with:Dust the filled cups with a light coating of powdered sugar.
Step 5: Serve Immediately
Plate the cannoli cups and serve right away to enjoy the perfect blend of crispy shells and creamy filling.
Cannoli Cup Perfection: Smart Tips & Tricks
Cannoli Cup Variations For Sweet Tooths
Fun Ways To Present Mini Cannoli Cups
Save Your Cannoli Cups For Later Enjoyment
FAQs
Yes, you can prepare the pie crust cups and filling separately in advance. Keep the baked cups at room temperature in an airtight container and store the filling in the refrigerator. Fill the cups just before serving to maintain their crispy texture.
Use whole milk ricotta for the smoothest and richest filling. Drain excess moisture from the ricotta using a cheesecloth or fine-mesh strainer to prevent a watery filling.
No, you just need a mini muffin tin, round cookie cutter, electric mixer, and a zip-top bag for piping. Most home cooks already have these basic kitchen tools.
Print
Mini Cannoli Cups Recipe
- Total Time: 30 minutes
- Yield: 6 1x
Description
Craving Italian dessert magic? Mini Cannoli Cups deliver sweet Sicily right to your plate, blending crisp pastry shells with rich ricotta cream. Sweet tooths will adore these bite-sized delights that pack classic flavor into one perfect nibble.
Ingredients
Main Ingredients:
- 1 container (15 ounces / 425 grams) whole-milk ricotta cheese
- 1 box (2 count) refrigerated pie crusts
- 1/4 cup miniature semisweet chocolate chips or finely chopped pistachios
Sweeteners and Flavor Enhancers:
- 1/2 cup powdered sugar
- 2 tablespoons granulated sugar
- 3 tablespoons turbinado sugar (raw sugar)
- 1 teaspoon finely grated orange or lemon zest
- 1/2 teaspoon vanilla extract
- 1 teaspoon ground cinnamon
- Additional powdered sugar for dusting
Preparation Ingredients:
(None)
Instructions
- Heat oven to 425°F, preparing a mini muffin tin for pastry shells.
- Dust work surface with flour and unroll pie crusts. Sprinkle generously with turbinado sugar and cinnamon, gently pressing sugar into dough with rolling pin.
- Use a 2½-inch round cutter to create pastry circles, carefully pressing each into muffin cups. Reroll dough scraps to maximize circle count.
- Bake pastry shells for 10 minutes until golden brown. Cool completely in tin for 15 minutes, then transfer to wire rack.
- Whip ricotta with powdered sugar, granulated sugar, citrus zest, and vanilla extract using electric mixer until smooth and creamy.
- Transfer filling to a zip-top bag and refrigerate until serving time.
- Before serving, pipe approximately 1 tablespoon of filling into each cooled pastry shell.
- Garnish filled cups with mini chocolate chips or chopped pistachios, then dust lightly with powdered sugar.
- Serve immediately to maintain crisp texture and fresh flavor.
Notes
- Swap pie crusts with gluten-free alternatives for celiac or gluten-sensitive guests, ensuring everyone can enjoy this delightful dessert.
- Try ricotta cheese substitutes like mascarpone or cashew cream for those with dairy restrictions, maintaining the creamy texture.
- Control sugar content by using monk fruit sweetener or reducing overall sugar quantity, making the recipe more diabetic-friendly.
- Prepare pastry cups ahead of time and store in an airtight container to streamline party preparation and reduce last-minute stress.
- Prep Time: 20 minutes
- Cook Time: 10 minutes
- Category: Desserts, Snacks
- Method: Baking
- Cuisine: Italian
Nutrition
- Serving Size: 6
- Calories: 295 kcal
- Sugar: 19 g
- Sodium: 310 mg
- Fat: 18 g
- Saturated Fat: 10 g
- Unsaturated Fat: 7 g
- Trans Fat: 0.3 g
- Carbohydrates: 25 g
- Fiber: 1.5 g
- Protein: 6 g
- Cholesterol: 70 mg
Natalie Brooks
Co-Founder & Content Strategist
Expertise
Education
eCornell
Natalie brings the vibrant, plant-powered side to Culinary Duo. After earning her Plant-Based Nutrition Certificate from eCornell, she combined her love for fresh ingredients with a passion for storytelling, aiming to make healthy cooking simple and satisfying.
Her kitchen motto: good food doesn’t need a fancy label, it just needs fresh ideas and a little creativity. Outside of writing and recipe testing, Natalie’s happiest in her garden, exploring farmers’ markets, or mixing global flavors into new kitchen experiments.