
Dreamy Pink Velvet Cookie Recipe: Fluffy & Sweet Perfection
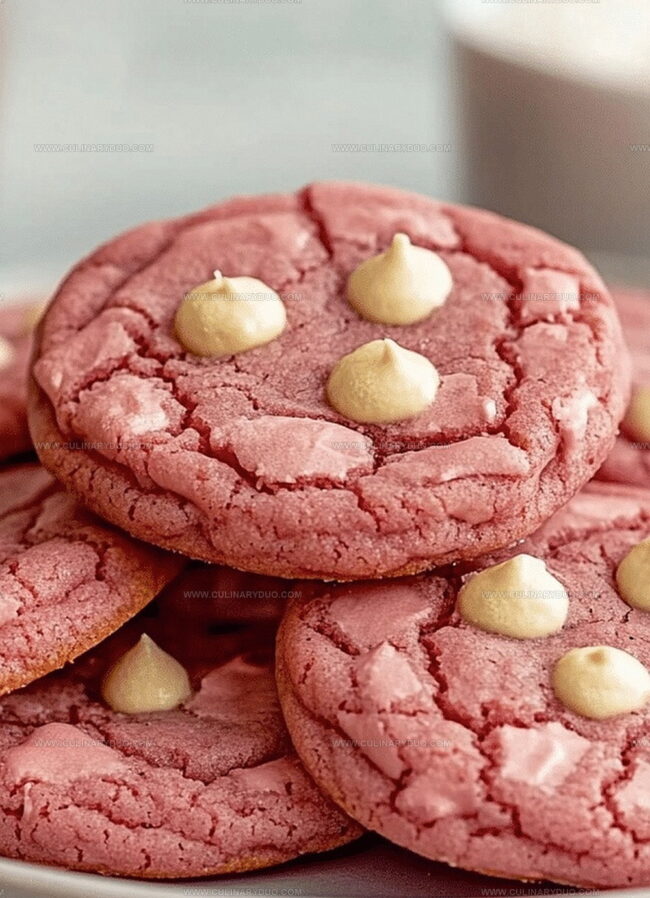
Soft, pillowy, and dressed in a stunning pink velvet cookie recipe shade, these cookies are a delightful twist on the classic red velvet treat.
The delicate blush hue catches the eye, promising a sweet adventure with every bite.
Cream cheese and subtle cocoa notes dance together in this irresistible confection.
Each cookie offers a tender, melt-in-your-mouth texture that speaks to pure indulgence.
The vibrant color makes these treats perfect for Valentine’s Day, birthday parties, or any moment craving a touch of whimsy.
With just a few simple ingredients, you can create a batch of these charming pink beauties that will wow everyone at the table.
Bake these cookies and watch smiles bloom like soft, sweet petals.
Pink Velvet Cookies, Why You’ll Crave Them
Must-Have Ingredients for Pink Velvet Cookies
Cookie Base Ingredients:Wet Ingredients:Decorative and Flavor Enhancers:Baking Steps for Pretty Pink Velvet Cookies
Step 1: Warm Up the Oven
Fire up your oven to a toasty 350°F and grab a baking sheet.
Line it with parchment paper to prevent any sticky situations.
Step 2: Combine Dry Ingredients
Grab a mixing bowl and whisk together these powdery friends:Make sure they’re well-acquainted and lump-free.
Step 3: Cream Butter and Sugar
In another bowl, blend butter and sugar until they transform into a fluffy cloud-like mixture.
Beat them together until they’re light and dreamy.
Step 4: Add Wet Ingredients
Introduce the egg and vanilla extract to your butter mixture.
Splash in some pink food coloring and mix until everything looks perfectly pink and beautiful.
Step 5: Create Cookie Dough
Slowly fold the dry ingredients into the wet mixture.
Keep stirring until a soft dough forms.
If you’re feeling extra indulgent, toss in white chocolate chips for more excitement.
Step 6: Shape the Cookies
Roll the dough into adorable little balls, each about 1 inch round.
Place them on your prepared baking sheet and gently press down to flatten slightly.
Step 7: Bake to Perfection
Slide the baking sheet into the oven and bake for 10-12 minutes.
Watch for golden edges as your signal that they’re ready.
Let them cool completely on a wire rack before devouring.
Tips for Soft and Chewy Velvet Cookies

Pink Velvet Cookie Variations for Fun
Serving Up Pink Velvet Cookies for Parties
Storage for Pink Velvet Cookies
FAQs
Pink food coloring gives these cookies their unique pink hue, and the addition of white chocolate chips creates a distinct flavor profile that sets them apart from traditional chocolate chip cookies.
Yes, you can use natural alternatives like beetroot powder or raspberry powder to achieve the pink color while keeping the recipe more natural and organic.
No special equipment is required – just basic baking tools like mixing bowls, a whisk, baking sheet, and parchment paper are all you’ll need to create these delightful pink velvet cookies.
Print
Pink Velvet Cookie Recipe
- Total Time: 32 minutes
- Yield: 12 1x
Description
Pink velvet cookies offer a delightful twist on classic red velvet, blending rich cocoa with a rosy hue. Delicate pink-tinted cookies with cream cheese frosting promise a sweet indulgence that melts in your mouth, tempting you to savor each delicious bite.
Ingredients
Main Ingredients:
- 1 1/2 cups all-purpose flour
- 1/2 cup unsalted butter, softened
- 3/4 cup granulated sugar
- 1 large egg
Leavening and Seasoning:
- 1/2 teaspoon baking soda
- 1/4 teaspoon salt
Optional and Flavoring Ingredients:
- 1 teaspoon vanilla extract
- 1–2 drops pink food coloring
- 1/4 cup white chocolate chips
Instructions
- Prepare the oven by heating to 350°F and lining a baking sheet with parchment paper for optimal cookie performance.
- Combine dry ingredients in a mixing bowl, thoroughly whisking flour, baking soda, and salt to ensure even distribution.
- Using an electric mixer, cream butter and sugar until the mixture becomes pale and develops a fluffy, aerated texture.
- Incorporate the egg and vanilla extract, blending smoothly. Add pink food coloring and mix until the batter achieves a uniform rosy hue.
- Gently fold dry ingredients into the wet mixture, stirring until a cohesive dough forms. Fold in white chocolate chips for extra decadence.
- Shape the dough into uniform 1-inch spheres, placing them evenly on the prepared baking sheet. Delicately press down on each ball to create a slightly flattened profile.
- Transfer the cookie sheet to the preheated oven and bake for 10-12 minutes, watching for golden edges and set centers as indicators of doneness.
- Remove from oven and allow cookies to cool completely on a wire rack, enabling them to firm up and develop optimal texture before serving.
Notes
- Customize color intensity by adjusting food coloring drops, creating soft pastel to vibrant pink shades.
- Ensure butter is softened at room temperature for smoother, more even cookie texture.
- White chocolate chips can be replaced with cream cheese chips for extra tangy flavor profile.
- Chill dough for 30 minutes before baking to prevent excessive spreading and maintain cookie shape.
- Prep Time: 20 minutes
- Cook Time: 12 minutes
- Category: Snacks, Desserts
- Method: Baking
- Cuisine: American
Nutrition
- Serving Size: 12
- Calories: 165 kcal
- Sugar: 9 g
- Sodium: 115 mg
- Fat: 8 g
- Saturated Fat: 5 g
- Unsaturated Fat: 3 g
- Trans Fat: 0.2 g
- Carbohydrates: 21 g
- Fiber: 1 g
- Protein: 2 g
- Cholesterol: 25 mg
Natalie Brooks
Co-Founder & Content Strategist
Expertise
Education
eCornell
Natalie brings the vibrant, plant-powered side to Culinary Duo. After earning her Plant-Based Nutrition Certificate from eCornell, she combined her love for fresh ingredients with a passion for storytelling, aiming to make healthy cooking simple and satisfying.
Her kitchen motto: good food doesn’t need a fancy label, it just needs fresh ideas and a little creativity. Outside of writing and recipe testing, Natalie’s happiest in her garden, exploring farmers’ markets, or mixing global flavors into new kitchen experiments.