
The Best Vanilla Cheesecake Recipe Ever Made at Home
Creamy, rich cheesecake with vanilla essence has the power to melt hearts and create instant smiles.
Dessert lovers adore this classic treat that promises pure indulgence.
The best vanilla cheesecake recipe combines simple ingredients with professional-level technique.
Smooth cream cheese blends perfectly with delicate vanilla notes to create a dreamy texture.
Each slice brings a silky, luxurious experience that feels like a gentle culinary embrace.
Vanilla Cheesecake Standout Qualities
Must-Have Ingredients for Vanilla Cheesecake
Crust Ingredients:Filling Ingredients:Optional Topping Ingredients:How to Prepare Vanilla Cheesecake Smoothly
Step 1: Prepare the Oven and Pan
Warm up your oven to a cozy 325°F.
Grab your trusty 9-inch springform pan and give it a light coating of grease to prevent any sticky situations.
Step 2: Create the Crunchy Crust
Crush graham crackers into fine crumbs and mix with melted butter.
Press this delightful mixture firmly into the bottom of the pan, creating a solid foundation for your cheesecake masterpiece.
Step 3: Whip Up the Creamy Filling
In a spacious mixing bowl, blend cream cheese and sugar until they become silky smooth.
Work your magic with an electric mixer to eliminate any lumps.
Step 4: Incorporate the Eggs
Add eggs one by one, mixing thoroughly after each addition.
This gentle approach ensures a perfectly smooth and velvety texture.
Step 5: Blend in the Final Touches
Introduce sour cream, vanilla extract, and flour to the mixture.
Stir until everything combines into a luxurious, creamy batter that promises pure indulgence.
Step 6: Bake to Perfection
Pour the luscious batter into the prepared crust.
Slide the pan into the preheated oven and bake for 60 minutes.
You’ll know it’s ready when the edges look set but the center still has a gentle wiggle.
Step 7: Cool and Set
Turn off the oven and let the cheesecake rest inside for an additional hour.
This helps prevent cracking and ensures a smooth, creamy texture.
Once completely cooled, transfer to the refrigerator and chill for at least 4 hours or overnight.
Step 8: Serve and Savor
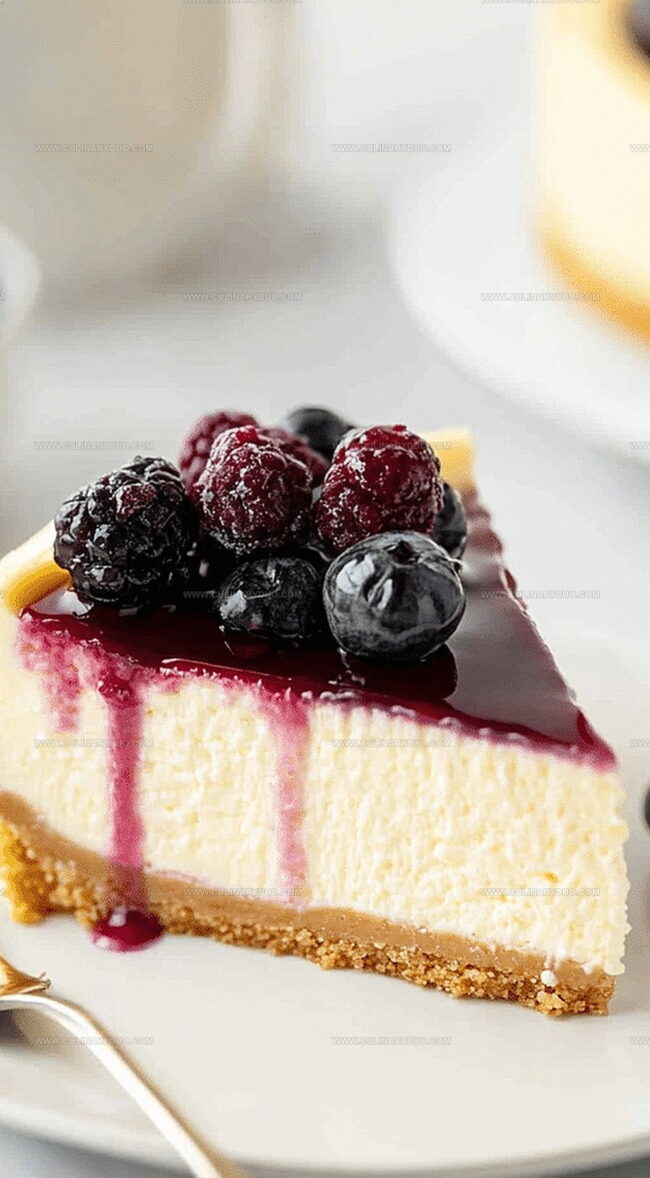
Remove from the refrigerator, slice, and serve this heavenly vanilla cheesecake.
Each bite promises a moment of pure bliss and creamy delight.
Tips for a Perfect Vanilla Cheesecake
Fun Vanilla Cheesecake Variations

Serving Vanilla Cheesecake Beautifully
Best Storage for Cheesecake Leftovers
FAQs
Full-fat Philadelphia cream cheese is recommended because it provides the smoothest texture and richest flavor, ensuring a creamy and delicious cheesecake.
Use room temperature ingredients, avoid overmixing the batter, and bake in a water bath to create humidity and prevent cracks from forming during baking.
Yes, you can use digestive biscuits or vanilla wafers as alternatives. Just ensure the crumbs are finely ground and mixed with melted butter for a solid crust base.
Print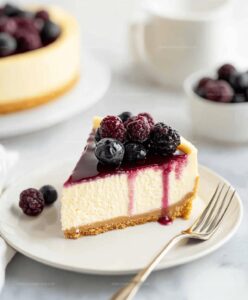
The Best Vanilla Cheesecake Recipe
- Total Time: 1 hour 20 minutes
- Yield: 12 1x
Description
Creamy New York-style vanilla cheesecake whispers pure indulgence with its silky smooth texture and rich graham cracker crust. Dessert enthusiasts will savor each luxurious bite of this classic cheesecake that promises to delight and satisfy sweet cravings.
Ingredients
Main Ingredients:
- 3 (8 ounces) packages cream cheese, softened
- 3 large eggs
- 1 cup granulated sugar
- 1 cup sour cream
Crust Ingredients:
- 2 cups graham cracker crumbs
- 1/2 cup (113 grams) unsalted butter, melted
Additional Ingredients:
- 1 tablespoon vanilla extract
- 1/4 cup (31 grams) all-purpose flour
Instructions
- Heat oven to 325°F and coat a 9-inch springform pan with light grease to prevent sticking.
- Combine graham cracker crumbs with melted butter, pressing the mixture firmly and evenly across the pan’s bottom to create a compact crust.
- Using an electric mixer, whip cream cheese and sugar together until achieving a silky, lump-free consistency.
- Incorporate eggs individually, gently mixing after each addition to maintain a smooth batter texture.
- Fold in sour cream, vanilla extract, and flour, stirring until ingredients are thoroughly integrated without overmixing.
- Carefully transfer the creamy batter into the prepared graham cracker crust, ensuring an even distribution.
- Bake for approximately 60 minutes, watching for set edges while maintaining a slight center jiggle, which indicates perfect cheesecake consistency.
- Once baking completes, switch off the oven and allow cheesecake to rest inside for an additional hour, helping prevent surface cracking.
- Remove from oven and let cool completely at room temperature before transferring to refrigerator.
- Chill for minimum 4 hours or preferably overnight to enhance flavor and structural integrity.
- Slice and serve directly from refrigerator for optimal texture and taste.
Notes
- Use room temperature ingredients to ensure smooth, lump-free batter and even mixing.
- Wrap the springform pan in aluminum foil to prevent water from seeping in during the water bath baking method.
- Avoid overmixing the batter to prevent cracks and maintain a silky, creamy texture.
- For a gluten-free version, substitute graham cracker crumbs with crushed gluten-free cookies or almond meal.
- Prep Time: 20 minutes
- Cook Time: 1 hour
- Category: Desserts
- Method: Baking
- Cuisine: American
Nutrition
- Serving Size: 12
- Calories: 388 kcal
- Sugar: 22 g
- Sodium: 250 mg
- Fat: 30 g
- Saturated Fat: 18 g
- Unsaturated Fat: 11 g
- Trans Fat: 0.5 g
- Carbohydrates: 27 g
- Fiber: 1 g
- Protein: 7 g
- Cholesterol: 105 mg
Natalie Brooks
Co-Founder & Content Strategist
Expertise
Education
eCornell
Natalie brings the vibrant, plant-powered side to Culinary Duo. After earning her Plant-Based Nutrition Certificate from eCornell, she combined her love for fresh ingredients with a passion for storytelling, aiming to make healthy cooking simple and satisfying.
Her kitchen motto: good food doesn’t need a fancy label, it just needs fresh ideas and a little creativity. Outside of writing and recipe testing, Natalie’s happiest in her garden, exploring farmers’ markets, or mixing global flavors into new kitchen experiments.