
The Ultimate Biscoff Cheesecake Brownies Recipe for Sweet Bliss
Decadent Biscoff cheesecake brownies merge two beloved desserts into a luxurious chocolate symphony.
Sweet cookie butter swirls create a mesmerizing pattern across rich fudgy layers.
Intense cocoa notes dance alongside creamy cheesecake ribbons that melt deliciously.
Crisp Biscoff cookies crumble perfectly against dense brownie textures.
Chocolate lovers appreciate unexpected flavor combinations that surprise and delight.
Each bite promises a magical blend of indulgent ingredients.
You won’t be able to resist this irresistible dessert masterpiece.
Biscoff Cheesecake Brownies For Dessert Dreamers
All Ingredients For Biscoff Cheesecake Brownie Joy
Main Ingredients:Baking Dry Ingredients:Cheesecake Layer Ingredients:Stepwise Guide To Swirled Biscoff Cheesecake Brownies
Step 1: Warm Up the Oven
Get your oven ready by heating it to 350F (175C).
Line a 9×13-inch baking pan with parchment paper, making sure it covers the bottom and sides completely.
Step 2: Create Brownie Magic
Grab a large mixing bowl and whisk together:Crack in the eggs and splash of vanilla extract, whisking until the mixture looks smooth and glossy.
Sift in the dry ingredients:Gently stir until everything just comes together.
Pour this delicious batter into the prepared pan, spreading it evenly.
Step 3: Whip Up Cheesecake Goodness
In another bowl, beat softened cream cheese and Biscoff spread until they’re silky smooth.
Mix in sugar, then beat in eggs and vanilla until the mixture is creamy and well combined.
Step 4: Swirl and Blend
Carefully pour the Biscoff cheesecake mixture over the brownie batter.
Use a knife or skewer to create beautiful swirls, mixing the two layers into a marbled masterpiece.
Step 5: Bake to Perfection
Slide the pan into the preheated oven and bake for 35-40 minutes.
You’ll know it’s ready when the edges look set but the center still has a slight jiggle.
Remove and let it cool completely in the pan.
Step 6: Add Final Touches
Once cooled, drizzle melted Biscoff spread over the top.
If you’re feeling extra indulgent, sprinkle crushed Biscoff cookie crumbs for added crunch and flavor.
Step 7: Chill and Serve
Pop the pan in the refrigerator for at least 2 hours to let the layers set properly.
When ready, slice into squares and enjoy your decadent Biscoff Cheesecake Brownies!
Tips To Achieve The Best Cheesecake Brownies
Biscoff Cheesecake Brownie Flavor Swaps To Try
Creative Ways To Serve Biscoff Cheesecake Brownies
How To Keep Cheesecake Brownies Extra Moist
FAQs
The combination of rich chocolate brownie base with creamy Biscoff cheesecake creates a decadent dessert that blends classic brownie texture with the unique caramelized cookie spread flavor.
While substitutions can be tricky, you can use alternatives like cream cheese alternatives for dairy-free options or different spreads if Biscoff isn’t available, but this might change the original recipe’s distinctive taste.
Use a knife or skewer to gently drag through the cheesecake and brownie layers, creating gentle, random swirls without overmixing, which helps maintain distinct layer patterns.
Print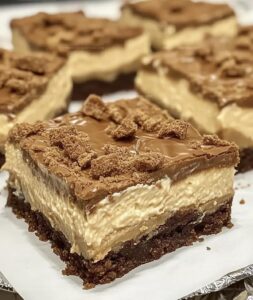
Biscoff Cheesecake Brownies Recipe
- Total Time: 1 hour 5 minutes
- Yield: 16 1x
Description
Sinful Biscoff cheesecake brownies blend rich chocolate depths with creamy cheesecake swirls and crumbled cookie magic. Sweet indulgence promises a delectable journey through layers of intense flavor you won’t want to miss.
Ingredients
Brownie Base:
- 1 cup (227 grams) unsalted butter, melted
- 1 1/2 cups (300 grams) granulated sugar
- 1 cup (220 grams) brown sugar, packed
- 4 large eggs
- 1 teaspoon vanilla extract
- 1 cup (120 grams) all-purpose flour
- 1 cup (100 grams) unsweetened cocoa powder
- 1/2 teaspoon salt
- 1/2 teaspoon baking powder
Cheesecake Layer:
- 16 ounces (454 grams) cream cheese, softened
- 3/4 cup (180 grams) Biscoff spread (cookie butter)
- 1/2 cup (100 grams) granulated sugar
- 2 large eggs
- 1 teaspoon vanilla extract
Topping:
- 1/4 cup (60 grams) Biscoff spread, melted
- Biscoff cookie crumbs (optional)
Instructions
- Prepare the baking environment by heating the oven to 350F (175C) and lining a 9×13-inch pan with parchment paper, ensuring complete coverage of the bottom and sides.
- Create the brownie foundation by whisking melted butter with granulated and brown sugars until thoroughly blended. Incorporate eggs and vanilla extract, mixing until the mixture achieves a silky consistency.
- Sift dry ingredients – flour, cocoa powder, salt, and baking powder – directly into the wet mixture. Gently fold until just combined, avoiding overmixing. Transfer the batter evenly into the prepared pan, spreading to create a smooth surface.
- Craft the cheesecake layer by beating softened cream cheese and Biscoff spread until completely smooth and free of lumps. Gradually add sugar, then introduce eggs and vanilla, mixing until the texture becomes uniform and creamy.
- Carefully pour the Biscoff cheesecake mixture over the brownie base, using a spatula to ensure even distribution. Use a knife or skewer to create elegant marbled swirls throughout the surface.
- Position the pan in the preheated oven and bake for 35-40 minutes. The edges should appear set while the center maintains a slight wobble, indicating perfect consistency.
- Remove from oven and allow to cool completely within the pan at room temperature. Once cooled, drizzle melted Biscoff spread across the surface and optionally sprinkle with crushed Biscoff cookie crumbs.
- Refrigerate for a minimum of 2 hours to allow layers to solidify and flavors to meld. Slice into squares and serve chilled for optimal texture and taste.
Notes
- Use room temperature ingredients to ensure smooth, lump-free batter and consistent mixing.
- Don’t overmix the brownie batter; stop stirring once the dry ingredients are just incorporated to maintain a fudgy texture.
- Swirl the cheesecake layer gently to create beautiful marbling without completely blending the layers.
- Test brownies for doneness by checking for slightly jiggly center with set edges, preventing overbaking and dry results.
- For gluten-free version, substitute all-purpose flour with almond or gluten-free flour blend and use gluten-free Biscoff cookies.
- Chill brownies thoroughly to help layers set and enhance flavor development, making cutting cleaner and more precise.
- Store leftovers in an airtight container in the refrigerator for up to 5 days, allowing flavors to meld and intensify.
- Prep Time: 25 minutes
- Cook Time: 40 minutes
- Category: Desserts, Snacks
- Method: Baking
- Cuisine: American
Nutrition
- Serving Size: 16
- Calories: 345 kcal
- Sugar: 31 g
- Sodium: 110 mg
- Fat: 22 g
- Saturated Fat: 13 g
- Unsaturated Fat: 8 g
- Trans Fat: 0.5 g
- Carbohydrates: 35 g
- Fiber: 2 g
- Protein: 5 g
- Cholesterol: 75 mg
Michael Reyes
Founder & Lead Recipe Developer
Expertise
Education
Santa Fe Community College
Michael’s love for cooking runs deep, rooted in the bold, colorful flavors of his New Mexico upbringing.
After earning his Culinary Arts Certificate from Santa Fe Community College, he spent years sharpening his skills in kitchens that celebrated traditional Southwestern and Latin American dishes.
He believes cooking should feel approachable and fun, never complicated. When he’s not stirring up new recipe ideas, Michael’s out hiking scenic trails, chatting with farmers at local markets, or chasing the perfect sunset shot for inspiration.