The Irresistible Boston Cream Pie Cupcakes Recipe You Need Now
Whipping up a delectable Boston cream pie cupcakes batch always brings smiles to everyone’s faces.
Sweet memories flood back from childhood bakery visits with these miniature desserts.
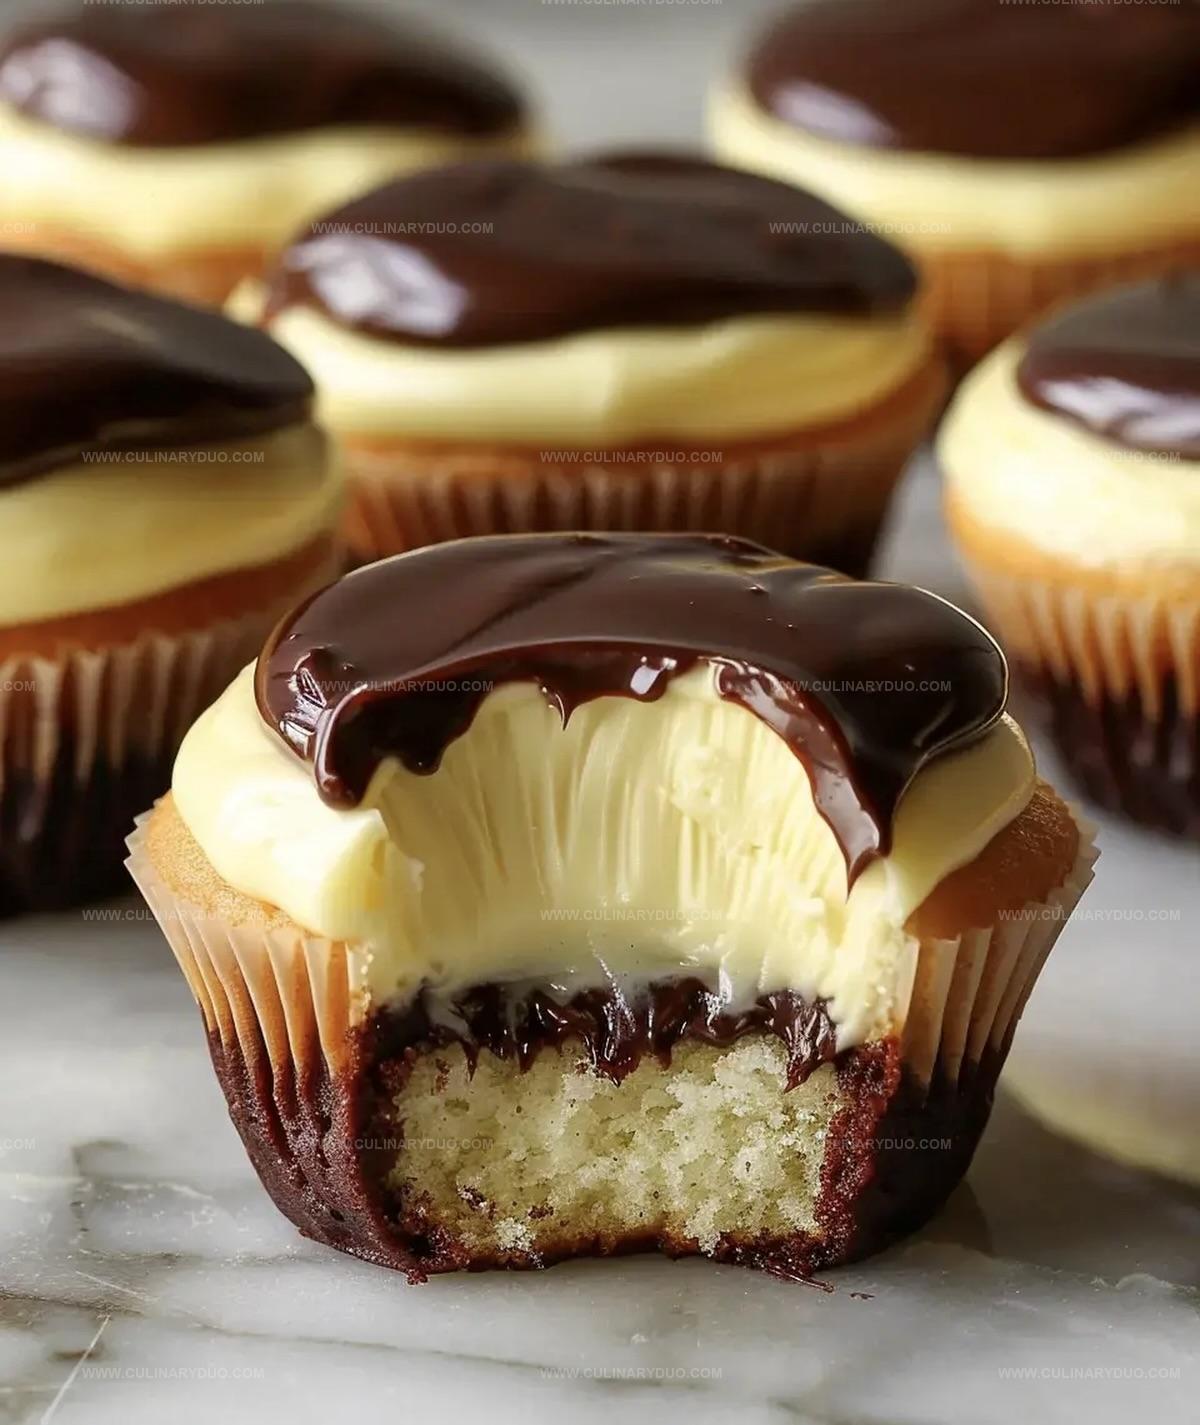
Creamy custard nestled between soft cake layers creates pure magic on your plate.
Light vanilla sponge provides the perfect canvas for rich, silky filling.
Chocolate ganache drizzled across the top adds an irresistible finishing touch.
Each bite promises a delightful journey through classic flavor combinations.
You will absolutely fall in love with this simple yet sophisticated treat.
Boston Cream Pie Cupcakes Make Dessert So Fun
Everything Needed For Boston Cream Pie Cupcakes
Cake Ingredients:Wet Ingredients:Filling and Topping Ingredients:Instructions For Boston Cream Pie Cupcakes Success
Step 1: Warm Up the Oven
Crank the oven to a toasty 350F (175C).
Grab your muffin tin and line it with cute cupcake wrappers.
Step 2: Mix Dry Stuff
Grab a medium bowl and whisk together:Set this powdery mix aside for later.
Step 3: Whip Up Butter Mixture
In a large bowl, beat butter and sugar until they transform into a fluffy cloud.
Drop in eggs one by one, giving each a good mix.
Splash in vanilla extract for extra flavor magic.
Step 4: Create Smooth Batter
Slowly dance between adding flour mixture and milk to your butter blend.
Start with flour and end with flour.
Mix until everything just comes together – no overmixing!
Step 5: Bake to Perfection
Pour batter evenly into cupcake liners.
Send them into the oven for 18-20 minutes.
They’re done when a toothpick comes out clean.
Let them cool completely.
Step 6: Create Creamy Centers
Once cooled, use a small knife to cut a little circle in each cupcake.
Fill these cozy holes with silky vanilla pudding.
Step 7: Craft Chocolate Drizzle
In a small saucepan, heat heavy cream until it’s just about to simmer.
Pour over chocolate chips.
Let it sit for 5 minutes, then stir until you’ve got a glossy, smooth chocolate sauce.
Step 8: Decorate with Chocolate
Spoon the rich chocolate ganache over each cupcake, letting it cascade down the sides.
Wait for the ganache to set before serving these delightful treats.
Tips For Fluffy Boston Cream Pie Cupcakes
Cupcake Flavors For Boston Cream Pie Fans
Ways To Serve Boston Cream Pie Cupcakes
Storing Boston Cream Pie Cupcakes Soft
FAQs
Insert a toothpick into the center of a cupcake. If it comes out clean without wet batter, your cupcakes are done. They should also have a light golden color and spring back when gently pressed.
Absolutely! Homemade vanilla pudding works great and can add a more authentic flavor to your Boston Cream Pie Cupcakes. Just ensure it’s cooled and thick enough for filling.
For a runny ganache, let it cool slightly before pouring. If it’s too thick, add a small amount of warm cream and stir until you reach the desired consistency. The ganache should flow smoothly but not be too thin.
Print
Boston Cream Pie Cupcakes Recipe
- Total Time: 45 minutes
- Yield: 12 1x
Description
Indulgent Boston cream pie cupcakes blend classic American dessert charm with modern bakery elegance. Creamy custard and silky chocolate glaze create a delightful treat you won’t be able to resist.
Ingredients
Main Ingredients:
- 1 cup all-purpose flour
- 1/2 cup unsalted butter, room temperature
- 2 large eggs
- 1/2 cup milk
- 2 cups vanilla pudding
- 1 cup heavy cream
Flavoring and Enhancers:
- 1/2 cup granulated sugar
- 1 teaspoon vanilla extract
- 1 teaspoon baking powder
- 1/4 teaspoon salt
Topping:
- 1 cup semi-sweet chocolate chips
Instructions
- Preheat the oven to 350°F (175°C) and prepare a muffin tin with cupcake liners, ensuring even spacing.
- In a medium bowl, thoroughly combine flour, baking powder, and salt using a whisk, creating a uniform dry mixture.
- Using an electric mixer, cream butter and sugar until the mixture becomes pale and fluffy, incorporating air for a light texture.
- Gradually add eggs to the butter mixture, beating thoroughly after each addition to maintain a smooth consistency. Blend in vanilla extract.
- Alternate adding flour mixture and milk to the butter base, starting and ending with flour. Mix gently until ingredients are just incorporated, avoiding overmixing.
- Distribute batter evenly among cupcake liners, filling each about two-thirds full for consistent rising.
- Bake for 18-20 minutes, rotating the pan halfway through. Test doneness by inserting a toothpick into the center – it should emerge clean.
- Allow cupcakes to cool completely on a wire rack, which prevents soggy bottoms and ensures structural integrity.
- Create filling cavities by carefully cutting a small circle from the center of each cooled cupcake using a sharp paring knife.
- Fill the cavities generously with vanilla pudding, ensuring even distribution.
- Prepare ganache by heating heavy cream until it barely reaches a simmer, then pour over chocolate chips. Let rest for 5 minutes before stirring until glossy and smooth.
- Carefully spoon ganache over each cupcake, allowing it to cascade down the sides elegantly. Let chocolate set at room temperature before serving.
Notes
- Perfectly measure flour by spooning it into the measuring cup and leveling off with a knife to avoid dense, heavy cupcakes.
- Use room temperature eggs and butter for smoother, more evenly mixed batter that creates a lighter texture.
- For gluten-free option, swap all-purpose flour with a cup-for-cup gluten-free flour blend to maintain the cupcake’s tender crumb.
- Ensure pudding filling is chilled and thick before piping into cupcake centers to prevent runny, messy results.
- Prep Time: 25 minutes
- Cook Time: 20 minutes
- Category: Desserts, Snacks
- Method: Baking
- Cuisine: American
Nutrition
- Serving Size: 12
- Calories: 271 kcal
- Sugar: 19 g
- Sodium: 103 mg
- Fat: 18 g
- Saturated Fat: 10 g
- Unsaturated Fat: 7 g
- Trans Fat: 0.5 g
- Carbohydrates: 25 g
- Fiber: 1 g
- Protein: 4 g
- Cholesterol: 58 mg
Michael Reyes
Founder & Lead Recipe Developer
Expertise
Education
Santa Fe Community College
Michael’s love for cooking runs deep, rooted in the bold, colorful flavors of his New Mexico upbringing.
After earning his Culinary Arts Certificate from Santa Fe Community College, he spent years sharpening his skills in kitchens that celebrated traditional Southwestern and Latin American dishes.
He believes cooking should feel approachable and fun, never complicated. When he’s not stirring up new recipe ideas, Michael’s out hiking scenic trails, chatting with farmers at local markets, or chasing the perfect sunset shot for inspiration.