
Irresistible Butterfinger Caramel Crunch Bars Recipe for Sweet Tooths
My sweet-toothed adventure into Butterfinger caramel crunch bars began with an unexpected kitchen experiment.
Layers of crunchy, golden candy pieces create a decadent dessert experience.
Chocolate and caramel merge into an irresistible symphony of flavors.
Crisp peanut butter notes dance across each delightful bite.
Kids and adults alike will fall in love with this indulgent treat.
Simple ingredients come together to craft something extraordinarily delicious.
We can’t wait for you to crack into these incredible bars and savor every single moment.
Butterfinger Crunch Bars—A Sweet Hit
Butterfinger Crunch Bar Essentials
Base Layer:Caramel and Binding Ingredients:Topping and Flavor Enhancers:Making Gooey Crunch Bars
Step 1: Prepare Baking Pan
Line a 9×9-inch baking pan with aluminum foil, ensuring extra foil hangs over the edges for easy bar removal.
Lightly spray the foil with cooking spray to prevent sticking.
Step 2: Create Crunchy Base
Crush graham crackers into fine crumbs and spread them evenly across the bottom of the prepared pan, creating a solid foundation for the bars.
Step 3: Add Fluffy Marshmallow Layer
Scatter mini marshmallows uniformly over the graham cracker base, covering the entire surface with soft, pillowy goodness.
Step 4: Craft Silky Caramel Sauce
Combine caramel bits and milk in a microwave-safe bowl.
Heat on high power, stirring between 30-second intervals until the mixture becomes smooth and fully melted.
Step 5: Pour Caramel Goodness
Gently pour the warm caramel sauce over the marshmallow layer, ensuring complete and even coverage across the pan.
Step 6: Sprinkle Butterfinger Crunch
Chop Butterfinger candy bars into small pieces.
Distribute the chunks generously over the caramel layer, pressing them lightly to help them adhere.
Step 7: Drizzle Chocolate Finale
Melt semi-sweet chocolate chips until completely smooth.
Use a spoon or piping bag to create beautiful chocolate drizzles across the Butterfinger layer.
Step 8: Chill and Set
Place the pan in the refrigerator for approximately one hour, allowing the bars to firm up and the layers to set perfectly.
Step 9: Slice and Serve
Remove the bars from the refrigerator.
Using the foil overhang, lift the entire batch out of the pan.
Cut into square pieces and serve immediately.
Enjoy the decadent combination of crunchy, sweet, and gooey textures!
Crunch Bar Pro Tips
Butterfinger Bar Flavor Ideas
Ways To Serve Crunch Bars
Storage For Butterfinger Crunch Bars
FAQs
Yes! These bars are perfect for kids. They’re sweet, have a fun crunchy texture, and combine favorite treats like marshmallows, chocolate, and Butterfinger candy.
Absolutely! You can swap Butterfinger with other chocolate or candy bars like Snickers, Reese’s, or Heath bars. Choose something with a similar crunch and flavor profile.
Not at all. This recipe is super simple and beginner-friendly. If you can melt caramel, use a microwave, and spread ingredients, you can definitely make these delicious bars.
Print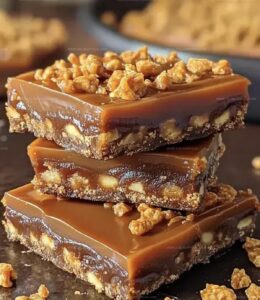
Butterfinger Caramel Crunch Bars Recipe
- Total Time: 16 minutes
- Yield: 12 1x
Description
Irresistible Butterfinger Caramel Crunch Bars combine sweet caramel and crunchy candy for a mouthwatering dessert that delights chocolate enthusiasts. Rich layers of flavor and texture create an indulgent treat you won’t be able to resist.
Ingredients
Crunch Base:
- 6 (12) sheets graham crackers (crushed)
- 2 cups mini marshmallows
Sweet Binding Ingredients:
- 1 (11 ounces / 312 grams) bag caramel bits
- 2 tablespoons milk
Topping Ingredients:
- 1 (10 ounces / 283 grams) bag Butterfinger bites (coarsely chopped)
- 2 ounces (56 grams) semi-sweet chocolate (melted)
Instructions
- Prepare the baking vessel by lining a 9×9-inch pan with aluminum foil, ensuring extended edges for effortless extraction. Apply a light coating of non-stick spray.
- Create a foundational layer by distributing crushed graham crackers uniformly across the pan’s bottom, forming a crisp base.
- Generously distribute mini marshmallows in an even, complete coverage over the graham cracker foundation.
- Combine caramel bits and milk in a microwave-safe container. Heat at full power for 1 minute, stirring between 30-second intervals until achieving a smooth, completely melted consistency.
- Cascade the molten caramel across the marshmallow layer, ensuring comprehensive and uniform distribution using a spatula.
- Liberally scatter chopped Butterfinger pieces over the caramel surface, gently pressing them to secure adherence.
- Drizzle melted semi-sweet chocolate in elegant, crisscrossing patterns across the Butterfinger-studded layer.
- Refrigerate for approximately 60 minutes until the bars achieve a solid, compact texture.
- Extract the confection using foil edges, slice into symmetrical squares, and serve chilled for maximum enjoyment.
Notes
- Swap graham crackers with gluten-free alternatives like almond flour cookies or crushed rice cereal for a gluten-sensitive diet.
- Reduce marshmallow quantity or use sugar-free marshmallows to lower overall sugar content for health-conscious individuals.
- Try dark, milk, or white chocolate drizzle to create different flavor profiles and match personal preferences.
- Keep bars refrigerated in an airtight container for up to 5 days, ensuring maximum freshness and maintaining their delightful crunch.
- Prep Time: 15 minutes
- Cook Time: 1 minute
- Category: Desserts, Snacks
- Method: None
- Cuisine: American
Nutrition
- Serving Size: 12
- Calories: 266 kcal
- Sugar: 23 g
- Sodium: 108 mg
- Fat: 15 g
- Saturated Fat: 9 g
- Unsaturated Fat: 5 g
- Trans Fat: 0.2 g
- Carbohydrates: 30 g
- Fiber: 1 g
- Protein: 3 g
- Cholesterol: 20 mg
Michael Reyes
Founder & Lead Recipe Developer
Expertise
Education
Santa Fe Community College
Michael’s love for cooking runs deep, rooted in the bold, colorful flavors of his New Mexico upbringing.
After earning his Culinary Arts Certificate from Santa Fe Community College, he spent years sharpening his skills in kitchens that celebrated traditional Southwestern and Latin American dishes.
He believes cooking should feel approachable and fun, never complicated. When he’s not stirring up new recipe ideas, Michael’s out hiking scenic trails, chatting with farmers at local markets, or chasing the perfect sunset shot for inspiration.