The Perfect Butterfinger Caramel Crunch Mini Pies Recipe
Sweet tooths crave a Butterfinger caramel crunch mini pie that promises pure indulgence.
Layers of creamy filling and crunchy candy bars combine in a delectable dessert.
Decadent textures dance across your palate with each delightful bite.
Chocolate and caramel mingle perfectly, creating an irresistible treat.
Crisp pie shells cradle rich, smooth ingredients that will make taste buds sing.
Simple steps transform basic pantry items into an extraordinary dessert.
Make these mini pies and watch everyone’s eyes light up with excitement.
Butterfinger Mini Pies Why They’re Fun
Butterfinger Mini Pies Ingredient List
Crust Base:Sweet Toppings:Cream and Flavor Enhancers:Butterfinger Mini Pies Making Steps
Step 1: Warm Up The Oven
Crank the oven to a toasty 350F (175C).
Grab your mini tart pans and give them a quick spray of cooking oil to prevent sticking.
Step 2: Create The Crunchy Base
In a mixing bowl, combine:Press this delightful mixture firmly into each mini tart pan.
Slide the pans into the oven and bake until they turn a gorgeous golden brown, about 10 minutes.
Let the crusts cool completely.
Step 3: Layer On The Gooey Goodness
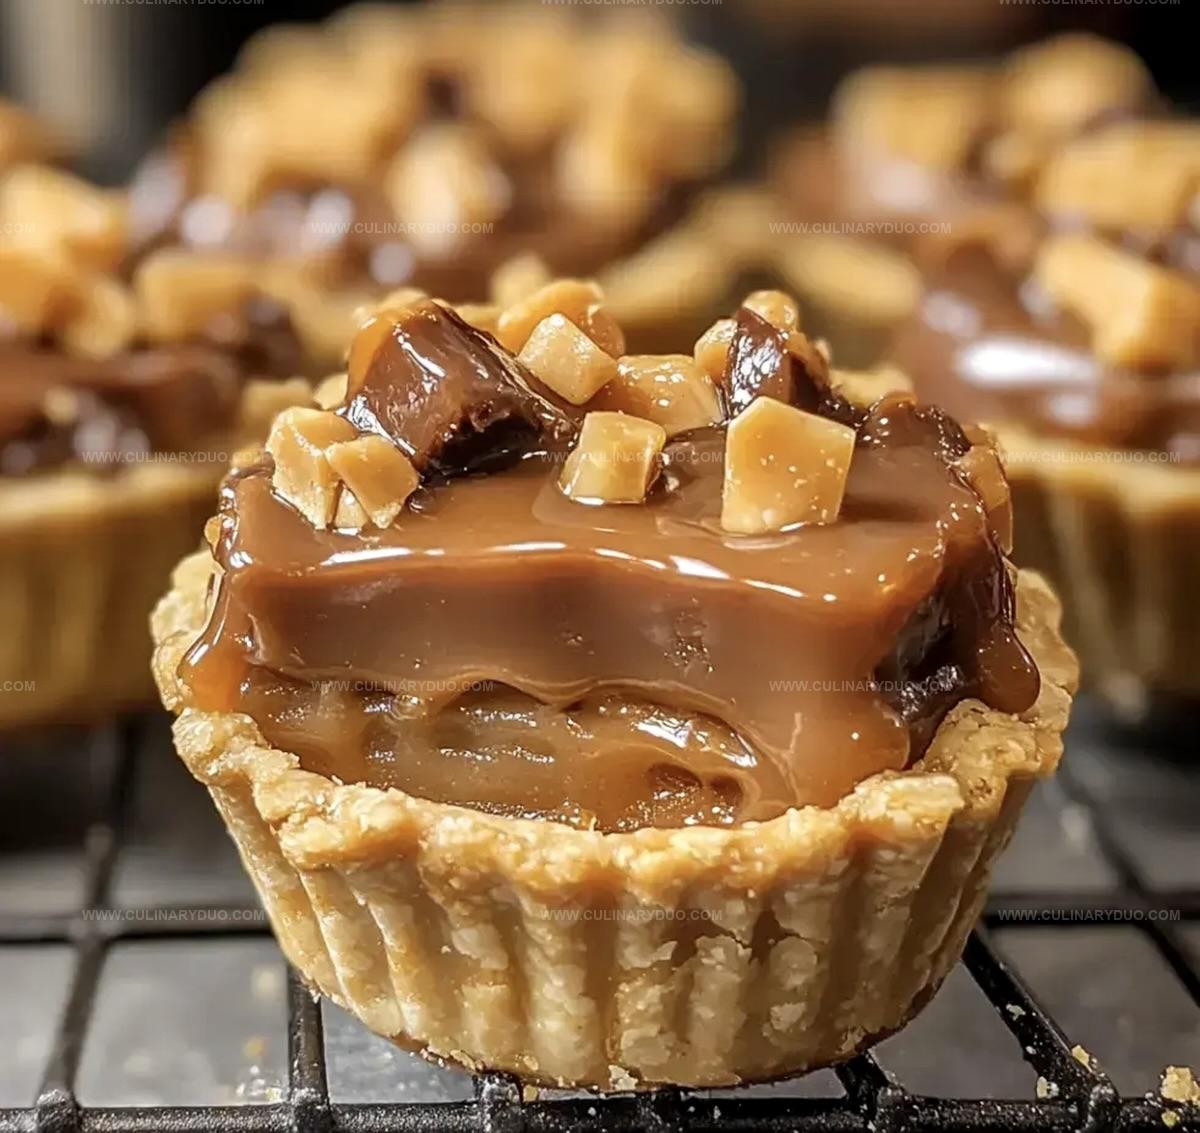
Drizzle a rich caramel sauce over each crispy crust.
Crush Butterfinger candy bars and sprinkle the delectable bits across the caramel layer.
Step 4: Whip Up A Fluffy Topping
In a chilled bowl, whisk together:Beat until the mixture forms luxurious, stiff peaks.
Pipe or dollop the whipped cream onto each mini pie with flair.
Step 5: Chocolate Waterfall
Melt dark chocolate chips and create a beautiful drizzle over the whipped cream, letting it cascade down the sides.
Step 6: Final Flourish And Chill
Scatter additional chopped Butterfinger pieces on top.
Pop the mini pies into the refrigerator and let them chill for at least an hour to set and intensify the flavors.
Butterfinger Mini Pies Tips For Crunch
Butterfinger Mini Pies Sweet Ideas
Serving Butterfinger Mini Pies
Butterfinger Caramel Mini Pies Storage Guide
FAQs
Yes, Butterfinger candy bars provide the signature crunch and caramel flavor that defines these mini pies. They add a distinctive texture and sweet-salty taste to the dessert.
Absolutely! You can prepare these mini pies up to 2 days in advance. Keep them refrigerated and add the chocolate drizzle just before serving to maintain the best texture and appearance.
Mini tart pans with removable bottoms are ideal. If you don’t have those, you can use a muffin tin with paper liners, which will work just as well for creating individual servings.
Print
Butterfinger Caramel Crunch Mini Pies Recipe
- Total Time: 40 minutes
- Yield: 12 1x
Description
Sinful Butterfinger caramel crunch mini pies promise a symphony of sweet and salty indulgence. Chocolate crusts cradle luscious caramel and crushed Butterfinger bars, delivering a mouthwatering dessert you cannot resist.
Ingredients
Main Ingredients:
- 1 1/2 cups graham cracker crumbs
- 1 cup caramel sauce
- 1 cup crushed Butterfinger candy bars
- 1 cup dark chocolate chips
- 1/2 cup chopped Butterfinger candy bars
Dairy and Binding Ingredients:
- 6 tablespoons (85 grams) unsalted butter, melted
- 1 cup heavy cream
- 1/2 cup granulated sugar
Flavoring and Finishing Ingredients:
- 1 tablespoon powdered sugar
- 1 teaspoon vanilla extract
Instructions
- Preheat the oven to 350°F (175°C) and lightly coat mini tart pans with non-stick cooking spray to ensure easy removal.
- Create the crust by combining graham cracker crumbs, melted butter, and sugar into a uniform mixture. Firmly press the crumb mixture into each tart pan, ensuring an even layer across the bottom and sides.
- Bake the crusts for 10 minutes until edges turn golden brown, then remove and allow to cool completely at room temperature.
- Once cooled, generously drizzle caramel sauce across the entire surface of each graham cracker crust, creating a smooth, even layer.
- Crush Butterfinger candy bars into small, uneven pieces and sprinkle liberally over the caramel layer, ensuring complete coverage.
- Whip heavy cream with powdered sugar and vanilla extract until stiff, glossy peaks form, creating a light and airy texture.
- Carefully pipe or spoon the whipped cream on top of the caramel and Butterfinger layer, creating decorative peaks and swirls.
- Melt dark chocolate chips using a double boiler or microwave, then delicately drizzle the melted chocolate over the whipped cream topping.
- Garnish with additional chopped Butterfinger pieces for extra crunch and visual appeal.
- Refrigerate the mini pies for at least 1 hour to allow flavors to meld and filling to set before serving.
Notes
- Customize the crust by substituting graham crackers with gluten-free cookies for a celiac-friendly version.
- Reduce sugar content by using dark chocolate with less sugar and unsweetened whipped cream.
- Enhance flavor complexity by toasting graham cracker crumbs before mixing with butter for a deeper, nuttier base.
- Keep mini pies stable by chilling the crusts completely before adding caramel layer to prevent soggy bottoms.
- Prep Time: 30 minutes
- Cook Time: 10 minutes
- Category: Desserts, Snacks
- Method: Baking
- Cuisine: American
Nutrition
- Serving Size: 12
- Calories: 213
- Sugar: 22 g
- Sodium: 55 mg
- Fat: 12 g
- Saturated Fat: 7 g
- Unsaturated Fat: 4 g
- Trans Fat: 0.2 g
- Carbohydrates: 26 g
- Fiber: 1 g
- Protein: 2 g
- Cholesterol: 28 mg
Michael Reyes
Founder & Lead Recipe Developer
Expertise
Education
Santa Fe Community College
Michael’s love for cooking runs deep, rooted in the bold, colorful flavors of his New Mexico upbringing.
After earning his Culinary Arts Certificate from Santa Fe Community College, he spent years sharpening his skills in kitchens that celebrated traditional Southwestern and Latin American dishes.
He believes cooking should feel approachable and fun, never complicated. When he’s not stirring up new recipe ideas, Michael’s out hiking scenic trails, chatting with farmers at local markets, or chasing the perfect sunset shot for inspiration.