
Gooey Caramel Peanut Butter Cookie Cups Recipe for Sweet Cravings
Tucking into a dreamy caramel peanut butter cookie cup sends sweet signals of pure comfort and indulgence.
Childhood memories flood back with every delectable bite of this irresistible treat.
Soft, chewy cookie shells cradle a luxurious center that melts effortlessly on your tongue.
Pockets of golden caramel intertwine with rich, creamy peanut butter for a symphony of flavors.
Minimal ingredients combine to create maximum satisfaction in these delightful miniature desserts.
Simple yet sophisticated, these cookie cups promise to become your new favorite weekend baking adventure.
You’ll want to share these decadent morsels with everyone around you.
Why You’ll Love These Cookie Cups
Cookie Cup Essentials
Base Ingredients:Dry Ingredients:Filling and Topping Ingredients:Make Cookie Cups In Minutes
Step 1: Warm Up The Oven
Crank your oven to a toasty 350F (175C).
Grab a muffin tin and give it a quick spray with non-stick baking magic.
Step 2: Create Dreamy Dough
Grab a big mixing bowl and blend together:Whip these ingredients with an electric mixer until they’re super smooth.
Toss in eggs and vanilla extract, then mix again.
Slowly fold in flour, baking powder, and salt until everything looks perfectly combined.
Step 3: Shape Delightful Cups
Gently press the cookie dough into each muffin tin compartment, creating adorable little cookie cups with your fingers.
Step 4: First Baking Round
Pop the muffin tin into the oven and bake for 11-13 minutes.
Watch for those edges to turn a light golden brown.
Pull them out when they look just right.
Step 5: Add Scrumptious Fillings
Drop a caramel right into the center of each cookie cup.
Then add:Sprinkle some roasted peanuts on top for extra crunch.
Step 6: Final Bake
Send those loaded cookie cups back into the oven for another 5 minutes to get everything melty and delicious.
Step 7: Cool Down
Let the cookie cups hang out in the muffin tin for about 15 minutes.
This helps them stay intact when you remove them.
Step 8: Indulge And Celebrate
Dive into these decadent cookie cups that are guaranteed to make your taste buds dance with joy!
Pro Tips For Perfect Cookie Cups
Switch Up Your Cookie Cups
Serving Cookie Cups With Style
Keeping Cookie Cups Fresh Longer
FAQs
Natural peanut butter might be too runny. Stick with traditional creamy peanut butter for the best cookie cup texture and stability.
A standard 12-cup muffin tin and electric mixer are all you’ll need. No fancy tools required.
Generously spray the muffin tin with non-stick baking spray before adding the dough. This ensures easy removal after baking.
Yes, you can prepare the dough in advance and refrigerate for up to 2 days before baking. Just let the dough come to room temperature before forming the cups.
Print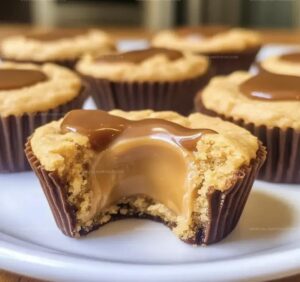
Caramel Peanut Butter Cookie Cups Recipe
- Total Time: 38 minutes
- Yield: 24 1x
Description
Indulgent caramel peanut butter cookie cups merge sweet and salty flavors in a delightful dessert. Crisp cookie shells cradle gooey caramel and creamy peanut butter, promising pure bliss with each irresistible bite you’ll savor.
Ingredients
Main Ingredients:
- 1 cup salted butter, softened
- 1 cup smooth peanut butter
- 2 large eggs
- 2½ cups all-purpose flour
Sugars:
- 1½ cups golden brown sugar, packed
- ½ cup granulated sugar
Flavor Enhancers and Toppings:
- 2 teaspoons vanilla extract
- 2 teaspoons baking powder
- 1 teaspoon salt
- 24 Kraft caramels (approximately 9 ounces)
- 8 ounces Reese’s Peanut Butter Cup Minis
- 8 ounces Reese’s Peanut Butter Cup White Chocolate Minis
- ½ cup roasted salted peanuts
Instructions
- Preheat the oven to 350°F (175°C) and generously coat a muffin tin with non-stick baking spray to ensure easy release.
- In a spacious mixing bowl, utilize an electric mixer to blend butter, peanut butter, brown sugar, and granulated sugar until achieving a smooth, creamy consistency. Incorporate eggs and vanilla extract, continuing to mix thoroughly.
- Gradually fold in flour, baking powder, and salt, stirring until the dough forms a uniform mixture without overmixing.
- Carefully distribute the cookie dough into each muffin cavity, using gentle pressure to create cup-shaped indentations with slightly raised edges.
- Bake for 11-13 minutes, watching for subtle browning around the edges, which indicates the cookies are nearly done.
- Immediately after removing from the oven, gently press one caramel into the center of each warm cookie cup, allowing it to slightly melt.
- Strategically place two peanut butter cups and two white chocolate peanut butter cups inside each cookie cup, then sprinkle roasted peanuts across the top for added texture.
- Return the muffin tin to the oven for an additional 5 minutes to help melt the chocolate and caramel slightly.
- Allow cookies to rest in the tin for approximately 15 minutes, enabling them to set and become stable before carefully transferring to a serving plate.
- Serve these indulgent, gooey cookie cups while still slightly warm for maximum flavor and enjoyment.
Notes
- Customize dough consistency by adjusting flour for chewier or crispier cookie cups depending on personal preference.
- Prevent sticking by using high-quality non-stick spray or silicone muffin liners for easy removal.
- Try alternative chocolate variations like dark chocolate peanut butter cups or milk chocolate chips for different flavor profiles.
- Ensure even baking by rotating muffin tin halfway through cooking process to guarantee uniform golden-brown edges and consistent texture.
- Prep Time: 20 minutes
- Cook Time: 18 minutes
- Category: Desserts, Snacks
- Method: Baking
- Cuisine: American
Nutrition
- Serving Size: 24
- Calories: 246
- Sugar: 17 g
- Sodium: 120 mg
- Fat: 15 g
- Saturated Fat: 6 g
- Unsaturated Fat: 8 g
- Trans Fat: 0.2 g
- Carbohydrates: 23 g
- Fiber: 2 g
- Protein: 5 g
- Cholesterol: 30 mg
Michael Reyes
Founder & Lead Recipe Developer
Expertise
Education
Santa Fe Community College
Michael’s love for cooking runs deep, rooted in the bold, colorful flavors of his New Mexico upbringing.
After earning his Culinary Arts Certificate from Santa Fe Community College, he spent years sharpening his skills in kitchens that celebrated traditional Southwestern and Latin American dishes.
He believes cooking should feel approachable and fun, never complicated. When he’s not stirring up new recipe ideas, Michael’s out hiking scenic trails, chatting with farmers at local markets, or chasing the perfect sunset shot for inspiration.