
Bubbly Bliss: Champagne Strawberry Cake Balls Recipe for Spring
Sweet memories dance around these delectable champagne strawberry cake balls that sparkle with festive charm.
Delicate crumbs blend perfectly with bubbly champagne essence, creating miniature dessert bites.
Soft strawberry notes weave through each morsel, promising pure indulgence.
Romantic and playful, these tiny treats capture celebration in every single bite.
Elegant yet approachable, they work wonderfully for intimate gatherings or sophisticated soirées.
Guests will adore these petite confections that combine rich cake texture with bright fruit and effervescent hints.
You can craft these showstopping morsels with simple ingredients and a touch of creativity.
Dive into this recipe and let your dessert magic shine.
Party Perfect Cake Balls That Steal The Show
Ingredients For The Ultimate Cake Ball Treats
Cake Base:Filling and Binding:Coating and Decoration:Steps To Make Perfect Party Cake Balls Fast
Step 1: Warm Up the Oven
Crank the oven to a toasty 350F.
Grab your 9×13-inch baking pan and give it a quick spritz of nonstick spray to prevent any sticky situations.
Step 2: Whip Up the Cake Base
Grab your mixing bowl and combine:Blend everything until silky smooth.
Pour the dreamy batter into your prepared pan and bake for 30-35 minutes.
You’ll know it’s done when a toothpick comes out clean.
Step 3: Create Creamy Filling
Let the cake cool completely.
Crumble the cake into fine pieces in a large bowl.
Fold in frosting until the mixture is perfectly combined.
Pop this mixture into the refrigerator and chill for 2 hours or overnight for best results.
Step 4: Shape Delightful Orbs
Take your chilled mixture and roll tablespoon-sized portions into cute little balls.
Place each ball on a wax paper-lined tray.
Return to the refrigerator and chill for 1-2 hours to firm up.
Step 5: Chocolate Dip Transformation
Melt white chocolate with a touch of oil in the microwave.
Use 30-second intervals, stirring between each burst.
Carefully dip each cake ball using a fork, letting excess chocolate drip off.
Place the coated balls on fresh wax paper.
Step 6: Add Sparkle and Shine
Mix pearl dust with a splash of lemon extract to create a magical paint.
Brush the chocolate-covered balls for a gorgeous shimmer.
Sprinkle on additional decorations before the chocolate sets completely.
Tips For Colorful And Moist Party Cake Balls
Fun Variations For Party Cake Ball Flavors
Serving Party Perfect Cake Balls On Dessert Tables
Storing Party Cake Balls For Special Occasions
FAQs
Champagne in the cake mix adds a sophisticated, light flavor that elevates the traditional cake ball recipe, creating a more elegant and adult-friendly dessert.
Absolutely! You can substitute champagne with prosecco, sparkling wine, or even clear spirits like vodka to maintain moisture and add unique flavor to the cake.
Use a small cookie scoop or tablespoon to measure equal amounts, then roll gently between your palms with light, consistent pressure to create smooth, uniform spheres.
Chilling helps the mixture firm up, making it easier to form balls and preventing them from falling apart during the dipping process, which ensures a cleaner, more professional finish.
Print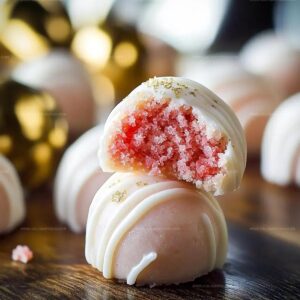
Champagne Strawberry Cake Balls Recipe
- Total Time: 1 hour 5 minutes
- Yield: 24 1x
Description
Sweet strawberry bliss meets champagne elegance in these irresistible cake balls, a celebration of delicate flavors and playful texture. Guests will adore these bite-sized treats that blend rich cake crumbs with champagne-infused frosting, creating a luxurious dessert perfect for special occasions.
Ingredients
Main Ingredients:
- 1 box strawberry cake mix
- 3 large eggs
- 1 1/4 cups champagne
- 1/3 cup vegetable oil (for cake)
- 16 ounces white cake frosting
- 24 ounces white chocolate melting wafers
Flavor Enhancers:
- 1/2 teaspoon lemon extract
- 1/2 teaspoon Wilton gold pearl dust
Coating Oil:
- 2 tablespoons vegetable oil (for chocolate)
Instructions
- Prepare the oven to 350°F and coat a 9×13-inch baking pan with nonstick spray, ensuring complete coverage.
- Combine cake mix, champagne, oil, and eggs in a mixing bowl, blending until the batter achieves a smooth, consistent texture. Transfer the mixture to the prepared pan and bake for 30-35 minutes, or until a toothpick inserted comes out clean.
- Allow the cake to cool completely, then crumble into fine pieces in a large mixing bowl. Incorporate frosting thoroughly, creating a cohesive mixture. Refrigerate for 2 hours or overnight to firm up the consistency.
- Using your hands, shape the chilled cake mixture into uniform, bite-sized spheres. Arrange the balls on a wax paper-lined tray, ensuring they do not touch. Return to the refrigerator for 1-2 hours to solidify.
- Melt white chocolate with oil in a microwave-safe bowl, heating in 30-second intervals and stirring between each to prevent burning. Carefully dip each cake ball using a fork, allowing excess chocolate to drip off before placing on fresh wax paper.
- Create a decorative glaze by mixing pearl dust with lemon extract. Delicately paint the chocolate-coated balls and optionally sprinkle with decorative toppings before the chocolate completely sets.
Notes
- Select a dry champagne for a subtle, sophisticated flavor that won’t overpower the cake’s sweetness.
- Extended chilling helps cake balls hold shape perfectly and makes them easier to dip in chocolate.
- Use room temperature frosting for smoother mixing and prevent cake crumbs from becoming too dry.
- Maintain chocolate at consistent warm temperature to achieve smooth, even coating without clumping.
- Prep Time: 30 minutes
- Cook Time: 35 minutes
- Category: Desserts, Snacks
- Method: Baking
- Cuisine: American
Nutrition
- Serving Size: 24
- Calories: 278
- Sugar: 21 g
- Sodium: 115 mg
- Fat: 15 g
- Saturated Fat: 7 g
- Unsaturated Fat: 7 g
- Trans Fat: 0.3 g
- Carbohydrates: 32 g
- Fiber: 0.5 g
- Protein: 2 g
- Cholesterol: 35 mg
Michael Reyes
Founder & Lead Recipe Developer
Expertise
Education
Santa Fe Community College
Michael’s love for cooking runs deep, rooted in the bold, colorful flavors of his New Mexico upbringing.
After earning his Culinary Arts Certificate from Santa Fe Community College, he spent years sharpening his skills in kitchens that celebrated traditional Southwestern and Latin American dishes.
He believes cooking should feel approachable and fun, never complicated. When he’s not stirring up new recipe ideas, Michael’s out hiking scenic trails, chatting with farmers at local markets, or chasing the perfect sunset shot for inspiration.