
Fluffy Cookie Monster Cheesecake Recipe: A Playful Sweet Treat
Whipping up a crazy delectable cookie monster cheesecake promises pure childhood nostalgia and sweet adventure.
Vibrant blue frosting creates an instant playful mood that captures imagination.
Creamy layers blend rich textures with classic dessert charm.
Chocolate chip cookies nestled throughout add delightful crunch and unexpected delight.
Baking this whimsical treat becomes a joyful experience that sparks smiles.
Colorful sprinkles and cookie crumbles make every slice feel like a celebration.
Get ready to unleash your inner dessert artist and create magic on a plate.
Why Cookie Monster Cheesecake Is A Showstopper
Ingredients Needed For Cookie Monster Cheesecake Success
Base Ingredients:Cheesecake Ingredients:Topping Ingredients:Steps To Make Cookie Monster Cheesecake Easily
Step 1: Warm Up The Oven
Crank your oven to a toasty 350F (175C).
Grease a springform pan with butter or cooking spray to prevent sticking.
Step 2: Create Blondie Base
In a saucepan, melt:Remove from heat and whisk in:Step 3: Combine Blondie Ingredients
Gently fold in:Spread batter evenly in the prepared pan and bake for 15-20 minutes until golden.
Let it cool completely.
Step 4: Whip Creamy Cheesecake Filling
In a large mixing bowl, blend:Beat until silky smooth.
Step 5: Add Vibrant Color And Cream
Mix in:Stir until perfectly blended and brilliantly blue.
Step 6: Incorporate Eggs
Add eggs one at a time, mixing gently after each addition.
Step 7: Fold In Cookie Chunks
Carefully fold crushed Oreos into the cheesecake mixture.
Pour over the cooled blondie base.
Step 8: Gentle Baking
Reduce oven temperature to 300F (150C).
Place cheesecake in a water bath and bake 50-60 minutes until center is barely set.
Step 9: Slow Cool Down
Turn off oven, crack the door open, and let cheesecake rest for one hour inside.
Step 10: Chill Overnight
Refrigerate cheesecake for maximum flavor and texture development.
Step 11: Create Glossy Ganache
Microwave:Stir until luxuriously smooth.
Step 12: Final Decoration
Drizzle ganache over chilled cheesecake.
Sprinkle extra cookie pieces for a playful touch.
Tips For Creamy Cookie Monster Cheesecake Layers
Cookie Monster Cheesecake Variations For Fun
Serving Cookie Monster Cheesecake For Smiles
Storing Cookie Monster Cheesecake For Later
FAQs
Blue gel food coloring gives the vibrant blue hue, while crushed Oreos and mini chocolate chips add signature cookie texture and flavor throughout the dessert.
No, this recipe is straightforward with clear step-by-step instructions. The key is following the baking temperatures and techniques like using a water bath and cooling slowly in the oven.
For best results, stick to the recipe. However, you can use different food coloring colors, swap regular chocolate chips for mini chips, or use alternative cookie types like chocolate chip cookies instead of Oreos.
Print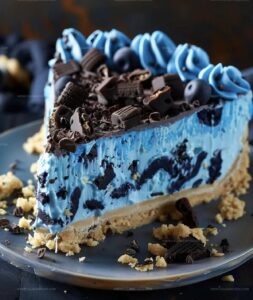
Cookie Monster Cheesecake Recipe
- Total Time: 1 hour 50 minutes
- Yield: 12 1x
Description
Indulgent Cookie Monster Cheesecake brings blue-hued whimsy to dessert tables with its playful nod to childhood nostalgia. Creamy cheesecake layers studded with chocolate chip cookies promise a delightful escape that will sweep you into pure sweet bliss.
Ingredients
Main Ingredients:
- 16 ounces (454 grams) cream cheese, softened
- 15 oreo cookies, crushed
- 1/2 cup (113 grams) unsalted butter
- 3/4 cup (128 grams) semisweet chocolate chips
- 1/2 cup (85 grams) semisweet mini chocolate chips
Baking Ingredients:
- 1/2 cup (60 grams) all-purpose flour
- 1/3 cup (67 grams) brown sugar
- 1/3 cup (67 grams) granulated sugar
- 2 teaspoons cornstarch
- 4 eggs
- 2 teaspoons vanilla extract
Finishing Ingredients:
- 1 cup (240 milliliters) whipping cream
- 1/2 teaspoon salt
- 1 pinch salt (for ganache)
- blue gel food coloring, to desired color
Instructions
- Preheat oven to 350F (175C) and prepare a 9-inch springform pan with light greasing.
- Create blondie base by melting butter with brown sugar over medium heat, then incorporate egg and vanilla extract off the heat.
- Gently fold flour into butter mixture until just combined, then delicately mix in mini chocolate chips.
- Evenly distribute batter across prepared pan and bake for 15-20 minutes until edges turn golden. Allow complete cooling.
- Whip cream cheese with cornstarch, sugar, and salt until achieving a silky smooth consistency.
- Incorporate whipping cream, blue gel food coloring, and vanilla extract, blending until color becomes uniform and vibrant.
- Carefully introduce eggs one at a time, gently mixing after each addition to maintain mixture’s integrity.
- Delicately fold crushed Oreos into cheesecake mixture, then pour and spread evenly over cooled blondie foundation.
- Reduce oven temperature to 300F (150C), place cheesecake in water bath, and bake 50-60 minutes until center stabilizes.
- Switch off oven, leaving cheesecake inside with door slightly ajar for one hour to gradual cooling.
- Refrigerate overnight to enhance texture and develop rich flavors.
- Prepare ganache by microwaving chocolate chips, heavy cream, and salt in 30-second intervals, stirring until glossy and smooth.
- Generously drizzle ganache over chilled cheesecake and garnish with additional cookie fragments for visual appeal.
Notes
- Avoid overmixing the cheesecake batter and use a water bath to create a moist baking environment, which helps prevent surface cracks.
- Ensure all dairy ingredients like cream cheese and eggs are at room temperature for smoother, lump-free mixing.
- Adjust the blue food coloring intensity to create a lighter or more vibrant Cookie Monster blue shade according to preference.
- Replace regular flour and Oreos with gluten-free alternatives to make the recipe suitable for those with gluten sensitivities.
- Prep Time: 30 minutes
- Cook Time: 1 hour 20 minutes
- Category: Desserts
- Method: Baking
- Cuisine: American
Nutrition
- Serving Size: 12
- Calories: 353 kcal
- Sugar: 27 g
- Sodium: 210 mg
- Fat: 25 g
- Saturated Fat: 14 g
- Unsaturated Fat: 10 g
- Trans Fat: 0.4 g
- Carbohydrates: 29 g
- Fiber: 1.5 g
- Protein: 6 g
- Cholesterol: 95 mg
Michael Reyes
Founder & Lead Recipe Developer
Expertise
Education
Santa Fe Community College
Michael’s love for cooking runs deep, rooted in the bold, colorful flavors of his New Mexico upbringing.
After earning his Culinary Arts Certificate from Santa Fe Community College, he spent years sharpening his skills in kitchens that celebrated traditional Southwestern and Latin American dishes.
He believes cooking should feel approachable and fun, never complicated. When he’s not stirring up new recipe ideas, Michael’s out hiking scenic trails, chatting with farmers at local markets, or chasing the perfect sunset shot for inspiration.