Dreamy Cotton Candy Cake Recipe: Fluffy Pink Magic in Every Bite
Sweet summer memories dance through this cotton candy cake, blending nostalgic carnival vibes with delightful homemade magic.
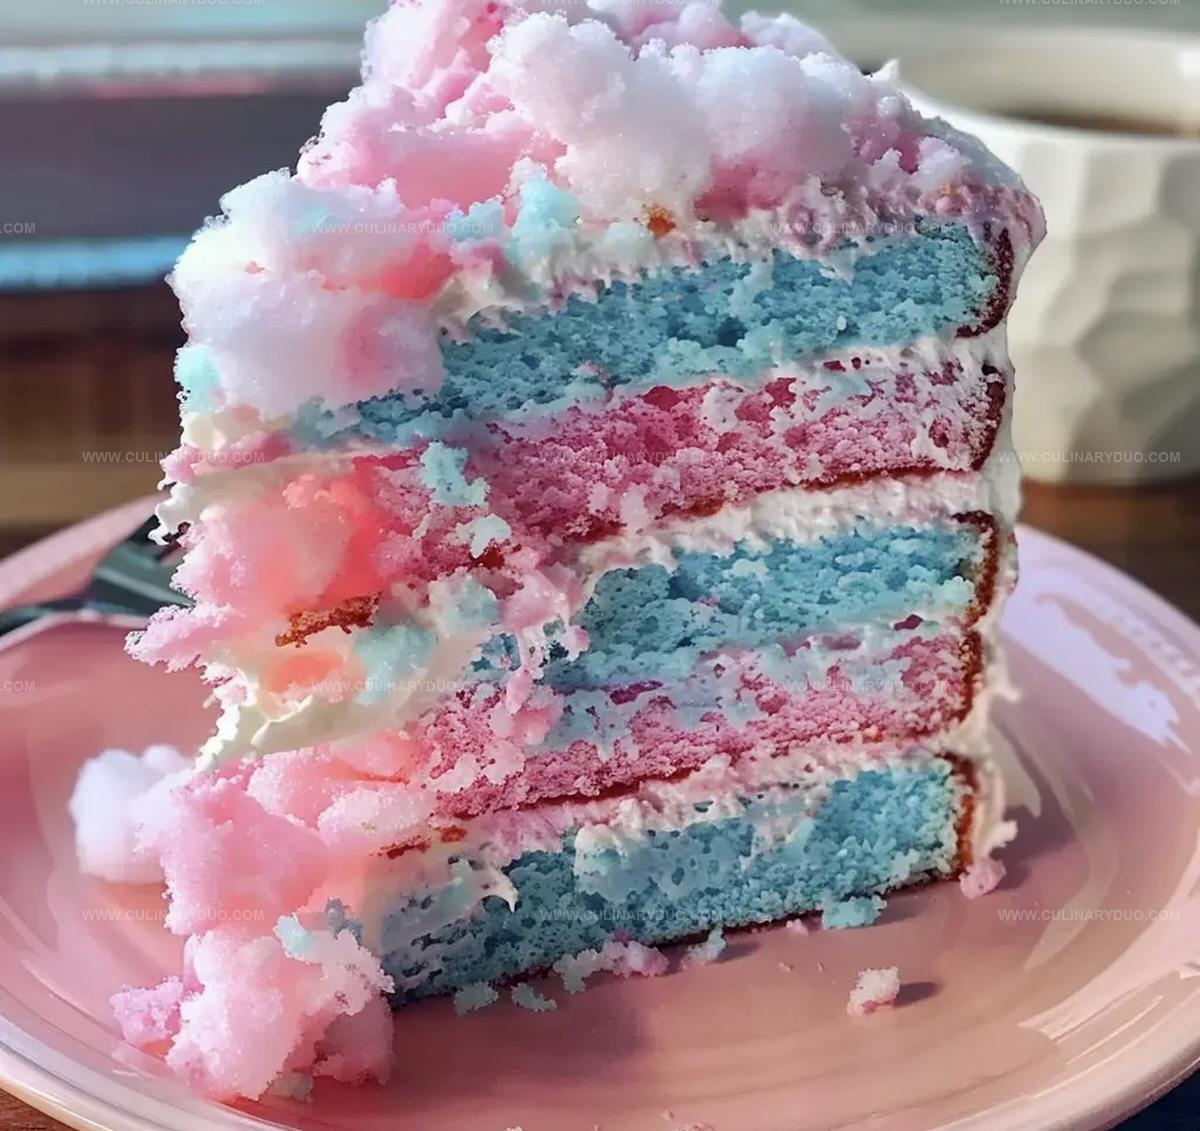
Sugary clouds of pastel pink and blue swirl across layers of soft, airy sponge.
Childhood whimsy meets sophisticated baking in a dessert that sparkles with playful charm.
Light meringue frosting captures the ethereal essence of fairground treats, creating a mesmerizing centerpiece.
Delicate decorations whisper of carefree moments and sugary dreams, inviting pure joy onto your plate.
Gather your mixing bowls and let pure delight guide your baking adventure.
Cotton Candy Cake That Brings The Party Home
What’s Needed For Fluffy Cotton Candy Cake Layers
Cake Base Ingredients:Coloring Ingredients:Frosting Ingredients:Steps To Make Cotton Candy Cake At Home
Step 1: Warm Up the Oven
Crank your oven to a toasty 350F (175C).
Grab two 9-inch round cake pans and give them a quick spray of cooking oil, then dust with a light coating of flour to prevent sticking.
Step 2: Whip Together Dry Ingredients
In a medium mixing bowl, grab a whisk and blend the flour, baking powder, and salt until they’re perfectly combined and free of lumps.
Step 3: Cream Butter and Sugar
Grab a large mixing bowl and beat the softened butter with granulated sugar until the mixture becomes light, fluffy, and looks like a cloud.
Gently add egg whites one at a time, giving each a good mix.
Splash in the vanilla extract for an extra burst of flavor.
Step 4: Create Magical Batter
Slowly incorporate the flour mixture and milk into the butter blend, mixing gently until everything just comes together.
Divide the batter into two bowls.
Wave your magic wand (or food coloring) to transform one portion into a vibrant pink and the other into a dreamy blue.
Fold chopped cotton candy into each colored batter.
Step 5: Swirl and Pour
Pour the pink and blue batters into the prepared pans.
Use a knife or skewer to create a mesmerizing marbled pattern by swirling the colors together like an artist.
Step 6: Bake to Perfection
Slide the pans into the preheated oven and bake for 25-30 minutes.
The cakes are ready when a toothpick comes out clean.
Let the cakes cool completely in their pans before removing.
Step 7: Whip Up Dreamy Frosting
Beat the softened butter until it’s smooth and creamy.
Gradually add powdered sugar, mixing thoroughly after each addition.
Splash in vanilla extract and add milk until the frosting reaches your ideal consistency.
Divide the frosting and color one portion pink and the other blue.
Step 8: Build Your Masterpiece
Place the first cake layer on a serving plate.
Spread a layer of frosting – choose pink or blue.
Carefully position the second cake layer on top.
Frost the entire cake, alternating between pink and blue for a playful look.
Just before serving, crown your creation with fluffy cotton candy pieces.
Tips For Light Cotton Candy Cake Every Time
Cotton Candy Cake Flavors For Fun Desserts
Presenting Cotton Candy Cake At Kids’ Parties
Storing Cotton Candy Cake To Keep It Soft
FAQs
The cotton candy pieces folded into the cake batter provide a sweet, nostalgic flavor that mimics the classic carnival treat, creating a fun and whimsical taste experience.
Yes, you can use gel or liquid food coloring to achieve the pink and blue colors. Gel food coloring is recommended as it provides more vibrant colors without affecting the cake’s consistency.
Add the chopped cotton candy quickly and gently fold it into the batter just before pouring into the pans. The cotton candy will slightly dissolve, creating pockets of sweet flavor throughout the cake.
Print
Cotton Candy Cake Recipe
- Total Time: 1 hour
- Yield: 12 1x
Description
Sweet clouds of cotton candy dreams dance through this whimsical Cotton Candy Cake, inviting nostalgic memories of carnival treats. Pastel-hued layers and fluffy frosting promise delightful moments you’ll savor with pure childhood joy.
Ingredients
Main Ingredients:
- 2 cups all-purpose flour
- 1 1/4 cups granulated sugar
- 4 egg whites
- 1 cup milk
- 1/2 cup unsalted butter, softened
Leavening and Seasoning:
- 1 tablespoon baking powder
- 1/2 teaspoon salt
- 1 teaspoon vanilla extract
Decorative and Frosting Ingredients:
- 1/2 cup chopped cotton candy (plus more for garnish)
- Pink and blue food coloring
- 4 cups powdered sugar
- 1 cup unsalted butter, softened (for frosting)
- 2 teaspoons vanilla extract
- 23 tablespoons milk (for frosting)
Instructions
- Preheat the oven to 350°F (175°C) and prepare two 9-inch round cake pans by greasing and dusting with flour.
- Whisk flour, baking powder, and salt together in a medium mixing bowl.
- In a large bowl, cream butter and sugar until the mixture becomes light and airy. Incorporate egg whites individually, mixing thoroughly after each addition, then blend in vanilla extract.
- Alternately fold flour mixture and milk into the butter base, mixing gently until just combined. Divide batter into two portions and tint one pink and the other blue. Gently fold chopped cotton candy into each colored batter.
- Create a marbled effect by pouring pink and blue batters into prepared pans, using a knife to swirl colors together.
- Bake for 25-30 minutes until a toothpick inserted in the center emerges clean. Allow cakes to cool completely within the pans.
- Prepare frosting by whipping butter until smooth. Gradually incorporate powdered sugar, mixing thoroughly. Add vanilla and milk to achieve desired consistency. Separate frosting and color one portion pink and the other blue.
- Place first cake layer on serving plate and spread with colored frosting. Position second layer on top and decorate with remaining frosting, alternating colors. Embellish with fresh cotton candy just before serving.
Notes
- Ensure ingredients are at room temperature for smoother mixing and better cake texture.
- Use gel food coloring for vibrant, intense colors without altering batter consistency.
- Add chopped cotton candy just before baking to prevent melting and maintain magical swirls.
- Avoid overmixing batter to keep the cake light and fluffy, stopping when ingredients are just combined.
- Prep Time: 30 minutes
- Cook Time: 30 minutes
- Category: Desserts
- Method: Baking
- Cuisine: American
Nutrition
- Serving Size: 12
- Calories: 487
- Sugar: 62 g
- Sodium: 153 mg
- Fat: 22 g
- Saturated Fat: 14 g
- Unsaturated Fat: 7 g
- Trans Fat: 0.5 g
- Carbohydrates: 74 g
- Fiber: 1 g
- Protein: 4 g
- Cholesterol: 55 mg
Michael Reyes
Founder & Lead Recipe Developer
Expertise
Education
Santa Fe Community College
Michael’s love for cooking runs deep, rooted in the bold, colorful flavors of his New Mexico upbringing.
After earning his Culinary Arts Certificate from Santa Fe Community College, he spent years sharpening his skills in kitchens that celebrated traditional Southwestern and Latin American dishes.
He believes cooking should feel approachable and fun, never complicated. When he’s not stirring up new recipe ideas, Michael’s out hiking scenic trails, chatting with farmers at local markets, or chasing the perfect sunset shot for inspiration.