
Zesty Magic: The Creamiest Lemon Pie Recipe You’ll Adore
Sunshine dances through the kitchen when you whip up this delightful creamy lemon pie recipe that promises pure citrusy bliss.
Tangy lemons merge with silky smooth textures to create a dessert that sparkles with brightness.
Sweet and zesty notes intertwine, crafting a slice of pure comfort on a plate.
Each forkful carries a delicate balance of richness and refreshing citrus flavor.
The pie’s velvety filling nestles perfectly in a buttery, crisp crust that melts on your tongue.
Layers of creamy goodness promise a dessert that will become an instant favorite at any gathering.
You’ll find this lemon pie is the perfect way to brighten any meal or celebration.
Creamy Lemon Pie, Sunshine on a Plate
What’s Needed for Creamy Lemon Pie
Main Pie Ingredients:Crust Ingredients:Topping Ingredients:How to Whip Up Creamy Lemon Pie Easily
Step 1: Warm Up the Oven
Fire up your oven to a cozy 350°F, creating the perfect toasty environment for your delightful lemon pie.
Step 2: Blend the Silky Filling
In a mixing bowl, whisk together these zesty ingredients:Blend until the mixture transforms into a smooth, creamy consistency that promises pure deliciousness.
Step 3: Pour Into Crust
Gently transfer the luscious lemon filling into your prepared pie crust, spreading it evenly with a gentle touch.
Step 4: Bake to Perfection
Slide the pie into the preheated oven and let it bake for 15 minutes.
Watch for the filling to set with a gentle, subtle firmness that signals it’s almost ready.
Step 5: Cool and Chill
Remove the pie from the oven and let it cool completely at room temperature.
Then, tuck it into the refrigerator for a minimum of 3 hours, allowing the flavors to meld and the texture to become wonderfully firm.
Step 6: Crown with Whipped Cream
Just before serving, lavish the top of your pie with a cloud-like layer of fluffy whipped cream, creating a dreamy finish that will make mouths water.
Tips for Smooth, Zesty Lemon Pie
Lemon Pie Flavors to Experiment With
Serving Creamy Lemon Pie Chilled
Keeping Lemon Pie Fresh and Flavorful
FAQs
Sweetened condensed milk creates the rich, smooth texture by providing both creaminess and sweetness to the pie filling.
Fresh lemon juice is recommended for the best flavor, but bottled juice can work if fresh lemons are unavailable. The key is using pure lemon juice without added preservatives.
The filling should look set but still slightly jiggly in the center when you gently shake the pie. It will continue to firm up while cooling.
Chilling allows the filling to completely set and develop a firmer, more stable texture, which helps the pie slice cleanly and enhances the flavor profile.
Print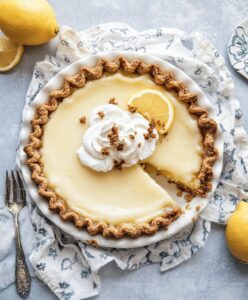
Creamy Lemon Pie Recipe
- Total Time: 30 minutes
- Yield: 8 1x
Description
Sweet and tangy Creamy Lemon Pie brings zesty sunshine to dessert tables with its silky smooth filling and buttery graham cracker crust. Guests will crave each refreshing slice that balances delicate citrus notes with rich, velvety textures.
Ingredients
Crust Ingredients:
- 1.5 cups graham cracker crumbs
- 0.5 cups (113 grams) unsalted butter, melted
- 2 tablespoons granulated sugar
- 1.25 cups all-purpose flour
- 0.5 cups (113 grams) unsalted butter, chilled and cubed
- 0.5 teaspoon salt
- 2–4 tablespoons ice water
Filling Ingredients:
- 1 can (14 ounces or 397 grams) sweetened condensed milk
- 4 large egg yolks
- 0.5 cups fresh lemon juice
- 1 tablespoon lemon zest
Topping Ingredients:
- 1 cup heavy whipping cream
- 2 tablespoons powdered sugar
- 0.5 teaspoon vanilla extract
- Lemon zest (optional)
- Lemon slices (optional)
Instructions
- Preheat the oven to a moderate 350°F, creating the ideal temperature for a delicate pie setting.
- Combine condensed milk, vibrant egg yolks, freshly squeezed lemon juice, and fragrant zest in a mixing bowl, whisking until the mixture transforms into a silky, uniform consistency.
- Carefully transfer the luminous lemon filling into the prepared pie crust, ensuring an even distribution.
- Place the pie in the preheated oven and bake for 15 minutes, watching for a gentle set and subtle firmness in the filling.
- Carefully extract the pie from the oven and allow it to cool completely at room temperature, enabling the filling to stabilize and develop its rich texture.
- Transfer the cooled pie to the refrigerator and chill for a minimum of 3 hours, allowing the flavors to meld and the filling to achieve a perfect, creamy consistency.
- Just before serving, crown the chilled pie with a generous layer of billowy whipped cream, adding a light and airy finishing touch to this zesty dessert.
Notes
- Zest lemons carefully to avoid bitter white pith, using only the bright yellow outer layer for maximum citrusy flavor.
- Try graham cracker or shortbread crust variations to customize the pie’s base and texture.
- Chill the pie thoroughly to ensure the filling sets perfectly and develops a rich, creamy consistency.
- For a lighter version, substitute low-fat sweetened condensed milk and use a reduced-fat graham cracker crust option.
- Prep Time: 15 minutes
- Cook Time: 15 minutes
- Category: Desserts
- Method: Baking
- Cuisine: American
Nutrition
- Serving Size: 8
- Calories: 370 kcal
- Sugar: 31 g
- Sodium: 115 mg
- Fat: 27 g
- Saturated Fat: 16 g
- Unsaturated Fat: 10 g
- Trans Fat: 0.5 g
- Carbohydrates: 29 g
- Fiber: 0.5 g
- Protein: 6 g
- Cholesterol: 165 mg
Michael Reyes
Founder & Lead Recipe Developer
Expertise
Education
Santa Fe Community College
Michael’s love for cooking runs deep, rooted in the bold, colorful flavors of his New Mexico upbringing.
After earning his Culinary Arts Certificate from Santa Fe Community College, he spent years sharpening his skills in kitchens that celebrated traditional Southwestern and Latin American dishes.
He believes cooking should feel approachable and fun, never complicated. When he’s not stirring up new recipe ideas, Michael’s out hiking scenic trails, chatting with farmers at local markets, or chasing the perfect sunset shot for inspiration.