
The Easiest Jello Poke Cake Recipe for Sweet Summer Joy
Crafting a delightful jello poke cake brings unexpected magic to dessert time.
Sweet surprises emerge when gelatin transforms ordinary cake into something extraordinary.
Colorful liquid seeps through soft cake layers, creating vibrant patterns that catch everyone’s eye.
Each slice promises a burst of flavor and whimsical texture.
Intricate designs bloom across the surface, making this dessert a conversation starter.
Simple ingredients combine to produce something remarkable that feels both nostalgic and fresh.
You’ll want to serve this playful treat at your next gathering.
Why Jello Poke Cake Always Gets The Applause
Jello Poke Cake Ingredient List For Success
Cake Base:Jello Layer:Topping:Steps For Bright And Sweet Jello Poke Cake
Step 1: Whip Up The Cake Batter
Crank your oven to a toasty 350F (175C).
Grab a 9×13-inch baking pan and give it a generous coating of grease and flour.
Mix the white cake mix following the package guidelines, combining:Pour the smooth batter into the prepared pan and slide it into the oven.
Bake for 30-35 minutes until a toothpick comes out clean.
Let the cake rest and cool completely inside the pan.
Step 2: Create Vibrant Jello Liquid
Grab a bowl and dissolve strawberry Jello in boiling water, stirring until every crystal disappears.
Add cold water and mix thoroughly until perfectly blended.
Step 3: Perforate The Cake Surface
After the cake has cooled down, take a wooden spoon handle and playfully poke holes all across the cake’s surface.
Don’t be shy – make those holes generous!
Step 4: Drench In Jello Magic
Carefully pour the Jello mixture over the cake, watching it seep into every single hole.
Place the cake in the refrigerator and let it chill for at least 4 hours until the Jello sets completely.
Step 5: Decorate And Serve
Spread a cloud-like layer of whipped topping across the entire cake.
For an extra burst of flavor, sprinkle chopped fresh strawberries on top.
Slice, serve, and enjoy your gorgeous creation!
Jello Poke Cake Tips For Any Color Combo
New Jello Poke Cake Flavors To Try Next
Serving Jello Poke Cake At Birthday Parties
Storing Jello Poke Cake For Extra Freshness
FAQs
You’ll need a white cake mix, strawberry Jello, water, vegetable oil, eggs, whipped topping, and optional fresh strawberries for garnish.
Absolutely! You can swap strawberry Jello for any flavor like cherry, raspberry, or lime to create a different taste and color variation of the cake.
Insert a toothpick into the center of the cake. If it comes out clean without any wet batter, the cake is done baking. This typically takes 30-35 minutes at 350F.
Print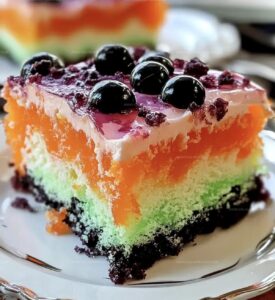
Jello Poke Cake Recipe
- Total Time: 55 minutes
- Yield: 12 1x
Description
Irresistible Jello Poke Cake delights dessert enthusiasts with its playful texture and nostalgic charm. Colorful gelatin-infused layers promise a sweet journey through childhood memories, inviting you to savor each delectable bite.
Ingredients
Cake Base:
- 1 box (15.25 ounces / 432 grams) white cake mix
- 3 large eggs
- 1 cup (240 milliliters) water
- 1/2 cup (120 milliliters) vegetable oil
Jello Filling:
- 1 box (3 ounces / 85 grams) strawberry Jello
- 1 cup (240 milliliters) boiling water
- 1/2 cup (120 milliliters) cold water
Topping:
- 1 cup (240 milliliters) whipped topping
- 1/2 cup (75 grams) chopped fresh strawberries (optional)
Instructions
- Preheat the oven to 350F (175C) and prepare a 9×13-inch baking pan by greasing and flouring its surface to prevent sticking.
- Mix the white cake batter according to package instructions, incorporating water, vegetable oil, and eggs until smooth and well-blended.
- Transfer the cake batter into the prepared pan, ensuring an even distribution, and bake for 30-35 minutes until a toothpick inserted in the center emerges clean.
- Allow the cake to cool completely inside the baking pan, which helps maintain its structure and moisture.
- Prepare the strawberry Jello by dissolving it thoroughly in boiling water, stirring until no granules remain.
- Add cold water to the Jello mixture and blend well to create a smooth, uniform liquid.
- Using the handle of a wooden spoon, carefully create multiple holes across the entire cake surface, spacing them evenly to ensure consistent Jello absorption.
- Slowly pour the prepared Jello mixture over the cake, allowing it to seep into the poked holes and saturate the cake’s interior.
- Refrigerate the cake for a minimum of 4 hours, enabling the Jello to set completely and infuse the cake with fruity flavor.
- Once set, generously spread whipped topping across the cake’s surface, creating a smooth and even layer.
- Optional: Garnish with freshly chopped strawberries for an additional burst of color and flavor.
Notes
- Select cake mix carefully, choosing high-quality brands for better texture and flavor.
- Ensure cake is completely cool before adding Jello to prevent soggy results and maintain cake structure.
- Poke holes consistently and evenly across entire cake surface for uniform Jello distribution and vibrant color penetration.
- Consider alternative flavors like raspberry or cherry Jello for exciting variations and personalized taste experience.
- Prep Time: 20 minutes
- Cook Time: 35 minutes
- Category: Desserts, Snacks
- Method: Baking
- Cuisine: American
Nutrition
- Serving Size: 12
- Calories: 246 kcal
- Sugar: 22 g
- Sodium: 210 mg
- Fat: 11 g
- Saturated Fat: 2 g
- Unsaturated Fat: 9 g
- Trans Fat: 0 g
- Carbohydrates: 34 g
- Fiber: 1 g
- Protein: 3 g
- Cholesterol: 35 mg
Michael Reyes
Founder & Lead Recipe Developer
Expertise
Education
Santa Fe Community College
Michael’s love for cooking runs deep, rooted in the bold, colorful flavors of his New Mexico upbringing.
After earning his Culinary Arts Certificate from Santa Fe Community College, he spent years sharpening his skills in kitchens that celebrated traditional Southwestern and Latin American dishes.
He believes cooking should feel approachable and fun, never complicated. When he’s not stirring up new recipe ideas, Michael’s out hiking scenic trails, chatting with farmers at local markets, or chasing the perfect sunset shot for inspiration.