The Spookiest Mummy Oreo Balls Recipe for Halloween Fun
Treat yourself to a delightful no-bake mummy oreo balls recipe that brings a spooky twist to your dessert table.
These adorable Halloween-themed treats blend creamy cream cheese with crushed oreo cookies.
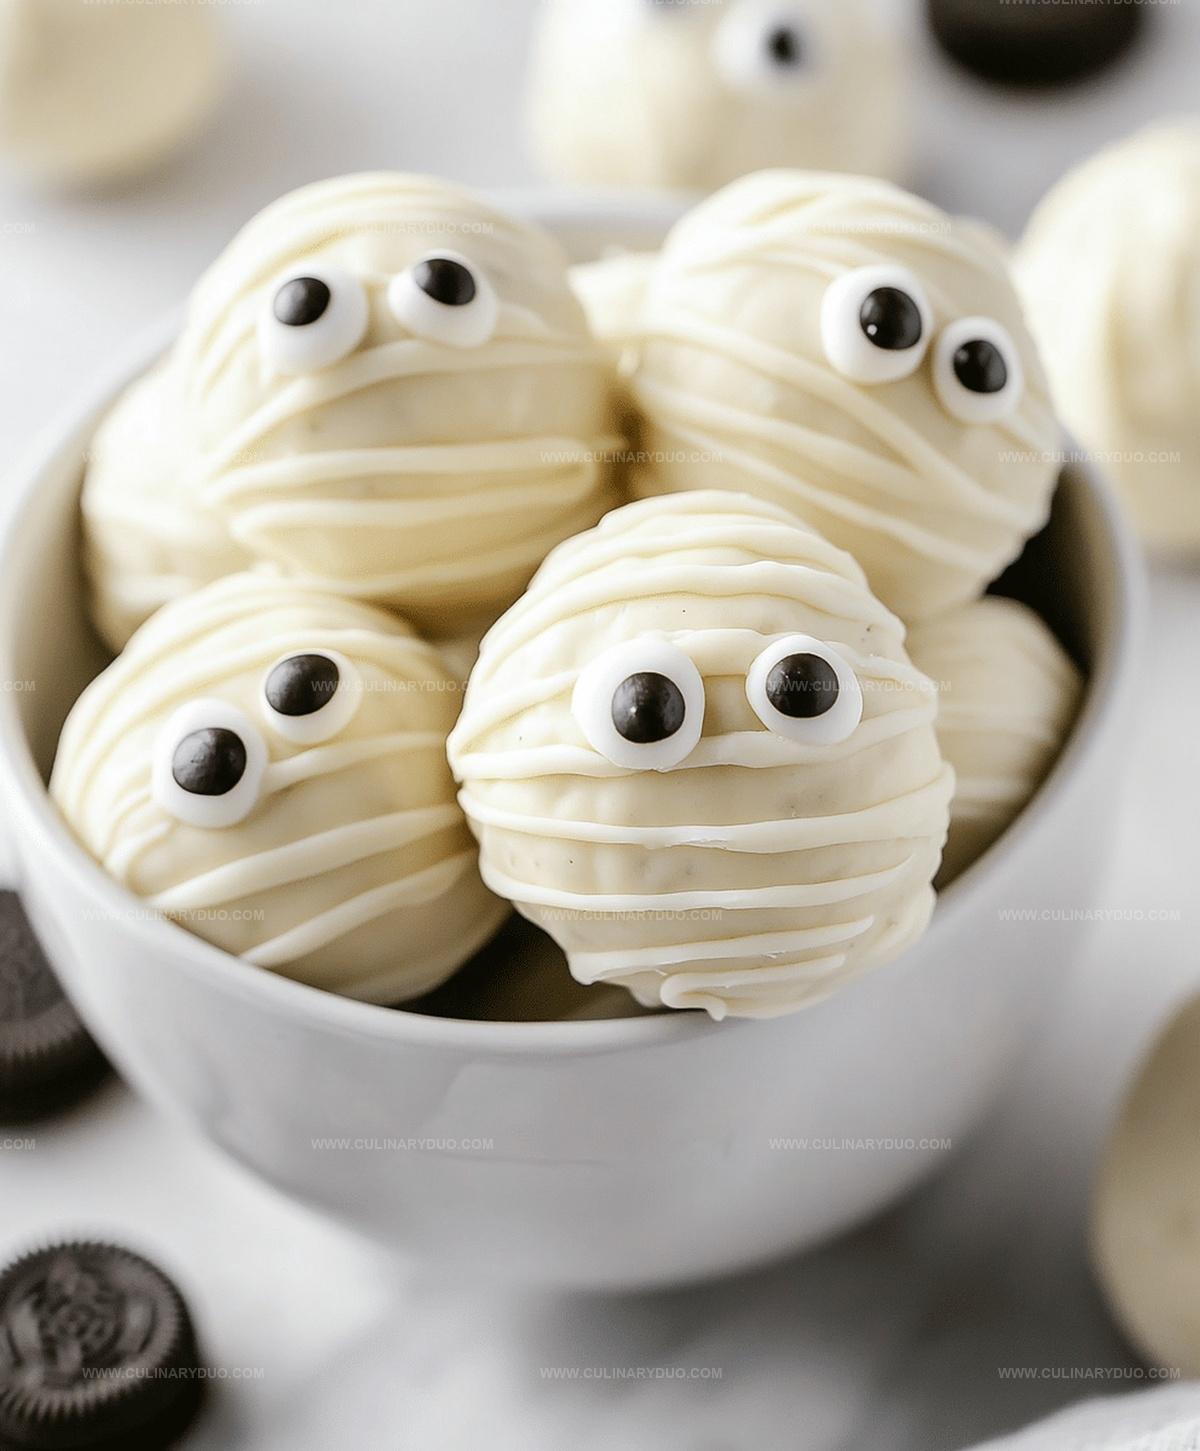
White chocolate drizzles create the perfect mummy bandage effect across each sweet bite.
Decorative candy eyes peek out from the delicate white chocolate coating, adding a playful touch to these irresistible oreo balls.
Kids and adults alike will love the combination of rich chocolate and creamy texture.
Simple ingredients and quick preparation make this recipe a go-to for festive gatherings.
Whip up these cute mummy oreo balls and watch smiles spread faster than the chocolate melts.
Oreo Balls Get Wrapped Up as Mummies!
Mummy Oreo Balls Ingredient List
Main Ingredients:Decorative Ingredients:Optional Ingredients:How to Create Mummy Oreo Balls at Home
Step 1: Crush Oreo Cookies
Use a food processor to transform Oreo cookies into fine, powdery crumbs.
Pulse until the cookies become a consistent texture that looks like soft sand.
Step 2: Blend Cookie Crumbs and Cream Cheese
In a spacious mixing bowl, combine the Oreo crumbs with softened cream cheese.
Mix thoroughly until the ingredients merge into a smooth, uniform mixture that holds together easily.
Step 3: Shape Delightful Balls
Gently roll the cookie mixture into small, bite-sized spheres.
Each ball should be roughly the size of a classic marble.
Arrange these delicate treats on a parchment-lined baking sheet.
Step 4: Chill the Balls
Place the baking sheet in the refrigerator.
Allow the Oreo balls to firm up and become solid, which takes approximately 30 minutes.
Step 5: Melt Chocolate Coating
Carefully melt white chocolate or candy melts in the microwave.
Use 30-second intervals, stirring between each session to ensure a smooth, glossy consistency.
Step 6: Dunk and Coat
Carefully submerge each Oreo ball into the melted white chocolate.
Ensure complete and even coverage, then return the coated balls to the parchment paper.
Step 7: Create Mummy Bandages
Using a spoon or piping bag, drizzle additional white chocolate over the balls.
Create crisscrossing lines that resemble mummy wrappings.
Step 8: Add Spooky Eyes
While the chocolate remains wet, gently press candy eyes onto each ball.
This gives your mummy Oreo balls a playful, haunting appearance.
Step 9: Let Chocolate Set
Allow the chocolate coating to harden completely at room temperature.
Once set, your spooky mummy Oreo balls are ready to serve and enjoy!
Tips for Cute, Creepy Halloween Treats
Oreo Ball Variations for the Season
Ways to Serve Mummy Oreo Balls
Keeping Oreo Balls Fresh
FAQs
Chill the balls thoroughly before dipping and place them on a parchment-lined baking sheet with space between each ball.
Yes, you can prepare them up to 3 days in advance and store them in the refrigerator before adding the final decoration.
Add a small amount of coconut oil or vegetable shortening to thin the chocolate and create a smoother coating.
A food processor helps crush the cookies evenly, but you can also use a zip-top bag and rolling pin to crush the Oreos.
Print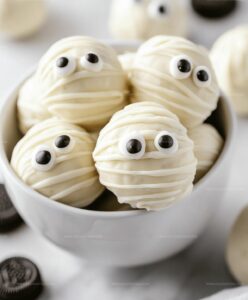
Mummy Oreo Balls Recipe
- Total Time: 50 minutes
- Yield: 24 1x
Description
Irresistible Mummy Oreo Balls bring spooky sweetness to Halloween dessert tables with creamy chocolate and playful white drizzles. Ghoulish guests will devour these adorable treats that blend classic cookie flavor with festive holiday charm.
Ingredients
Chocolate Base:
- 1 14.3 ounces (406 grams) package of Oreo cookies (regular or double-stuffed)
- 8 ounces (227 grams) cream cheese (softened)
Coating:
- 16 ounces (454 grams) white chocolate or white candy melts
Decoration:
- Candy eyeballs
- 1 teaspoon vanilla extract or almond extract (optional)
Instructions
- Pulverize Oreo cookies into ultra-fine crumbs using a food processor, ensuring a consistent texture.
- Incorporate softened cream cheese with the cookie crumbs, thoroughly blending until a uniform mixture forms.
- Shape the mixture into compact spheres approximately one inch in diameter, arranging them on a parchment-lined tray.
- Chill the formed balls in the refrigerator for 30 minutes to solidify their structure and enhance handling.
- Gently melt white chocolate or candy melts in 30-second microwave intervals, stirring between each interval to achieve a smooth, glossy consistency.
- Carefully submerge each chilled ball into the melted white chocolate, ensuring complete and even coverage.
- Return chocolate-coated balls to the parchment-lined surface, allowing excess chocolate to drip off.
- Use a piping bag or spoon to create delicate, irregular white chocolate drizzles across the surface, mimicking mummy bandages.
- While chocolate remains wet, strategically place candy eyes to give each ball a playful, character-like appearance.
- Allow the Oreo balls to rest at room temperature until the chocolate coating completely hardens and sets.
Notes
- Crush Oreos thoroughly to ensure a smooth, consistent texture without large cookie chunks.
- Chill the mixture before rolling to make ball formation easier and prevent sticking to hands.
- Use room temperature cream cheese for smoother blending and easier mixing with cookie crumbs.
- When melting white chocolate, stir frequently to prevent burning and maintain a silky consistency.
- Opt for candy melts as an alternative for easier coating and more stable final appearance.
- Create thinner chocolate drizzles by holding the spoon higher above the Oreo balls for delicate mummy wrapping effect.
- Consider using gluten-free Oreos and dairy-free cream cheese for allergy-friendly version.
- Store Oreo balls in refrigerator to maintain firmness and prevent chocolate from melting.
- For kid-friendly decorating, let children help place candy eyes for personalized mummy faces.
- Prep Time: 20 minutes
- Cook Time: 30 minutes
- Category: Snacks, Desserts
- Method: Blending
- Cuisine: American
Nutrition
- Serving Size: 24
- Calories: 171
- Sugar: 14 g
- Sodium: 95 mg
- Fat: 10 g
- Saturated Fat: 6 g
- Unsaturated Fat: 3 g
- Trans Fat: 0.1 g
- Carbohydrates: 18 g
- Fiber: 1 g
- Protein: 2 g
- Cholesterol: 15 mg
Michael Reyes
Founder & Lead Recipe Developer
Expertise
Education
Santa Fe Community College
Michael’s love for cooking runs deep, rooted in the bold, colorful flavors of his New Mexico upbringing.
After earning his Culinary Arts Certificate from Santa Fe Community College, he spent years sharpening his skills in kitchens that celebrated traditional Southwestern and Latin American dishes.
He believes cooking should feel approachable and fun, never complicated. When he’s not stirring up new recipe ideas, Michael’s out hiking scenic trails, chatting with farmers at local markets, or chasing the perfect sunset shot for inspiration.