
Dreamy No-Bake Cheesecake Jars Recipe for Sweet Moments
Creamy, dreamy no-bake cheesecake jars dance with delightful layers of pure indulgence.
These decadent dessert miracles combine smooth cream cheese and graham cracker bliss in a simple recipe that screams summer comfort.
Elegant yet effortless, these portable treats will become your new favorite sweet obsession.
Small glass jars transform an ordinary dessert into a stunning presentation that impresses without complicated techniques.
Each spoonful delivers rich, velvety textures that melt perfectly on your tongue.
Chilled and ready in minutes, these individual cheesecake jars offer a stress-free dessert solution for any occasion.
No-Bake Cheesecake Jars, Dessert on Demand
Cheesecake Jar Ingredient Checklist
Base:Filling:Topping:Layering Instructions for Cheesecake Jars
Step 1: Create Crumbly Crust Base
Grab a mixing bowl and combine the following ingredients:Use a spoon or spatula to mix until the ingredients stick together.
Carefully press the mixture into the bottom of each glass jar, creating a solid foundation for your cheesecake.
Make sure the crust is evenly distributed and firmly packed.
Step 2: Whip Up Creamy Filling
Grab a large mixing bowl and blend:Use an electric mixer or whisk to beat these ingredients until they transform into a silky, smooth mixture with no lumps.
The texture should be light and creamy.
Step 3: Fold in Fluffy Whipped Cream
Take freshly whipped cream and gently fold it into the cream cheese mixture.
Use a spatula and mix with a light touch to preserve the airiness of the whipped cream.
The goal is to create a dreamy, cloud-like filling.
Step 4: Layer the Cheesecake
Carefully spoon the creamy filling over the graham cracker crust in each jar.
Use a spoon or piping bag to ensure a neat and even distribution.
Fill the jars almost to the top, leaving a little space.
Step 5: Chill and Set
Place the jars in the refrigerator for at least two hours.
This allows the cheesecake to firm up and develop a perfect, smooth texture.
The cooling process helps the flavors meld together.
Step 6: Garnish and Serve
Once chilled, add your favorite toppings like fresh berries, fruit compote, chocolate shavings, or a drizzle of caramel.
Serve directly from the jars for a cute and individual dessert experience.
Tips for Silky, No-Bake Cheesecake Filling
Ways to Switch Up Cheesecake Jar Flavors
How to Present Cheesecake Jars
Storage Tips for Jarred Desserts
FAQs
Yes, you can substitute graham crackers with digestive biscuits, shortbread cookies, or even vanilla wafers for a different flavor profile.
Make sure the cream cheese is completely softened at room temperature and beat it thoroughly before adding other ingredients. Use an electric mixer and mix on medium speed until smooth.
Absolutely! These no-bake cheesecake jars can be prepared up to 3 days in advance and stored in the refrigerator, making them perfect for meal prep or entertaining.
Print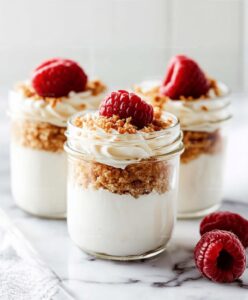
No-Bake Cheesecake Jars Recipe
- Total Time: 2 hours 20 minutes
- Yield: 6 1x
Description
Silky smooth no-bake cheesecake jars bring creamy indulgence straight to your spoon. Layered with graham cracker crumbs and luscious cream cheese filling, these portable desserts deliver pure delight in each delectable bite.
Ingredients
Cheesecake Ingredients:
Main Ingredients:
- 16 ounces (454 grams) cream cheese, softened
- 1 cup heavy cream
- 1 1/2 cups graham cracker crumbs
- 1/2 cup unsalted butter, melted
Sweeteners:
- 1 cup powdered sugar
- 1/4 cup granulated sugar
Flavor Enhancers and Toppings:
- 1 teaspoon vanilla extract
- Zest of 1 lemon (optional)
- Fresh berries (strawberries, blueberries, raspberries)
- Chocolate shavings or chips
- Caramel or chocolate sauce
- Crushed cookies or nuts
Instructions
- Crush graham crackers into fine crumbs and combine with melted butter and sugar, creating a cohesive base mixture.
- Firmly press the cracker mixture into the bottom of each glass jar, creating a compact and even foundation for the dessert.
- In a separate mixing bowl, whip cream cheese until smooth and velvety, gradually incorporating powdered sugar and vanilla extract.
- Gently fold whipped cream into the cream cheese mixture, creating a light and airy filling with a silky texture.
- Carefully distribute the cheesecake filling over the graham cracker base, using a spoon to ensure even coverage in each jar.
- Refrigerate the assembled desserts for a minimum of 2 hours, allowing the filling to set and develop a rich, creamy consistency.
- Before serving, garnish with fresh seasonal berries, fruit compote, or a drizzle of fruit sauce to enhance flavor and visual appeal.
Notes
- Press graham cracker mixture firmly and evenly to create a compact, stable base that won’t crumble when serving.
- Ensure cream cheese is completely softened at room temperature to achieve a silky, lump-free filling that blends smoothly.
- Fold whipped cream gently into cream cheese mixture to maintain its airy texture and prevent deflating the volume.
- Swap graham crackers with gluten-free alternatives or use crushed nuts for a low-carb version, and use dairy-free cream cheese for vegan guests.
- Prep Time: 20 minutes
- Cook Time: 2 hours
- Category: Desserts
- Method: Chilling
- Cuisine: American
Nutrition
- Serving Size: 6
- Calories: 433 kcal
- Sugar: 28 g
- Sodium: 189 mg
- Fat: 35 g
- Saturated Fat: 21 g
- Unsaturated Fat: 13 g
- Trans Fat: 0.5 g
- Carbohydrates: 27 g
- Fiber: 1 g
- Protein: 6 g
- Cholesterol: 110 mg
Michael Reyes
Founder & Lead Recipe Developer
Expertise
Education
Santa Fe Community College
Michael’s love for cooking runs deep, rooted in the bold, colorful flavors of his New Mexico upbringing.
After earning his Culinary Arts Certificate from Santa Fe Community College, he spent years sharpening his skills in kitchens that celebrated traditional Southwestern and Latin American dishes.
He believes cooking should feel approachable and fun, never complicated. When he’s not stirring up new recipe ideas, Michael’s out hiking scenic trails, chatting with farmers at local markets, or chasing the perfect sunset shot for inspiration.