
The Creamiest No-bake Peanut Butter Buckeye Bars Recipe Ever
Chocolate and peanut butter dance together in these irresistible no-bake peanut butter buckeye bars that melt in your mouth.
Sweet layers of creamy goodness create a dessert that’s pure bliss.
Rich peanut butter forms the perfect base for these decadent treats.
Each bite combines smooth chocolate with silky peanut butter that creates an unbeatable combination.
The recipe comes together quickly without any baking required, making these bars a stress-free dessert.
Chilled and sliced into perfect squares, these buckeye bars will become your new favorite indulgence.
Treat yourself to a little slice of heaven that’s sure to impress.
Peanut Butter Buckeye Bars for Every Occasion
Ingredients for No-Bake Buckeye Bars
Base Ingredients:Chocolate Topping:Optional Garnish:Buckeye Bar Instructions, Step by Step
Step 1: Whip Up the Creamy Peanut Butter Base
Grab a spacious mixing bowl and combine the smooth peanut butter, melted butter, powdered sugar, and crushed graham crackers.
Mix everything thoroughly until the ingredients blend into a consistent, velvety mixture that holds together perfectly.
Step 2: Create the Perfect Peanut Butter Layer
Transfer the mixture into a parchment paper-lined 8×8-inch pan.
Use your hands or a spatula to press the mixture evenly across the bottom, creating a smooth and compact base that will serve as the foundation for your delicious treat.
Step 3: Craft the Luxurious Chocolate Topping
In a microwave-safe bowl, melt the chocolate chips together with additional peanut butter.
Stir the mixture carefully and consistently until it transforms into a silky, glossy chocolate sauce with no lumps.
Step 4: Drizzle and Spread the Chocolate Layer
Gently pour the melted chocolate over the peanut butter base.
Use a spatula to spread the chocolate evenly, ensuring complete coverage of the bottom layer and creating a beautiful, uniform surface.
Step 5: Chill and Set the Buckeye Bars
Place the pan in the refrigerator and let the bars set for a minimum of 2 hours.
The cooling process will help the layers firm up and create a delectable, slice-able dessert.
Step 6: Slice and Serve the Decadent Treats
Once fully chilled and firm, remove the bars from the refrigerator.
Lift the parchment paper to easily remove the entire dessert, then slice into perfect squares and serve immediately.
Pro Tips for Creamy Buckeye Bars
Buckeye Bar Variations to Try Next
Serving Buckeye Bars at Any Gathering
Easy Storage for Buckeye Bars
FAQs
The key ingredients are peanut butter, melted butter, powdered sugar, graham cracker crumbs, and chocolate chips.
No, these bars are incredibly easy and require no baking. You simply mix ingredients, layer them, and refrigerate.
Yes, you can substitute peanut butter with almond butter or cashew butter for a different flavor profile.
When stored in an airtight container in the refrigerator, these bars will stay fresh for up to one week.
Print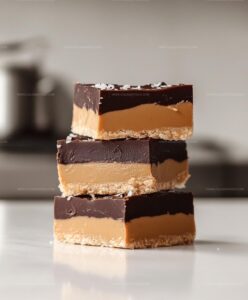
No-bake Peanut Butter Buckeye Bars Recipe
- Total Time: 2 hours 15 minutes
- Yield: 12 1x
Description
Sweet chocolate and creamy peanut butter combine in classic Buckeye bars, creating a heavenly no-bake dessert that whispers Ohio’s culinary charm. Chocolate-drizzled and silky smooth, these bars deliver pure indulgence with minimal effort, promising delightful satisfaction in every single bite.
Ingredients
Main Ingredients:
- 2 cups chocolate chips
- 1 cup creamy peanut butter
- 1 1/2 cups graham cracker crumbs
Binding Ingredients:
- 1/2 cup unsalted butter, melted
- 2 cups powdered sugar
Topping Ingredients:
- 1/4 cup peanut butter (for chocolate layer)
Instructions
- Combine peanut butter, melted butter, powdered sugar, and graham cracker crumbs in a mixing bowl, stirring until the mixture forms a cohesive, smooth texture.
- Transfer the mixture into a parchment-lined 8×8-inch pan, using a spatula or your hands to create an even, compact layer across the bottom of the pan.
- Prepare the chocolate topping by microwaving chocolate chips with additional peanut butter in 30-second intervals, stirring between each interval until the mixture becomes completely smooth and glossy.
- Carefully pour the melted chocolate over the peanut butter base, using a spatula to spread it evenly and create a uniform chocolate layer that covers the entire surface.
- Place the pan in the refrigerator for approximately 2 hours, allowing the bars to set and firm up completely.
- Once chilled and solid, remove the bars from the refrigerator and lift the parchment paper to transfer to a cutting board.
- Using a sharp knife, slice the chilled dessert into square or rectangular pieces, creating clean, precise cuts.
- Serve the buckeye bars chilled and enjoy the rich, creamy combination of peanut butter and chocolate.
Notes
- Customize the sweetness by adjusting powdered sugar to taste, making the bars less or more sweet depending on preference.
- Use gluten-free graham crackers to transform this dessert into a celiac-friendly treat without compromising texture or flavor.
- Sprinkle crushed peanuts or sea salt on top of chocolate layer for added crunch and enhanced flavor complexity.
- Wrap individual bars in wax paper for easy portable snacks or party-friendly dessert option that travels well.
- Prep Time: 15 minutes
- Cook Time: 2 hours
- Category: Snacks, Desserts
- Method: Blending
- Cuisine: American
Nutrition
- Serving Size: 12
- Calories: 283
- Sugar: 19 g
- Sodium: 93 mg
- Fat: 20 g
- Saturated Fat: 6 g
- Unsaturated Fat: 13 g
- Trans Fat: 0 g
- Carbohydrates: 22 g
- Fiber: 2 g
- Protein: 7 g
- Cholesterol: 15 mg
Michael Reyes
Founder & Lead Recipe Developer
Expertise
Education
Santa Fe Community College
Michael’s love for cooking runs deep, rooted in the bold, colorful flavors of his New Mexico upbringing.
After earning his Culinary Arts Certificate from Santa Fe Community College, he spent years sharpening his skills in kitchens that celebrated traditional Southwestern and Latin American dishes.
He believes cooking should feel approachable and fun, never complicated. When he’s not stirring up new recipe ideas, Michael’s out hiking scenic trails, chatting with farmers at local markets, or chasing the perfect sunset shot for inspiration.