
Grandma’s Cozy Old School Banana Pudding Cake Recipe
Southern kitchens buzz with excitement over this classic banana pudding cake that weaves nostalgic memories into every delectable bite.
Grandmothers whispered sweet secrets about layering creamy textures and rich flavors across generations.
Soft vanilla cake mingles with ripe bananas, creating a dessert that feels like a warm embrace.
Creamy pudding swirls between tender cake layers, promising indulgence with each forkful.
Vanilla wafers add delightful crunch, breaking through smooth custard landscapes.
Comfort settles into every slice, connecting you with cherished family traditions.
Wake up your taste buds and dive into this irresistible Southern classic that promises pure, blissful delight.
Banana Pudding Cake Throwback
Pudding Cake Ingredients
Cake Base:Pudding Layer:Toppings and Garnish:Baking Banana Pudding Cake
Step 1: Warm Up the Oven
Prepare your oven by heating it to 350°F.
Generously coat a 9×13-inch baking dish with grease and flour to ensure easy cake removal.
Step 2: Create Cake Batter
Grab a large mixing bowl and combine cake mix, water, vegetable oil, eggs, and vanilla extract.
Whisk everything together until the mixture becomes smooth and free of lumps.
Step 3: Bake the Cake Base
Transfer the batter into the prepared baking dish.
Slide it into the preheated oven and bake for 25-30 minutes.
Check doneness by inserting a toothpick – it should come out clean.
Allow the cake to cool completely at room temperature.
Step 4: Whip Up Banana Pudding
In a medium bowl, blend cold milk with instant banana pudding mix.
Whisk vigorously for about 2 minutes until the mixture thickens.
Gently fold in whipped cream until fully incorporated.
Step 5: Transform the Cake
Use a fork to create numerous holes across the cooled cake surface.
Carefully spread the banana pudding mixture evenly over the entire cake.
Layer with fresh banana slices and sprinkle crushed vanilla wafers generously.
Step 6: Create Fluffy Topping
In a separate bowl, combine:Whip these ingredients until stiff peaks form.
Spread the creamy topping over the banana pudding layer.
Step 7: Chill and Serve
Refrigerate the cake for at least 2 hours to allow flavors to meld.
Before serving, garnish with additional banana slices and a sprinkle of crushed vanilla wafers for extra crunch.
Tips For Vintage Pudding Cake
Ways To Switch Up Banana Cake
Serving Banana Pudding Cake
Storing Pudding Cake
FAQs
This cake combines the classic flavors of banana pudding with a traditional cake, creating a nostalgic and creamy dessert that’s both comforting and indulgent.
Yes, you can experiment with other pudding flavors like vanilla or cheesecake to create a unique twist on the original recipe.
Absolutely! The cake is easy to transport, serves multiple people, and has a crowd-pleasing combination of flavors that everyone loves.
Not at all. This recipe is beginner-friendly and requires basic mixing and assembly skills, making it perfect for home bakers of all levels.
Print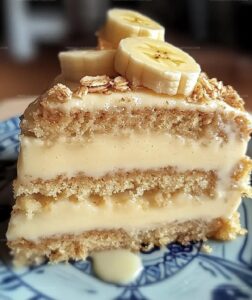
Old School Banana Pudding Cake Recipe
- Total Time: 1 hour
- Yield: 12 1x
Description
Southern comfort meets dessert magic in this classic banana pudding cake that weaves nostalgic flavors into every delightful slice. Creamy layers and sweet banana essence promise a delectable journey through Southern baking traditions you’ll savor to the last crumb.
Ingredients
Main Ingredients:
- 1 box yellow cake mix
- 3 large eggs
- 2–3 ripe bananas (sliced)
- 1 package (3.4 ounces/96 grams) instant banana pudding mix
- 2 cups cold milk
Liquid and Binding Ingredients:
- 1 cup water
- 1/2 cup vegetable oil
- 1 teaspoon vanilla extract
- 1 cup whipped cream or whipped topping
Topping and Garnish Ingredients:
- 1 cup heavy whipping cream
- 2 tablespoons powdered sugar
- 1 teaspoon vanilla extract
- Additional banana slices (for garnish)
- Crushed vanilla wafers (for garnish)
Instructions
- Prepare a 9×13-inch baking dish by greasing and dusting with flour. Set oven temperature to 350F (175C).
- Create cake batter by mixing cake mix, water, vegetable oil, eggs, and vanilla extract until achieving a smooth consistency.
- Transfer batter into prepared baking dish and bake for 25-30 minutes, ensuring a clean toothpick test indicates complete cooking. Allow cake to cool entirely.
- Craft pudding mixture by whisking cold milk with instant banana pudding mix for approximately 2 minutes until thickening occurs. Gently incorporate whipped cream for a uniform texture.
- Use a fork to create multiple holes across the cooled cake surface. Distribute banana pudding evenly over entire cake. Layer sliced bananas and sprinkle crushed vanilla wafers atop pudding.
- Prepare whipped cream by combining heavy cream, powdered sugar, and vanilla extract, whipping until stiff peaks form. Carefully spread whipped cream over banana pudding layer.
- Refrigerate cake for minimum 2 hours to set. Before serving, garnish with additional banana slices and extra crushed vanilla wafers for enhanced visual appeal and texture.
Notes
- Adapt the cake mix for gluten-free diets by using a gluten-free cake mix and ensuring all other ingredients are certified gluten-free.
- Prevent banana browning by tossing sliced bananas in a little lemon juice before adding to the cake, which helps maintain their fresh appearance.
- Create a lighter version by using sugar-free pudding mix and replacing heavy cream with Greek yogurt for reduced calories.
- Enhance flavor complexity by adding a sprinkle of cinnamon or nutmeg to the pudding layer, which complements the banana’s natural sweetness.
- Prep Time: 30 minutes
- Cook Time: 30 minutes
- Category: Desserts, Snacks
- Method: Baking
- Cuisine: American
Nutrition
- Serving Size: 12
- Calories: 380 kcal
- Sugar: 28 g
- Sodium: 320 mg
- Fat: 22 g
- Saturated Fat: 9 g
- Unsaturated Fat: 12 g
- Trans Fat: 0.2 g
- Carbohydrates: 40 g
- Fiber: 1.5 g
- Protein: 4 g
- Cholesterol: 70 mg
Michael Reyes
Founder & Lead Recipe Developer
Expertise
Education
Santa Fe Community College
Michael’s love for cooking runs deep, rooted in the bold, colorful flavors of his New Mexico upbringing.
After earning his Culinary Arts Certificate from Santa Fe Community College, he spent years sharpening his skills in kitchens that celebrated traditional Southwestern and Latin American dishes.
He believes cooking should feel approachable and fun, never complicated. When he’s not stirring up new recipe ideas, Michael’s out hiking scenic trails, chatting with farmers at local markets, or chasing the perfect sunset shot for inspiration.