
Irresistible Oreo Cherry Chocolate Chip No Bake Cheesecake Recipe
Creamy Oreo cherry chocolate chip no bake cheesecake promises a delightful twist on classic dessert traditions.
Layers of rich flavors dance together in this cool and refreshing treat.
Cookies crumble perfectly beneath silky smooth filling, creating an irresistible texture.
Each spoonful brings a symphony of chocolate, cherry, and cream cheese that melts on your tongue.
Minimal kitchen effort yields maximum enjoyment with this simple yet impressive dessert.
Weekend celebrations or spontaneous sweet cravings find their perfect match in this decadent no-bake wonder.
Grab a fork and prepare to be amazed by this indulgent masterpiece.
Why You’ll Love Oreo Cherry Cheesecake
Oreo Cherry Cheesecake Ingredients
Crust:Filling Ingredients:Garnish:No-Bake Cheesecake Steps
Step 1: Create Crumbly Crust
Grab your food processor and transform those Oreo cookies into fine crumbs.
Drizzle in melted butter and sprinkle sugar, then mix until the mixture looks like damp sand.
Press this delightful base into your springform pan, covering the bottom and climbing slightly up the sides.
Pop it in the refrigerator to firm up for a cool 30 minutes.
Step 2: Whip Creamy Cheese Blend
Grab a large mixing bowl and combine softened cream cheese with granulated sugar.
Beat these ingredients until they become silky smooth and look like a dreamy cloud of deliciousness.
Step 3: Melt Cherry Gelatin
Pour boiling water over the cherry gelatin and stir enthusiastically until every crystal dissolves completely.
Allow the mixture to cool down and rest for a few moments.
Step 4: Chop Cherry Chunks
Take those thawed cherries and slice them into delectable little pieces.
Set them aside for their grand entrance later.
Step 5: Whisk Fluffy Cream
In a separate bowl, transform heavy cream and powdered sugar into a cloud-like mixture with stiff, beautiful peaks.
Step 6: Blend Gelatin Cream
Once the gelatin has cooled and slightly thickened, gently fold it into the whipped cream.
Mix until they become best friends and create a harmonious blend.
Step 7: Combine Creamy Ingredients
Carefully fold the cream cheese mixture into the gelatin-cream blend until everything looks perfectly smooth.
Tenderly introduce the diced cherries and chocolate chips, letting them mingle throughout.
Step 8: Build Dreamy Dessert
Pour the luscious filling into your prepared crust, spreading it evenly like a delicate blanket.
Decorate the top with whole cherries, and if you’re feeling extra fancy, sprinkle some crushed Oreos or additional chocolate chips.
Step 9: Chill and Delight
Slide your masterpiece into the refrigerator and let it rest for at least 4 hours.
When it’s completely set, slice and savor every single bite of this incredible no-bake cheesecake!
Pro Tips For Cheesecake Success
Tasty Variations For Oreo Cheesecake
Serving Up Oreo Cherry Cheesecake
Storing Cherry Cheesecake Right
FAQs
Yes, you can use thawed frozen cherries. Just make sure to drain excess liquid before dicing and adding to the cheesecake mixture.
A springform pan is recommended for easy removal, but you can use a regular cake pan lined with parchment paper if needed.
The cheesecake can be refrigerated for up to 5 days when covered properly with plastic wrap or in an airtight container.
Substitute regular Oreo cookies with gluten-free Oreo-style cookies to make the recipe gluten-free.
Print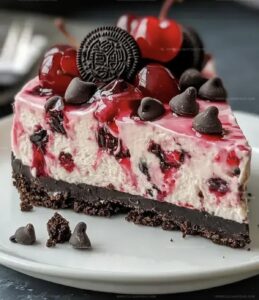
Oreo Cherry Chocolate Chip No Bake Cheesecake Recipe
- Total Time: 4 hours 45 minutes
- Yield: 12 1x
Description
Indulgent Oreo cherry chocolate chip no bake cheesecake combines creamy richness with irresistible cookie crunch. Sweet summer memories melt together in this effortless dessert that brings pure deliciousness to your table.
Ingredients
Ingredients
Main Ingredients:
- 16 ounces (454 grams) cream cheese, softened
- 16 ounces (454 grams) heavy cream
- 2 cups semisweet chocolate chips
- 12 ounces (340 grams) frozen cherries, thawed
Crust Ingredients:
- 22 Oreo cookies
- 3 tablespoons melted butter
- 1 tablespoon sugar
Sweeteners and Flavor Enhancers:
- 1 cup granulated sugar
- 1/4 cup powdered sugar
- 1 large box (6 ounces/170 grams) cherry gelatin
Instructions
- Crush Oreo cookies into fine crumbs using a food processor, ensuring a uniform texture that will create a sturdy base for the cheesecake.
- Blend melted butter and sugar into the cookie crumbs, creating a cohesive mixture that will firmly bind the crust together.
- Press the crumb mixture into a springform pan, covering the bottom and sides with an even layer. Compact the crust firmly to prevent crumbling.
- Chill the crust in the refrigerator for 30 minutes to allow it to set and become firm.
- In a large mixing bowl, whip cream cheese and sugar until the mixture becomes silky smooth and free of lumps.
- Dissolve cherry gelatin in boiling water, stirring until completely integrated and no granules remain.
- Allow the gelatin mixture to cool slightly, reaching a lukewarm temperature before further processing.
- Chop half of the thawed cherries into small, uniform pieces for even distribution throughout the cheesecake.
- Whip heavy cream and powdered sugar until stiff, glossy peaks form, creating a light and airy texture.
- Gently fold the cooled gelatin into the whipped cream, ensuring a consistent and smooth incorporation.
- Integrate the cream cheese mixture into the gelatin-cream blend, stirring carefully to maintain the mixture’s airiness.
- Fold in diced cherries and chocolate chips, distributing them evenly throughout the filling.
- Transfer the filling into the chilled crust, smoothing the top with a spatula for an even surface.
- Decorate the cheesecake with whole cherries and optional crushed Oreos or additional chocolate chips.
- Refrigerate for 4 hours at 40°F until the cheesecake is completely set and firm.
Notes
- Use a food processor for consistently fine cookie crumbs, ensuring a smooth and compact crust that holds together beautifully.
- Dissolve gelatin carefully to prevent lumps, letting it cool slightly before mixing to maintain the right texture and prevent separation.
- Soften cream cheese at room temperature for 30-60 minutes to achieve a silky smooth consistency without lumps.
- Substitute dairy-free cream cheese and whipped coconut cream for a vegan version, using plant-based gelatin alternative to accommodate different dietary needs.
- Prep Time: 45 minutes
- Cook Time: 4 hours
- Category: Desserts
- Method: Chilling
- Cuisine: American
Nutrition
- Serving Size: 12
- Calories: 433
- Sugar: 39 g
- Sodium: 150 mg
- Fat: 29 g
- Saturated Fat: 17 g
- Unsaturated Fat: 11 g
- Trans Fat: 0.5 g
- Carbohydrates: 41 g
- Fiber: 2 g
- Protein: 4 g
- Cholesterol: 85 mg
Michael Reyes
Founder & Lead Recipe Developer
Expertise
Education
Santa Fe Community College
Michael’s love for cooking runs deep, rooted in the bold, colorful flavors of his New Mexico upbringing.
After earning his Culinary Arts Certificate from Santa Fe Community College, he spent years sharpening his skills in kitchens that celebrated traditional Southwestern and Latin American dishes.
He believes cooking should feel approachable and fun, never complicated. When he’s not stirring up new recipe ideas, Michael’s out hiking scenic trails, chatting with farmers at local markets, or chasing the perfect sunset shot for inspiration.