
Quick & Colorful Rainbow Drip Cake Recipe For Sweet Celebrations
Crafting a mesmerizing rainbow drip cake can turn an ordinary dessert into a vibrant celebration of color and sweetness.
Layers of pastel-hued sponge create a dreamy canvas that sparks joy and wonder.
Cascading white chocolate ganache adds elegant drama to each magnificent tier.
Precision matters when building these spectacular confections, so patience becomes your secret ingredient.
Mixing food coloring with careful technique brings each layer to brilliant life.
Decorating requires steady hands and a playful spirit that transforms simple ingredients into edible art.
You’ll find this magical creation perfect for birthdays, parties, or moments that deserve extraordinary delight.
Rainbow Drip Cake Fun Factor
Rainbow Cake Ingredient Essentials
Cake Base Ingredients:Coloring Ingredients:Frosting and Decoration Ingredients:Making A Magical Drip Cake
Step 1: Preheat Oven
Warm up the oven to 350F (180C).
Grab three 8-inch round cake pans and generously grease them, then line the bottom with parchment paper for easy cake removal.
Step 2: Whip Butter And Sugar
In a spacious mixing bowl, beat the butter and sugar until they transform into a fluffy, cloud-like mixture that looks light and airy.
Step 3: Incorporate Eggs
Gently add eggs one by one, mixing thoroughly after each addition to create a smooth, well-blended batter.
Step 4: Prepare Dry Mixture
In a separate bowl, sift together the flour and baking powder, ensuring no lumps remain for a perfectly smooth cake texture.
Step 5: Combine Wet And Dry Ingredients
Slowly fold the dry ingredients into the butter mixture, alternating with milk.
Start and end with dry ingredients.
Stir in the vanilla extract for an extra flavor boost.
Step 6: Create Colorful Layers
Divide the batter evenly into three separate bowls.
Add vibrant gel food colors to each bowl:Mix each bowl until the color is completely uniform.
Step 7: Bake Colorful Layers
Pour each colored batter into the prepared pans.
Slide into the preheated oven and bake for 25-30 minutes.
Check doneness by inserting a toothpick – it should come out clean.
Allow cakes to cool completely on a wire rack.
Step 8: Stack Cake Layers
Place the first cake layer on a serving plate.
Spread a generous layer of buttercream frosting between each colorful cake layer.
Step 9: Apply Crumb Coat
Spread a thin layer of buttercream over the entire cake to lock in crumbs.
Refrigerate for 30 minutes to set the initial frosting layer.
Step 10: Smooth Final Frosting
Remove the cake from the refrigerator and apply a smooth, even layer of buttercream frosting.
Step 11: Create Chocolate Drip
Prepare white chocolate drip with food coloring.
Carefully pour the tinted chocolate over the cake’s edges, allowing it to cascade dramatically down the sides.
Step 12: Final Decorative Touches
Pipe beautiful buttercream swirls on top of the cake.
Sprinkle colorful decorative sprinkles for a festive, eye-catching finish.
Drip Cake Pro Tips
Rainbow Cake Twist Ideas
Serve Your Rainbow Drip Cake With Flair
Store Rainbow Cake For Later
FAQs
Grease the pans thoroughly with butter or cooking spray, then line the bottom with parchment paper. This ensures easy cake removal and prevents breaking.
No, liquid food coloring can alter the cake batter’s consistency and won’t create vibrant colors. Gel food coloring provides intense, bright colors without affecting the cake’s texture.
Use a bench scraper or offset spatula and rotate the cake while holding the tool at a 45-degree angle. Chill the cake between frosting layers to help create a smooth, professional finish.
Print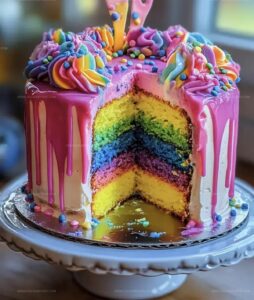
Rainbow Drip Cake Magic Recipe
- Total Time: 1 hour 15 minutes
- Yield: 12 1x
Description
Delightful Rainbow Drip Cake celebrates color and sweetness with whimsical layers of vibrant frosting and playful chocolate drips. Guests will adore this eye-catching dessert that promises pure joy and delicious creativity.
Ingredients
Cake Ingredients:
- 2 cups sugar
- 1 cup unsalted butter, softened
- 4 large eggs
- 3 cups all-purpose flour
- 2 1/2 teaspoons baking powder
- 1 cup whole milk
Flavoring and Coloring:
- 1 teaspoon vanilla extract
- Gel food coloring (pink, blue, yellow)
Decoration:
- Buttercream frosting
- Sprinkles
- White chocolate drip, tinted with gel food coloring
Instructions
- Prepare the oven to 350F (180C) and prepare three 8-inch round cake pans by greasing and lining them with parchment paper.
- Using an electric mixer, blend butter and sugar until the mixture becomes pale and fluffy, creating a smooth base for the cake.
- Incorporate eggs individually into the butter-sugar mixture, ensuring each is fully integrated before adding the next.
- In a separate bowl, sift together flour and baking powder to eliminate any potential lumps and ensure even distribution.
- Gradually fold the dry ingredients into the butter mixture, alternating with milk in three stages, starting and ending with dry ingredients. Gently mix in vanilla extract for enhanced flavor.
- Separate the batter equally into three bowls, then infuse each with distinct gel food coloring: vibrant pink, electric blue, and sunny yellow.
- Transfer each colored batter into the prepared pans, spreading evenly. Bake for 25-30 minutes until a toothpick emerges clean when inserted into the center. Allow cakes to cool completely on a wire rack.
- Create a stable cake structure by layering the cooled cakes, spreading buttercream frosting between each colorful tier.
- Apply a thin crumb coat of buttercream to seal in cake crumbs, then refrigerate for 30 minutes to set the initial frosting layer.
- Once chilled, generously cover the entire cake with a smooth, even layer of buttercream frosting.
- Prepare tinted white chocolate drip and carefully pour it around the cake’s top edges, allowing it to cascade dramatically down the sides.
- Embellish the cake’s surface with elegant buttercream swirls and finish by scattering colorful sprinkles for a playful, festive touch.
Notes
- Measure ingredients precisely for consistent color and texture throughout the cake layers.
- Use gel food coloring for vibrant, concentrated colors that won’t water down the batter.
- Cool cakes completely before frosting to prevent buttercream from melting and sliding off.
- Chill the crumb coat helps create a smooth, professional-looking final frosting layer.
- Prep Time: 45 minutes
- Cook Time: 30 minutes
- Category: Desserts
- Method: Baking
- Cuisine: American
Nutrition
- Serving Size: 12
- Calories: 392 kcal
- Sugar: 34 g
- Sodium: 180 mg
- Fat: 22 g
- Saturated Fat: 13 g
- Unsaturated Fat: 8 g
- Trans Fat: 0.5 g
- Carbohydrates: 46 g
- Fiber: 1 g
- Protein: 5 g
- Cholesterol: 90 mg
Michael Reyes
Founder & Lead Recipe Developer
Expertise
Education
Santa Fe Community College
Michael’s love for cooking runs deep, rooted in the bold, colorful flavors of his New Mexico upbringing.
After earning his Culinary Arts Certificate from Santa Fe Community College, he spent years sharpening his skills in kitchens that celebrated traditional Southwestern and Latin American dishes.
He believes cooking should feel approachable and fun, never complicated. When he’s not stirring up new recipe ideas, Michael’s out hiking scenic trails, chatting with farmers at local markets, or chasing the perfect sunset shot for inspiration.