
Dreamy Red Velvet Oreo Cheesecake Recipe That Wows Every Time
Creamy red velvet Oreo cheesecake blends two beloved desserts into an irresistible treat that promises pure indulgence.
Chocolate cookie crumbs create a delectable foundation for this luxurious dessert.
Smooth cream cheese melts perfectly with vibrant red cake notes, delivering a stunning visual and flavor experience.
Rich layers intertwine classic comfort with modern culinary creativity.
Each bite promises a decadent journey through contrasting textures and sweet sensations.
Dark Oreo cookies provide unexpected crunch against silky cream cheese filling.
You’ll fall in love with this inventive dessert that breaks traditional cheesecake boundaries.
Dive into this recipe and create a showstopping masterpiece that will leave everyone craving more.
Red Velvet Oreo Cheesecake: Star Qualities
Red Velvet Oreo Cheesecake Must-Haves
Crust Base:Cheesecake Filling:Topping and Decoration:Let’s Make Red Velvet Oreo Cheesecake
Step 1: Prepare Baking Pan
Grease a 9-inch springform pan thoroughly.
Preheat the oven to 325°F (163°C) to ensure it’s perfectly heated for baking.
Step 2: Create Oreo Crust
Crush Oreo cookies into fine crumbs.
Mix the cookie crumbs with melted butter:Press the mixture firmly into the bottom of the prepared pan.
Bake the crust for 10 minutes, then remove and let it cool completely.
Step 3: Whip Cheesecake Filling
Blend cream cheese until ultra-smooth and creamy.
Gradually incorporate:Mix until the ingredients are fully combined and create a silky texture.
Step 4: Enhance Cheesecake Color And Texture
Add eggs one at a time, mixing thoroughly after each addition.
Stir in cocoa powder and red food coloring to create the signature red velvet look.
Gently fold in crushed Oreo pieces for extra crunch.
Step 5: Bake The Cheesecake
Pour the vibrant red batter into the cooled crust.
Bake for 60-70 minutes until the center is almost set.
Turn off the oven, crack the door open slightly, and let the cheesecake cool inside for one hour.
Refrigerate for at least 4 hours or overnight.
Step 6: Create Chocolate Drizzle
Melt chocolate chips with heavy cream in the microwave.
Stir until the mixture becomes smooth and glossy.
Drizzle the chocolate sauce over the chilled cheesecake.
Step 7: Add Final Decorative Touches
Garnish the cheesecake with:Serve chilled and enjoy your spectacular dessert!
Red Velvet Oreo Cheesecake Kitchen Smarts
Fun Twists for Red Velvet Oreo Cheesecake
Plate Up Red Velvet Oreo Cheesecake
Red Velvet Oreo Cheesecake Save for Later
FAQs
The red food coloring combined with cocoa powder creates the signature red velvet color, giving the cheesecake its vibrant and appealing appearance.
Baking the cheesecake in a water bath, avoiding overmixing, and cooling it slowly in the oven helps prevent cracks from forming on the surface.
While you can use low-fat cream cheese, full-fat cream cheese provides better texture, richness, and a creamier consistency for the cheesecake.
Adding eggs individually helps incorporate them evenly into the batter, preventing lumps and ensuring a smooth, consistent cheesecake texture.
Print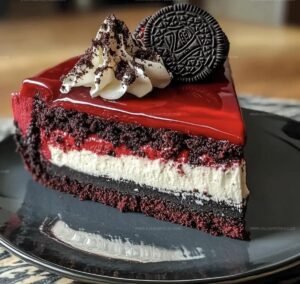
Red Velvet Oreo Cheesecake Recipe
- Total Time: 2 hours 35 minutes
- Yield: 12 1x
Description
Red velvet oreo cheesecake beckons dessert enthusiasts with its luxurious layers of creamy indulgence and chocolate cookie crunch. Rich crimson cake meets silky cheesecake, creating a blissful dessert masterpiece you’ll savor to the last delectable bite.
Ingredients
Main Ingredients:
- 24 ounces (680 grams) cream cheese, softened
- 3 large eggs
- 1 cup granulated sugar
- 1 cup sour cream
Crust and Oreo Components:
- 2 cups Oreo crumbs
- 1/4 cup unsalted butter, melted
- 1/2 cup crushed Oreos
- 2 tablespoons cocoa powder
Flavor and Decoration Ingredients:
- 1 teaspoon vanilla extract
- 1 teaspoon red food coloring
- 1 cup semi-sweet chocolate chips
- 1/2 cup heavy cream
- Whipped cream (for decoration)
- Mini Oreos (for decoration)
- Red velvet cake crumbs (for decoration)
- Sprinkles (for decoration)
Instructions
- Preheat the oven to 325°F (163°C) and prepare a 9-inch springform pan with a light grease coating to prevent sticking.
- Create the crust by crushing Oreo cookies into fine crumbs, mixing with melted butter, and firmly pressing the mixture into the bottom of the prepared pan. Bake the crust for 10 minutes, then allow it to cool completely.
- In a large mixing bowl, thoroughly beat the cream cheese until it reaches a smooth, creamy consistency without any lumps.
- Gradually incorporate sugar, sour cream, and vanilla extract into the cream cheese mixture, blending until uniformly combined.
- Add eggs one at a time, gently mixing after each addition to maintain a silky texture. Carefully fold in cocoa powder and red food coloring to achieve the classic red velvet appearance.
- Gently fold crushed Oreo pieces into the batter, distributing them evenly throughout the mixture.
- Pour the prepared batter over the cooled crust, ensuring an even distribution and smooth surface.
- Bake for 60-70 minutes until the cheesecake is almost set but still slightly jiggly in the center. Turn off the oven and leave the cheesecake inside with the door slightly ajar for an additional hour to prevent cracking.
- Remove from the oven and refrigerate for a minimum of 4 hours or preferably overnight to allow complete setting.
- Create a rich chocolate drizzle by melting chocolate chips with heavy cream in the microwave, stirring until achieving a smooth, glossy consistency.
- Once chilled, drizzle the chocolate sauce over the cheesecake in an artistic pattern.
- Garnish with dollops of whipped cream, scattered mini Oreos, red velvet cake crumbs, and a sprinkle of decorative toppings for a stunning presentation.
Notes
- Chill cream cheese to room temperature before beating to ensure a smooth, lump-free batter that blends perfectly.
- Use a water bath during baking to prevent cracks and create a silky, creamy texture in the cheesecake.
- Crush Oreos finely for a more even distribution throughout the cheesecake, enhancing both flavor and visual appeal.
- Swap food coloring with natural alternatives like beetroot powder for a healthier, chemical-free red velvet color option.
- Prep Time: 25 minutes
- Cook Time: 2 hours 10 minutes
- Category: Desserts
- Method: Baking
- Cuisine: American
Nutrition
- Serving Size: 12
- Calories: 437 kcal
- Sugar: 33 g
- Sodium: 233 mg
- Fat: 31 g
- Saturated Fat: 18 g
- Unsaturated Fat: 12 g
- Trans Fat: 0.5 g
- Carbohydrates: 32 g
- Fiber: 1 g
- Protein: 6 g
- Cholesterol: 92 mg
Michael Reyes
Founder & Lead Recipe Developer
Expertise
Education
Santa Fe Community College
Michael’s love for cooking runs deep, rooted in the bold, colorful flavors of his New Mexico upbringing.
After earning his Culinary Arts Certificate from Santa Fe Community College, he spent years sharpening his skills in kitchens that celebrated traditional Southwestern and Latin American dishes.
He believes cooking should feel approachable and fun, never complicated. When he’s not stirring up new recipe ideas, Michael’s out hiking scenic trails, chatting with farmers at local markets, or chasing the perfect sunset shot for inspiration.